# Intro

Welcome to the Stella-verse!

<figure><img src="/files/Krz9JJ3b5V5ZrHXeHD8o" alt=""><figcaption></figcaption></figure>

### Polkadot's leading decentralized exchange (DEX) for fast and low-slippage trading. Built on Moonbeam, Secured by Polkadot.

StellaSwap opens the door to DeFi through its simple user experience.

StellaSwap is an EVM-based, hybrid-AMM DEX for fast and low-slippage trading on Polkadot. Powered by Vote-Escrow (VE) 3,3 model and a modular V4 AMM, StellaSwap is built on the most advanced stack in all of DeFi.

This ensures you get access to the best market prices and powerful features for your DeFi experience.


# Vote-Escrow STELLA (3,3)

When we launched StellaSwap more than 3 years ago, our launch was predicated on a very basic tokenomics. This basic tokenomics failed to take into consideration key principles of **“*****true*****” utility** (as opposed to singularly focused on emissions-propping) and **value-accrual**. The truest utility that was missing in our tokenomics was perhaps the most important one: **governance**.

> Decentralization without community governance is a contradiction.

Empowering the community and tapping on the wisdom of the crowd will set us on the right path towards decentralization, as well as unlocking our potential to reach new heights. As DeFi has evolved radically, so must we.

## Introducing Vote-Escrow STELLA

veSTELLAis based on [Andre Cronje’s VE (3,3) model](https://andrecronje.medium.com/ve-3-3-44466eaa088b) that incorporates Curve’s locking/VE model, which incentivizes long-term holders, with Olympus DAO’s game theory (3,3) model that focuses on staking mechanisms that results in **maximum value-accrual** for tokenholders and increases protocol **sustainability** (by focusing on fee-generation).

<figure><img src="/files/GhiPFoWhmQzbB3qeixwh" alt=""><figcaption></figcaption></figure>

veSTELLA is an ERC-721 governance token in the form of an NFT (Non-Fungible-Token). It is acquired by locking STELLA, our native token. veSTELLA was introduced to enable incentivized governance of StellaSwap, rewarding participating users and holders of STELLA favorably and to create a fly-wheel effect across Polkadot’s top DEX.


# History & Evolution

## History and Evolution of Vote Escrow Model

Vote Escrow (VE) is a significant innovation in the DeFi landscape, primarily aimed at enhancing community governance and incentivizing long-term holding behaviors. This section provides a brief overview of the VE model, tracing its origin, evolution and inspiration that have shaped StellaSwap’s VE model.

### **Origin**

Vote escrow emerged in response to challenges faced by governance mechanisms in decentralized platforms, particularly around token holder engagement and alignment of interests. Initially popularized by Curve Finance in 2020. VE model was designed to encourage users to lock their tokens for extended periods in exchange for governance rights and rewards. This approach solved key issues in relation to concentration governance power and incentivizing long term holders in return strengthening the token.

### Evolution of VE Across DeFi

With time, the vote escrow model evolved to include more complex systems that strengthen token utility and value-accrual for tokenholders. Here’s a look at the progress:

**Key Projects and Evolution**

1. Curve Finance: Pioneer of the VE model, Curve introduced the mechanism where users could burn their CRV tokens and lock their LP for a period between one week to four years. Gaining voting power and native token rewards proportional to the length of their lock
2. Olympus DAO: Notable project that led the DeFi 2.0 movement, introducing an innovative approach called game theory (3,3) aiming to increase holders value by incentivizing long term holding and staking. However, it had faced significant challenges keeping its OHM token stable. Yet, the community engagement and the innovation made everyone in the space take note.
3. Solidly: Developed by renowned developer Andre Cronje, further illustrates the evolution of the VE model; it expands on principles established by Curve and Olympus DAO. It aimed at creating the most efficient DEX by utilizing the VE model. It integrates two core components that further strengthened the VE model:&#x20;
   1. Linear Decay: Unlike Curve’s VE model, Solidly is in-built with decay, meaning that one’s voting power decreases in value with time. Users need to constantly lock to ensure they maintain their voting power.
   2. Direct-Pool-Earning: Voters in Solidly earn fees only in the pools they vote, unlike Curve where overall revenue is distributed to all tokenholders. Under Solidly’s model, holders are incentivized to vote for pools with high fee generation to maximize their earnings. Rewards allocation is much more efficient this way, and addresses the structural mis-alignment of incentives under Curve’s model.
4. Velodrome & Aerodrome: Building on previous innovations of the VE model, Velodrome and Aerodrome emerged with the most polished and mature versions of VE that are hugely successful. In contrast to other platforms; Velodrome made VE the single most important feature of the DEX and tied every other function around it, expanding to emissions and farming. <br>

In designing our new VE model, we draw upon lessons learned from these pioneering projects while also refining and innovating the approach to meet the needs of StellaSwap users. The experience of Curve, Olympus DAO, Solidly, Velodrome and Aerodrome has paved the way for a sustainable and vibrant StellaSwap ecosystem where we aim to cultivate loyal holders who are incentivized to contribute to the long-term success of StellaSwap.


# Why veSTELLA

veSTELLA was the logical evolution of StellaSwap given the success of VE (3,3) models that maximized DEX token utility and sustainability. The following point sums up our reasons;

1. Shift towards **governance** model in the pursuit of decentralization
2. **Democratizing** the core functino of a DEX: STELLA Emissions
3. **Incentivize** long term holders of STELLA
4. Drive ecosystem **growth**
   1. veSTELLA creates a flywheel effect where protocols bribe users for their votes with their own token, users accumulate or lock STELLA longer to receive more returns and more voting power
5. Increase incentives for **protocols** to accumulate STELLA
   1. Protocols will be incentivized to acquire more STELLA and vote with it to receive STELLA rewards on their preferred pool.
6. Less STELLA in **Circulation**
   1. Longer lockups of STELLA, leading to less STELLA sold on the open market supporting price

## Benefits

<figure><img src="/files/Pkd7Cb5tfmQuPrynh5MQ" alt=""><figcaption></figcaption></figure>

veSTELLA holders will receive the following benefits:

* Huge Increase in APR
  * New veSTELLA Revenue share swap fees= 83.5% > old xSTELLA= 11.5%
  * Active participation required each epoch to receive rewards
* Rewards from Trade fees & Liquid Staked Derivatives (stDOT & stGLMR soon)
* Relay strategies can pay rewards in stable coins (USDC)
* Direct where emissions go by voting
* Receive Bribes for your votes in partner tokens
* Participate in future governance of the platform
* Auto managed strategies for lock & forget


# How it works

Lock, Vote & Earn

1. **Lock STELLA to receive veSTELLA**

Your voting power and earnings potential is dependent on the amount of veSTELLA you hold.

* The more STELLA you lock, the more veSTELLA (Voting Power) you’ll get
* The longer you lock, the more veSTELLA you’ll get

<figure><img src="https://lh7-rt.googleusercontent.com/docsz/AD_4nXc34rPWAfMrnU1aoBWdHCc3IaTP3Mjat0dgiEhHs7bnABk4qAYl8Qn0NUuOA0SIMIooCOw2fG3KJ2o8JImtoijYYFZR2gooygddpTvh0dHlmBU_5bZaAv3Wzs_lA3yPr-JrEJCaOA?key=_Q9LweOiIdCvlEpekKTixA" alt=""><figcaption></figcaption></figure>

2. **Vote**

Actively vote on the most productive pools to maximize your earnings. You’ll earn directly from the pools that you voted as all trade fees accumulated will be given to Voters of the pool.

{% hint style="info" %}
Important Note: **Vote Power Decay**

Your voting power will decay linearly with time. This means your veSTELLA power will decrease everyday. For example, a Lock duration of 1-Month means that your veSTELLA power reduces by ¼ every epoch. Lesser voting power = lesser share of protocol revenue = lower earnings. Depositing your Lock into an Auto-Strategy mitigates the decay as your STELLA is continually compounded to ensure it is not affected by daily decay.

Here's an example of how your voting power decays :arrow\_down:
{% endhint %}

<figure><img src="https://documents.lucid.app/documents/cdbcaf57-ff1d-44ee-b30a-3ad04a79df31/pages/gKBPngILHTMj?a=151653&#x26;x=19991&#x26;y=10742&#x26;w=1760&#x26;h=224&#x26;store=1&#x26;accept=image%2F*&#x26;auth=LCA%207f92cd4f2629b3bbf09d5a4f99c07f6fca7d9393651a5728aedec50517ebb190-ts%3D1751629807" alt=""><figcaption></figcaption></figure>

There are two ways to vote:&#x20;

1. Vote with 100% of your voting power to one pool
2. Or split your voting power across many pools

Voting will occur every 7 days (Epoch), with each Epoch ending at 23.59 UTC on Thursdays.

3. **Earn**

At the end of the voting period, voters will achieve the following:

* Direct STELLA rewards towards pools they have voted for
* Earn swap fee for the pool they have voted for

4. **Functions**&#x20;

There are several functions for managing your lock.

{% tabs %}
{% tab title="Increase" %}
You can increase your voting power by **Increasing Lock**, simply by locking more STELLA into your existing locks. This would be useful if you're looking to focus on your existing locks instead of creating new locks.

<figure><img src="/files/giDUW1TBh8cQyia5tSwC" alt="" width="563"><figcaption></figcaption></figure>
{% endtab %}

{% tab title="Extend" %}
You can extend your existing lock duration with the **Extend** function, if your existing locks are not maxed (2Y). This applies to locks that have a Lock duration of between 1W - 1Yr.

Simply select the Lock duration for you're keen on extending.

<figure><img src="/files/63GC4pTpXtAX49fPFKkG" alt=""><figcaption></figcaption></figure>
{% endtab %}

{% tab title="Merge" %}
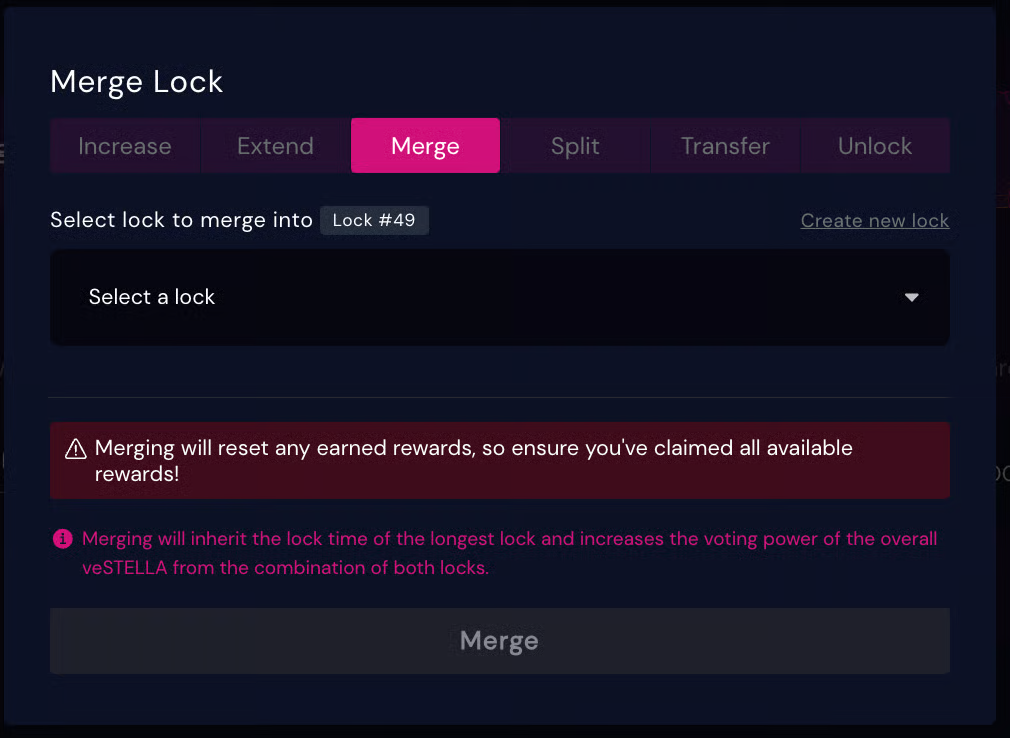
You can **Merge** your existing locks into a single Lock, with the unified Lock inheriting the higher of the previous 2 Lock duration. For example, assuming you're merging 2 locks;

* Lock #1: 6M Lock duration
* Lock #2: 1Yr Lock duration

Your new, merged Lock will have a Lock duration of 1Yr.

<figure><img src="/files/3UM9AGeVlvsWBuhILHNs" alt="" width="563"><figcaption></figcaption></figure>
{% endtab %}

{% tab title="Split" %}
You can **split** your existing Lock into two, whereby your two new Locks will inherit the same Lock duration. For example, if your existing Lock has a duration of 1Yr, both Locks (after splitting) will inherit a 1yr Lock duration.

<figure><img src="/files/r7DohlXWgFZ9fmNrv4JJ" alt="" width="563"><figcaption></figcaption></figure>
{% endtab %}

{% tab title="Transfer" %}
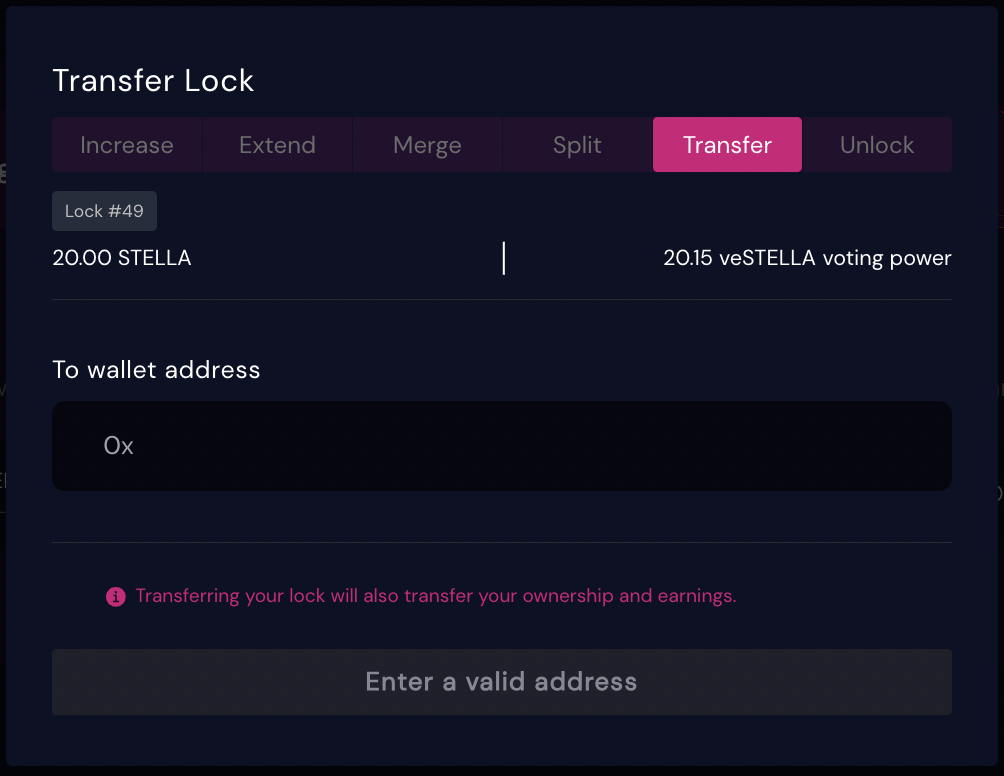
You can **transfer** your lock to another wallet address.

Simply add the recipient address you're hoping to transfer your Lock to in the field.

WARNING: Transferring your lock will mean you're relinquishing the ownership, rights & earnings of your Lock to the recipient.

<figure><img src="/files/V6cd4tgpu34hEIgEwEOb" alt="" width="563"><figcaption></figcaption></figure>
{% endtab %}

{% tab title="Unlock" %}
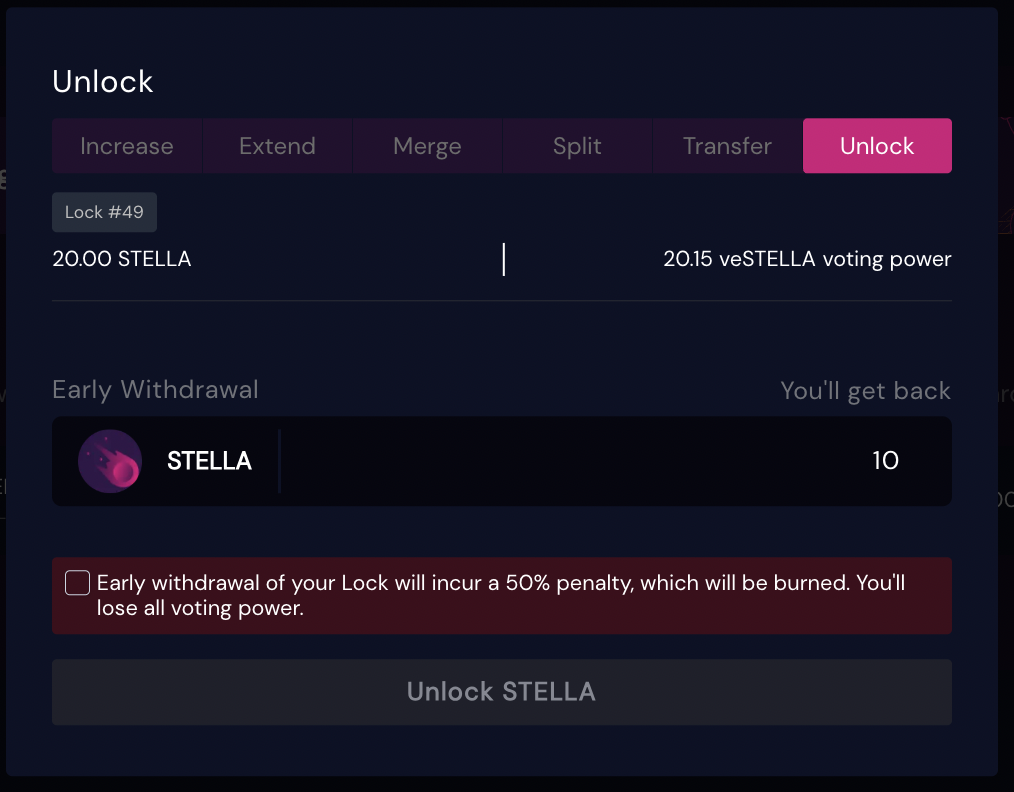
You can **break** your Lock to withdraw your locked STELLA. This means you're relinquishing your voting power and destroying your Lock.

WARNING: Early withdrawal of your Lock will incur a 50% penalty, which will be burned.&#x20;

<figure><img src="/files/VSX8KOLFGmshpxiTaBzW" alt="" width="563"><figcaption></figcaption></figure>
{% endtab %}
{% endtabs %}

4. **Additional Earnings: Bribes**

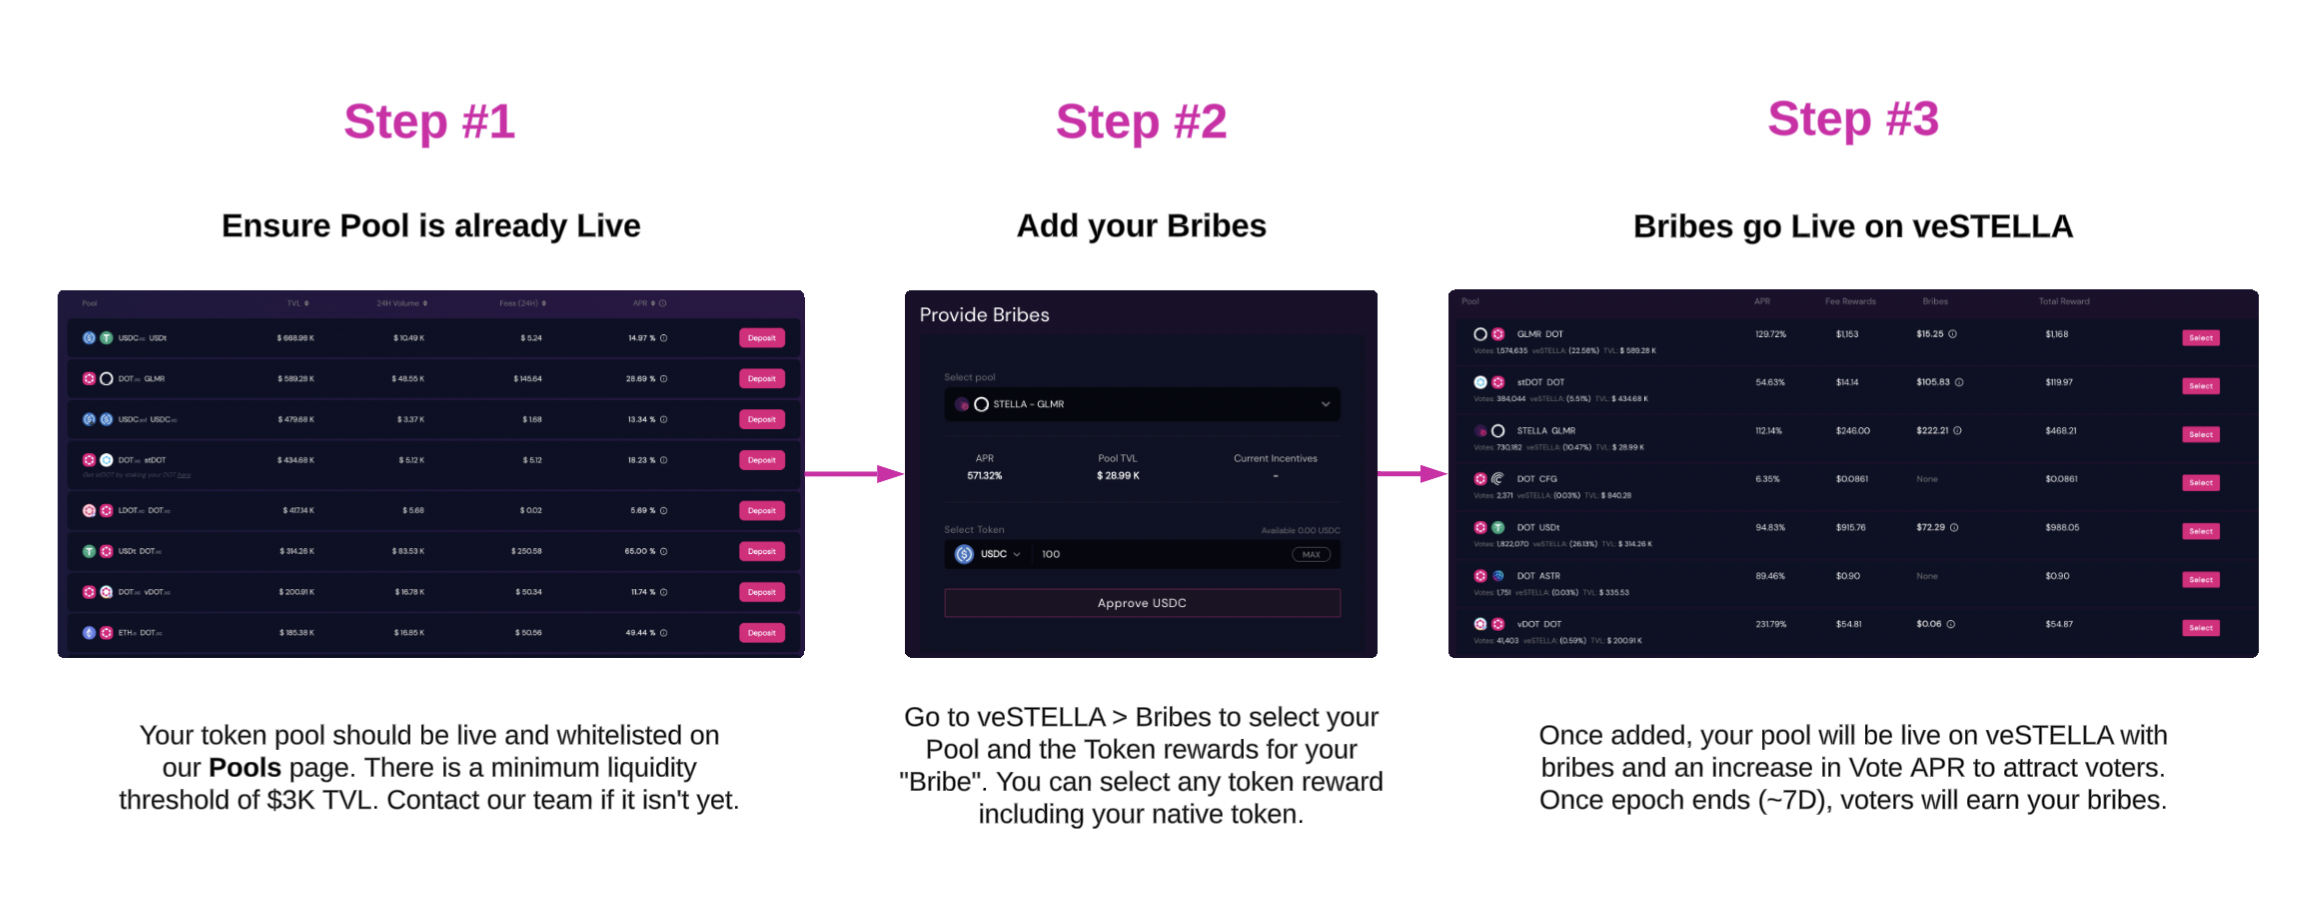
Extra incentive can be earned from bribes. Platforms or any user can bribe veSTELLA holders for their votes towards a specific pool.


# Auto Strategies

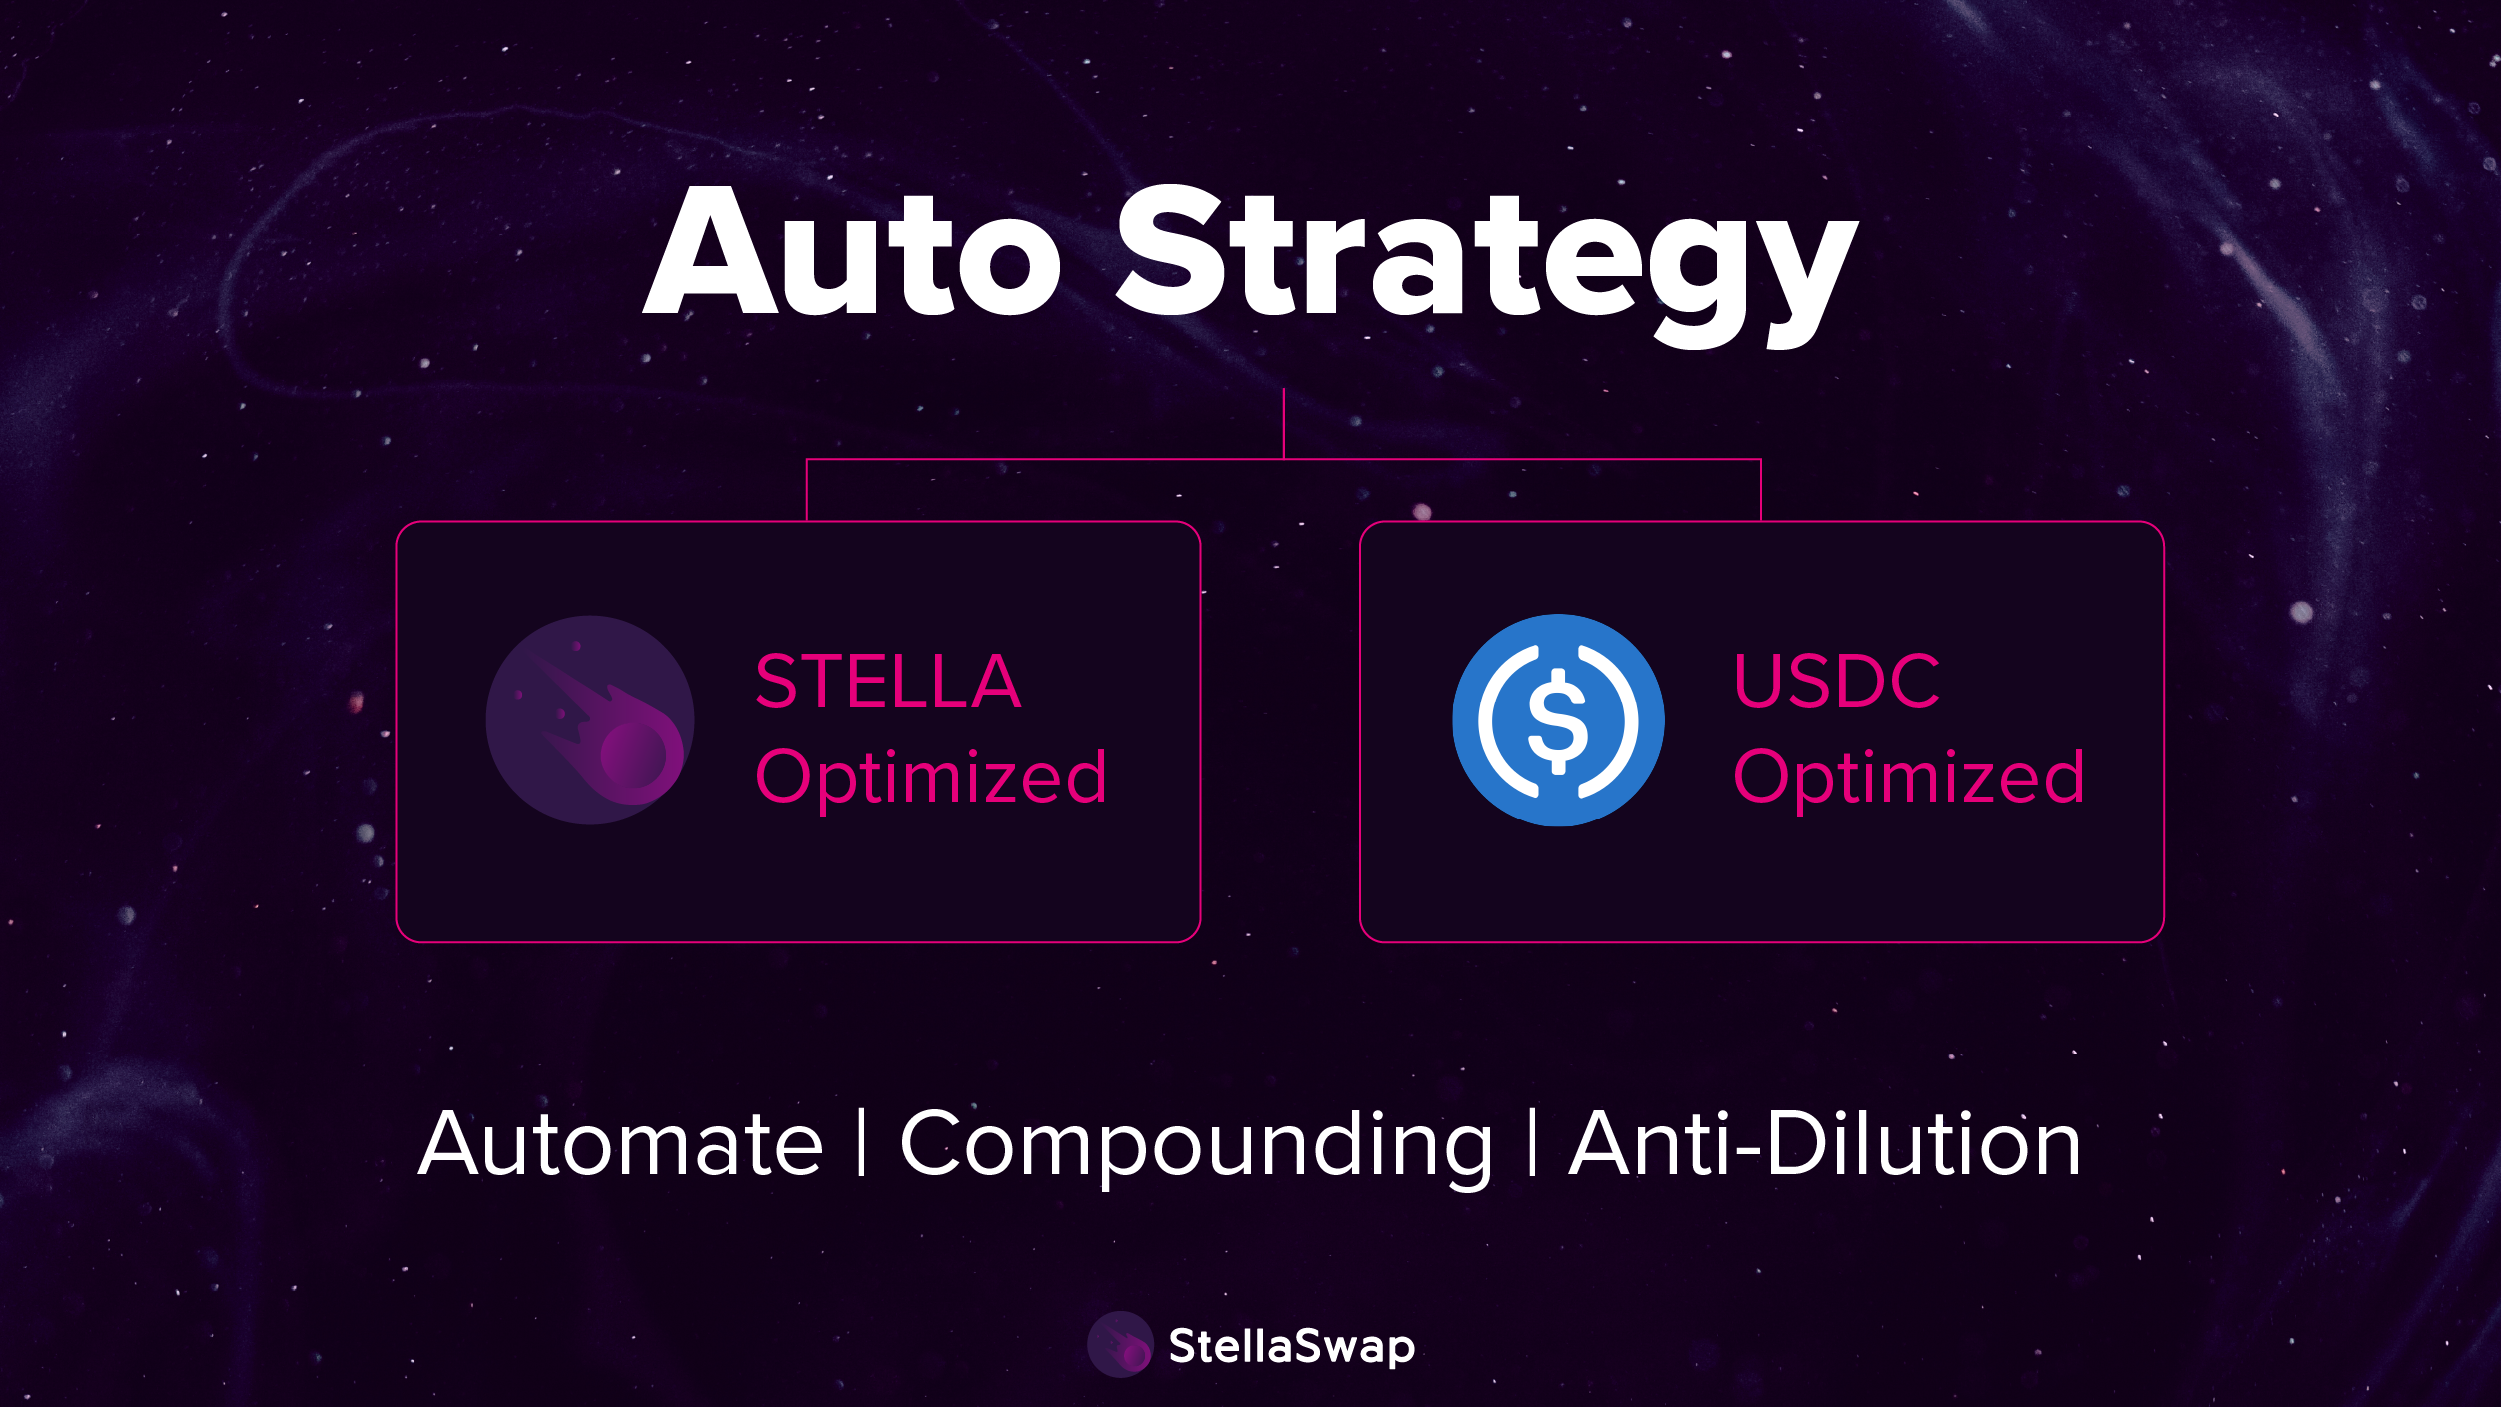
If the notion of participating every week to achieve the maximum return is too daunting of a task, you can **deposit your lock** into any of our two relay strategies. Our relay strategies are meant to simplify the process by automating the voting process (into the most productive pools so you earn the maximum) as well as compounding your voting power.

Here are some highlights;

* Auto strategies **automate** your voting process passively by voting on the highest-performing pools to **maximize your returns**
* Auto strategies will continually compound your Lock to 2yrs, so anytime you withdraw your Lock its duration will be 2yrs
* There's a 1% fee for depositing your Locks into auto strategies (deducted from rewards)
* There's a 1-Epoch (1-Week) delay for claiming your USDC/actualizing compounded STELLA

<figure><img src="/files/2dLdj04nlm3LofJM6wgp" alt=""><figcaption></figcaption></figure>

At the start there will be two StellaSwap managed relay strategies:

**Strategy #1: STELLA Optimizer**

<figure><img src="/files/KeeW5gC8iHcyKOnhbEd2" alt=""><figcaption></figcaption></figure>

The STELLA optimizer strategy votes for the highest yielding return, converts all earning back to STELLA and locks it in veSTELLA with maximum lock. This strategy focuses on **increasing your voting power** via maximizing your STELLA stack.&#x20;

> Higher voting power \~ Higher earnings potential

Perfect if you want to ensure your voting power & earnings increases with time. No hassle, no decay, maximum earnings.

**Strategy #2: USDC Optimizer**

<figure><img src="/files/TllBBEfu1SVMZiWsGXS7" alt=""><figcaption></figcaption></figure>

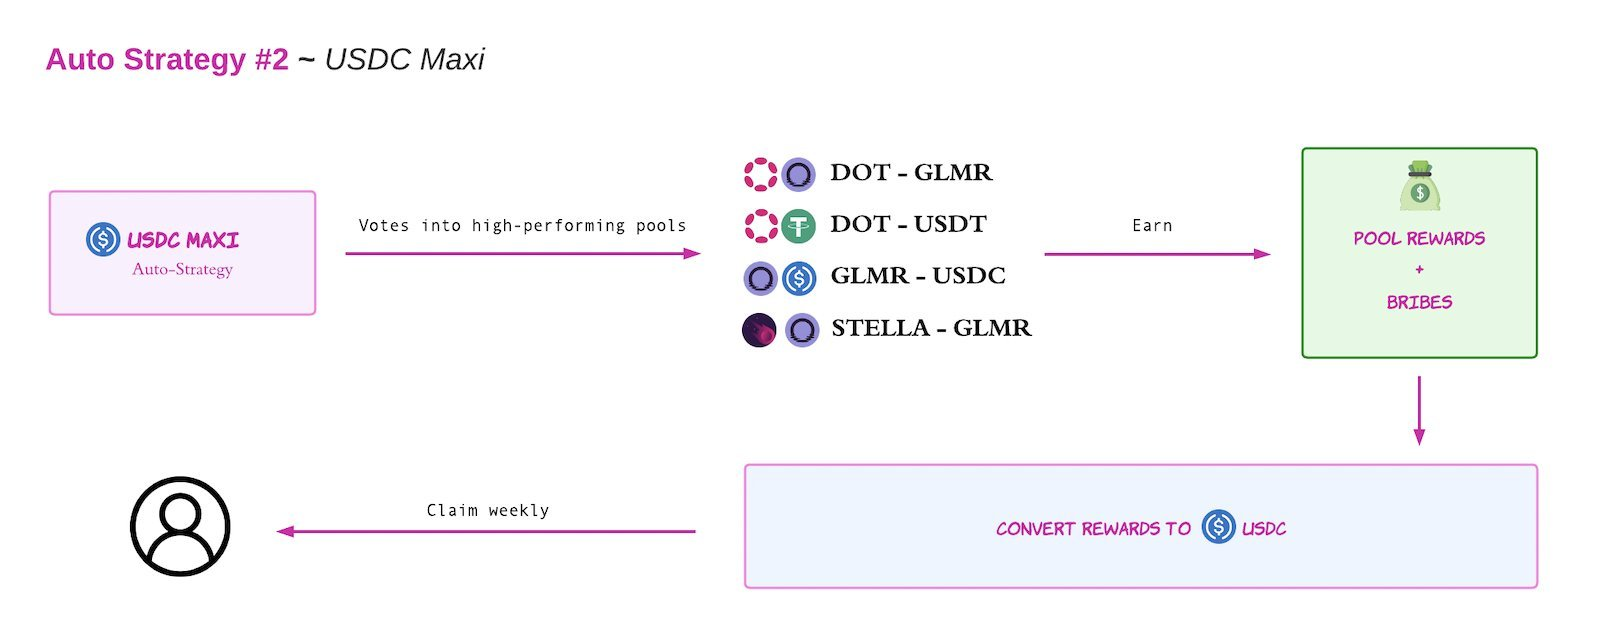
The USDC optimizer strategy votes for the highest yielding pools, converts all earning to USDC that can be claimed anytime (after the 1st epoch). This strategy focuses on stability, converting all your earnings into USDC.

All earnings from trade fees, LSD rev & bribes will be converted into USDC every week, claimable anytime post-epoch.

Perfect for sitting back and earning stables. The only downside is decay, as your veSTELLA (and earnings) decreases in power over time.

Other strategies can be operated by partner platforms or even expert users, through a whitelisting process that will be communicated later. **Relay strategies have a fee of 1%.**

<br>


# Bribes

The introduction of veSTELLA brings an exciting feature for protocols and token issuers keen on increasing their overall liquidity on StellaSwap. Partnering protocols can attract deep liquidity and grow exposure by participating in veSTELLA.

> veSTELLA is StellaSwap's vote-escrow token model that introduces governance, incentivize long-term engagement, and democratize token emissions distribution. By locking STELLA, users receive veSTELLA, an ERC-721 token, with voting power determined  based on the duration and amount of the lock.&#x20;

<figure><img src="/files/yWRxS1JAXPx3uCPYQkvd" alt=""><figcaption></figcaption></figure>

Voting Escrow (VE) model allows protocols to:

* Acquire STELLA and vote directly for their own pool to boost emissions.
* Mobilize their community to vote for their pool on veSTELLA by sharing it across their channels.
* Provide bribes to attract external voters – any user can vote for their pool to receive both the bribe and STELLA incentives.

## More votes = More emissions = More incentives on your pool

### How it Works

<figure><img src="/files/9rn9IraNEbBt3iPR2wmP" alt=""><figcaption></figcaption></figure>

veSTELLA holders vote to direct weekly STELLA emissions toward liquidity pools, with rewards distributed pro rata based on votes. This model revolutionizes StellaSwap’s incentivization strategy as veSTELLA holders control 100% of StellaSwap's emissions. Protocols can directly add bribes to their pools or use veSTELLA voting to direct emissions themselves in the pursuit of boosting their pool TVL. This creates a flywheel effect, aligning incentives across the platform for greater participation and sustainable growth.

Each week a number of STELLA tokens - starting from 280,000 STELLA - is up for vote. Bribes will be the most efficient way to attract TVL towards a pool; provided expected market conditions bribes will be:

1. &#x20;Cheaper than acquiring STELLA, Locking it for veSTELLA and voting with it
2. &#x20;More efficient in attracting TVL when pools are rewarded with STELLA vs protocol token
3. &#x20;More visibility for protocol token and pair
4. Interact directly with StellaSwap community and veSTELLA holders


# Emissions: Deflationary

STELLA Emissions will be an integral part of veSTELLA aside from voting and deciding where STELLA is rewarded. The number of STELLA tokens awarded per epoch will be set in advance with **dilution protection;** a declining STELLA amount per epoch will be implemented. &#x20;

This means that STELLA will be deflationary with every epoch. Emissions will decrease by 0.25% weekly. This means lesser STELLA distributed to pools with time.

<figure><img src="https://lh7-rt.googleusercontent.com/docsz/AD_4nXcbUTAodN2TKxRIbipabZ0LQU_GvhbONKgMjCgGrhrab86_Qi42e4UgoWcc3oJvgwdaBH_KzRYEN37JlakJsJWT4ja7Gn5U8Y0cpiKwwzhhWykkW374G435h76_bcTuufXr-e7Wsg?key=_Q9LweOiIdCvlEpekKTixA" alt=""><figcaption></figcaption></figure>

> More users locking STELLA for greater earning power + deflationary supply = Scarcity

Emission will be set every epoch (1 week), starting with 40,000 STELLA per day and reducing by 0.25% every epoch.&#x20;

Here is an example of the first 10 epochs:

![](/files/Auos78sGqO0ORV1Qk7lN)<br>


# StellaSwap V4

<figure><img src="/files/7YuKvmcpzS8hpbWc11PQ" alt=""><figcaption></figcaption></figure>

StellaSwap V4 is a next-gen, modular AMM powered by a concentrated liquidity engine **core** and reinforced with a custom **plugins** network for the ultimate DeFi experience.

Developed by Algebra, our V4 focuses on;

⭐️  Solidifying overall **security** via a focused & lean core\
⭐️  **Gas optimization** via the flexibility of plugins integration\
⭐️  **Adaptability** via upgrades that do not require any liquidity migration

### Plugins: Enhancing Your DeFi Experience

With Integral V4, we can radically add secure features via Plugins that'll make your DeFi experience better.

Examples of plugins include; \
⭐️ Dynamic & elastic fees \
⭐️ Limit Orders \
⭐️ Gas discount, or compensation mechanisms \
⭐️ Solutions for JIT liquidity issues \
⭐️ Impermanent Loss reduction

Unlike UniV4 Hooks, Integral’s Plugins can be updated or changed within an existing pool, eliminating the need to create new pools and reducing unnecessary liquidity migration.

### StellaSwap V4 Better than UniSwap V4?

The Algebra team has conducted multiple gas efficiency tests comparing Integral vs. Uniswap V4 across various swap scenarios on Arbitrum. Let’s take a look at how Integral outperforms in different swap operations:

<figure><img src="/files/7Nf3rylguMDdVjp7QuOT" alt=""><figcaption></figcaption></figure>

While Uniswap V4 may be more gas-efficient in double swaps, Integral offers lower gas costs in large swaps, tick-crossing swaps, and high-volume transactions. Additionally, Integral’s modular architecture provides ongoing optimizations without requiring liquidity migration.

With **modular architecture, customizable fee structures, and enhanced security**, our V4 is a major step forward for DeFi. While Integral might not match UniV4 in multihop swaps, overall, it outperforms Uniswap in single swaps — **especially for large trades.** The ability to **tailor functionality through plugins** makes Integral a **more adaptable and future-proof solution** compared to Uniswap V4.

<br>


# Concentrated Liquidity

StellaSwap's concentrated liquidity engine at the core of our V4 AMM, users will access optimal asset prices, low-slippage and greater yield optimization for LP stakers! 💥

## Concentrated Liquidity is the Future <a href="#a53f" id="a53f"></a>

Concentrated liquidity has proven to be the most efficient DEX model so far, measured by a lower slippage rate for the same amount of TVL. In fact, centralised trading engines such as Binance and Coinbase is based on a concentrated liquidity model.

{% hint style="info" %}
StellaSwap's V4 AMM is centered around a concentrated liquidity engine called the "core".
{% endhint %}

On StellaSwap, liquidity providers (LPs) are able to ‘*concentrate*’ their liquidity in specific price ranges to maximize capital efficiency. LPs who provide deeper liquidity for ranges where trades actually occur will earn a higher share of fees and rewards, thereby enhancing potential ROIs.

<figure><img src="/files/qPL96TMcD2q5GfkNBOhv" alt=""><figcaption><p>Capital efficiency of up to 4,000x! (Source: Uniswap)</p></figcaption></figure>

Here’s a quick summary of how concentrated liquidity is a **beast** of AMMs;

⭐️ LPs can provide liquidity with up to **4,000x capital efficiency** relative to standard AMMs, earning higher ROIs on their capital

⭐️ **Liquidity utilization rates beyond 100%**, compared to an average of 5%-10% that StellaSwap currently has. This is good news for LPs as they’ll earn more fees for a given capital base

⭐️Capital efficiency results in **ultra-low slippage** trade execution that can surpass both centralized exchanges and stable AMMs

⭐️ LPs can significantly increase their exposure to preferred assets and **reduce their downside risk**

⭐️ LPs can sell one asset for another by adding liquidity to a price range entirely above or below the market price, approximating a fee-earning limit order that executes along a smooth curve️

⭐️ With greater ROI potential, STELLA emissions can be exponentially reduced. With a reduced inflation rate, we’ll be on the path of tokenholder-value maximization

## Building V4 with Algebra <a href="#ca40" id="ca40"></a>

StellaSwap has officially acquired the license for a variation of concentrated liquidity AMM from Algebra, the superstar team that has developed the V3 codebase. Algebra is behind the launch of Quickswap’s concentrated liquidity AMM (largest DEX on Polygon) that recently launched. We have finalized the agreement with Algebra, which would grant us exclusive usage of the concentrated liquidity codebase on Moonbeam.

One of the key proposition of Algebra in creating a more ‘user-friendly’ solution, relative to Uniswap, is their [dynamic fee model](https://algebra.finance/static/Algerbra%20Tech%20Paper-51ff302b23209d0432e2453dbd9649a8.pdf). Though groundbreaking, Uniswap’s V3 had an Achilles heel; close to 50% of LPs on Uniswap’s V3 lost money due to impermanent loss. With Algebra’s dynamic fee model, yield optimization is inherent in the staking process. This mean users do not need to to actively move their liquidity between pools to earn the highest rewards.

**Audits**

There can be no doubt that security is the most important thing for StellaSwap, especially after what transpired with [Nomad’s exploit](https://stellaswap.medium.com/an-overview-of-stellaswaps-response-action-plan-going-forward-5a62e8fdf642). There can be no compromises when it comes to security. It is our responsibility to ensure that all security issues are addressed before launching. Algebra’s codebase has undergone two external audits, from Hexen and ABDK (Uniswap’s auditor). All critical and major issues have been addressed by Algebra. The audit will be shared with the community soon.

Additionally, we’re in the process of doing our own audit, beyond the two external audits.

## Strengthening Moonbeam & Polkadot Ecosystem <a href="#id-613d" id="id-613d"></a>

A core vision of StellaSwap is to be the Schelling point of Polkadot, actualized via cross-consensus message format (XCM). For that to materialize, it is necessary for us to evolve past standard AMMs and launch an extremely capital-efficient DEX.

Not only that, the recent exploits of Nomad bridge and Acala’s aUSD has resulted in a less-than-ideal sentiment across the entire ecosystem, with aggregate TVL being at an all-time low. We are confident that things will pick up, albeit at a slower pace. That is why as the leading DEX on Moonbeam, it is vital for us to create a stronger foundation that will benefit the ecosystem.

In general here are the high-level benefits that will accrue to the ecosystem;

⭐️ **Maximize Ecosystem Liquidity Utilization:** The aforementioned exploits has resulted in dampening of TVL from value depegging and capital leakage. Not only would concentrated liquidity enable unification of liquidity across StellaSwap’s AMM, but it would also maximize liquidity utilization, allowing users to deploy their capital more efficiently and earn substantially greater yields. From a previous benchmark of 5%-10%, StellaSwap aims to achieve a utilization ratio of above 50% within the first 6 months.

⭐ **Enable Sufficient Liquidity for Stakeholder Operations:** Optimal capital efficiency results in requiring a fraction of TVL to achieve low slippage levels and better price discovery, which is vital for relevant stakeholders like money market protocols on Moonbeam — such as Moonwell — to facilitate liquidations. On StellaSwap, it would need only 1/10th of the original TVL target for token support on Moonwell. This enables relevant stakeholders to reduce the dependancy on a prerequisite liquidity depth.

⭐️ **Effective Emissions Management for Ecosystem:** Perhaps a core element for the long-term sustainability of any ecosystem is effective emissions management, especially in the midst of token inflation to achieve protocol bootstrapping (i.e. attracting liquidity). With higher liquidity utilization rates, the increased ROI would significantly bump up trade revenues, and wean off excessive spending incentives to attract TVL. This would be ideal for when Harvest Moon resumes across the board and incentives are required to attract ecosystem TVL; a fraction of the incentives are needed to achieve key metrics of TVL accrual and APR sustenance.

⭐️️ **Improved User Experience:** Users would be ecstatic to know that on StellaSwap, price discovery for token value would be the most optimal and there’ll be ultra-low slippage, thereby resulting in tremendous cost-savings. Given the fast confirmation times of Moonbeam network it would be much easier for user retention given a streamlined and optimized user experience. Happy users = stronger ecosystem!

More information would be released down the line. The team at StellaSwap will be hard at work with Algebra to ensure a perfect launch. In the meantime, if there are any feedback or suggestions, please join our [Discord ](http://discord.stellaswap.com/)and approach our team!

Discord Link: [discord.stellaswap.com](https://t.co/Z7gTJ6IvT8)


# Automated Earnings

A New Way to DeFi: Say Hello to 1-Click Automated Earnings

<figure><img src="/files/BFEcFxsZfhxMW7Bje0WK" alt=""><figcaption></figcaption></figure>

We’re excited to announce a major breakthrough in simplifying DeFi: Automated Earnings powered by our offchain rewarder! This means that liquidity providers no longer have to stake their LP into the farm, and instead will earn rewards immediately upon the creation of their positions!

In other words; **Simpler DeFi | Greater Efficiency | Better Experience**

<figure><img src="/files/NGAbvkjDK49eKvVnvdZE" alt=""><figcaption></figcaption></figure>

## Making Liquidity Staking Easier <a href="#id-68b4" id="id-68b4"></a>

Let’s take a closer look at the old vs new process:

<figure><img src="/files/bkRZkAK2CAncmGY5YyWj" alt=""><figcaption></figcaption></figure>

With this launch, we have removed the need for you to stake your LP into the farm to start earning rewards. No more wasting time, gas fees or even the risk of you forgetting to stake your LP. Stake, and earn.

## Simplifying Reward Distribution with Beefy’s Auto Vaults <a href="#a88a" id="a88a"></a>

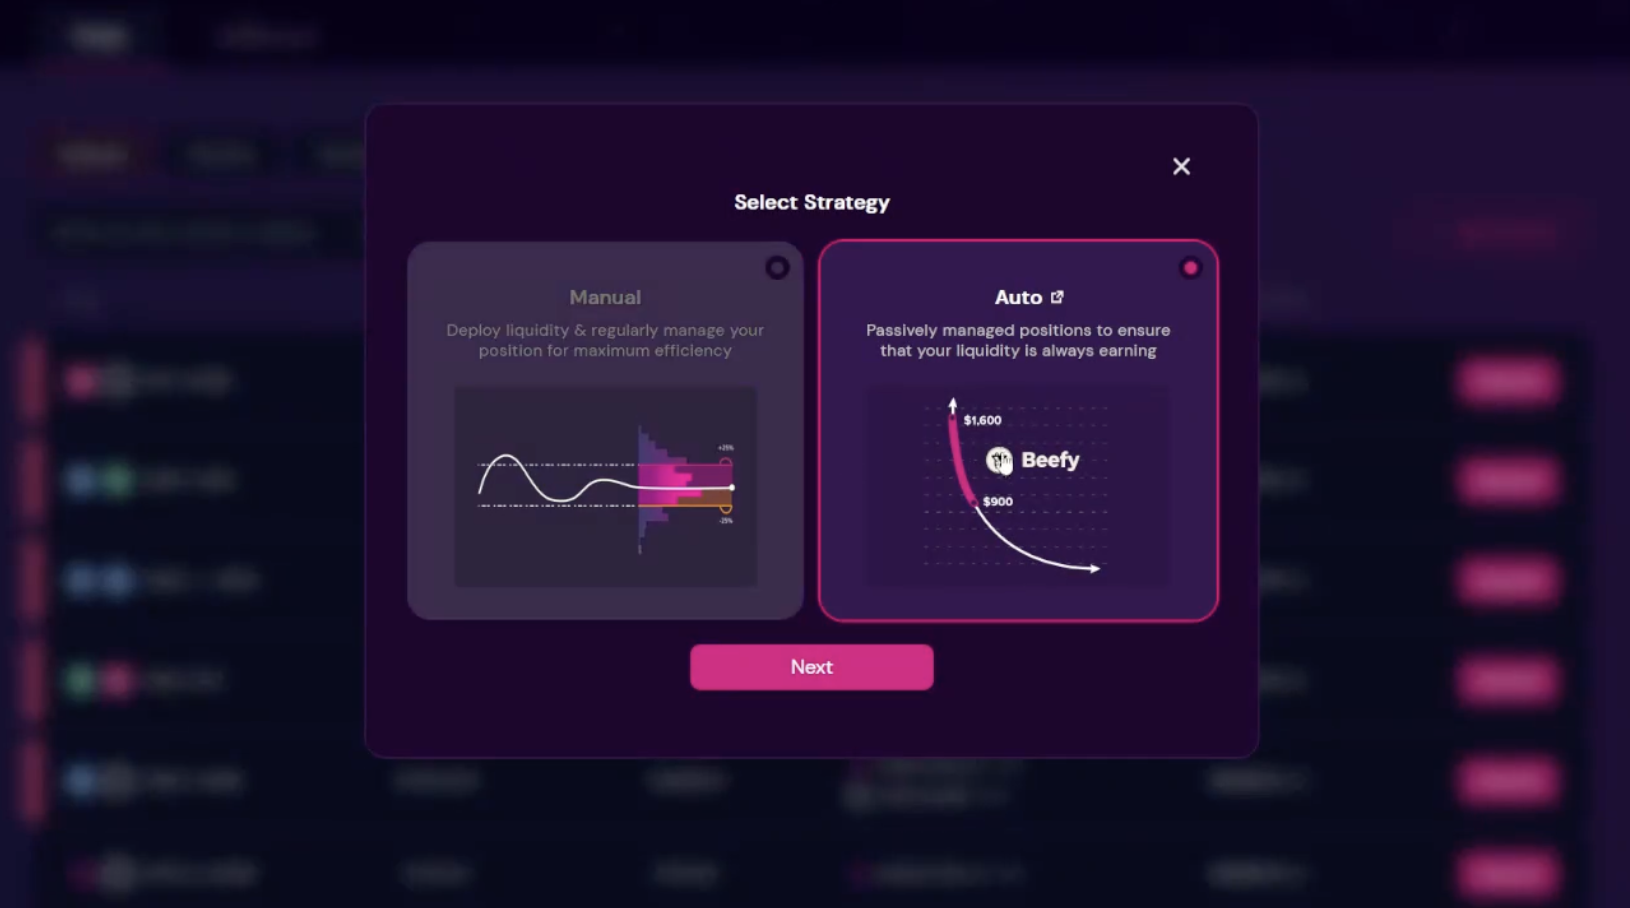
As a concentrated liquidity (V3) DEX, we understand that creating a liquidity position (LP) is a complex and manual affair; you’d have to manually rebalance your positions if it went out-of-range. That’s why we’ve integrated with key Active Liquidity Managers (ALMs) to help make your life much easier. ALM’s manage your positions by rebalancing and auto-compounding, ensuring that you constantly stay in-range and your positions are optimized. When you’re always in-range, you’re always earning.

## Core Technology: Off-Chain Rewarder <a href="#id-05d9" id="id-05d9"></a>

The technology that makes this all possible is our **offchain rewarder**, which we’ve built from ground up. Our rewarder automatically read every user’s on-chain LP position and rewards liquidity providers in an efficient way

> *It is a reward method that calculates all the rewards per position every five minutes off the chain, then distributes the reward on a one hour cadence to users.*

## Why the Transition Towards Off-Chain <a href="#e5de" id="e5de"></a>

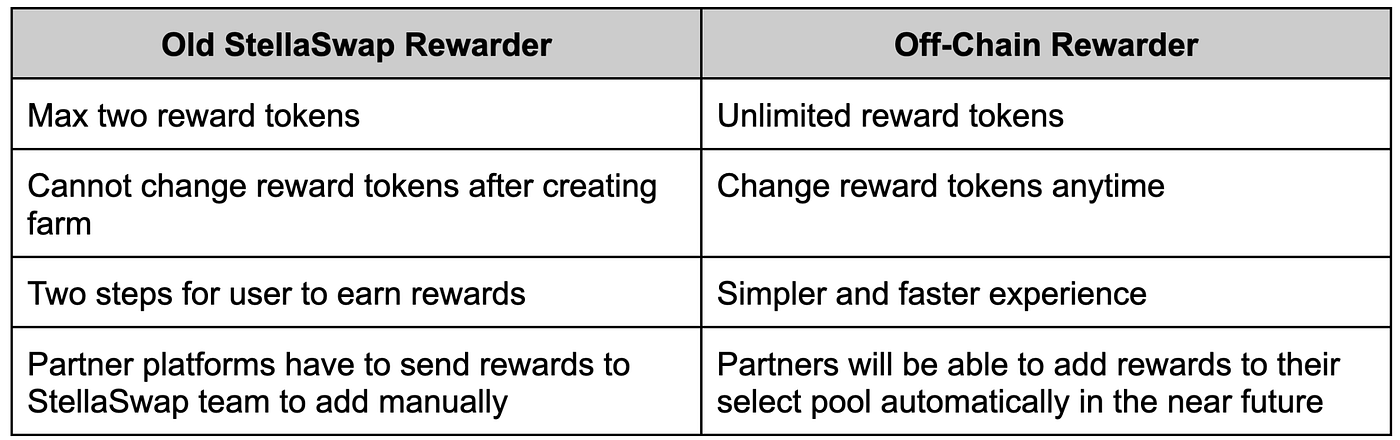
Off-Chain removes a lot of the limitations of the regular incentivization process, which is highlighted below;

<figure><img src="https://miro.medium.com/v2/resize:fit:1400/1*Kw7ikE_BPEHjN4h37gWUkg.png" alt="" height="220" width="700"><figcaption></figcaption></figure>

More importantly, it reduces the need for us to manage rewards **on** other ALMs, and instead we’re able to manage the rewards directly on our end. This fosters greater scalability; imagine having to allocate rewards to 5 different ALMs for the incentivization of our pools. It’s simply a nightmare.

Not only does it simplify our backend processes, it facilitates greater composability for our LPs.

## How to Earn rewards with Off-Chain <a href="#id-2d50" id="id-2d50"></a>

In order to earn on a pool that is emitting rewards, all you have to do is create an LP position. If you have an existing position, don’t worry you’ll still earn rewards. You don’t have to do anything!

Off-Chain rewarder posses the following characteristics:

1. It calculate rewards every 5 minutes
2. It distribute rewards every 1 hour
3. User can claim distributed rewards anytime

## What Does This Mean to Users? <a href="#id-094b" id="id-094b"></a>

If you are an existing StellaSwap user, you will start to earn rewards from Off-Chain without **having to do anything**. Even if you have your LP staked in a farm you will still earn your rewards.

There will be changes to the UI of StellaSwap’s “pool page” and “my dashboard” that will ensure new users do not have to stake into farms. However, for existing users they will still be able to unstake their LP from a farm.

<br>

<br>


# Telegram Position Tracker

<figure><img src="/files/wpdL2HhrFvgHlNZsQgAA" alt=""><figcaption></figcaption></figure>

We're excited to launch our Telegram Position Tracker tool, allowing users to be updated whenever their positions go out-of-range (OOR)! :fire:

### Alerting You To Ensure You Continue to Earn, Every Minute

You can now track all your positions via our tool and enable notifications to ensure that you can react quickly whenever your positions go OOR. We understand that time is money, and every second your position go OOR, you're not earning any rewards. Therefore, it is vital that you get notified IMMEDIATELY whenever your positions go OOR so that you can reposition your LP!

That's why we've created this tool for you!

{% hint style="warning" %}
When your positions go OOR, your positions will stop earning token rewards and trading fees. Quick rebalancing of your positions ensure that you continue to earn.
{% endhint %}

### Features

Here are the following features of our TG Tracker;

1. Tracks your LP positions of your associated wallet address
2. Ability to track numerous associated wallets
3. Alerts you when your in-range positions go out-of-range
4. Alerts you when your OOR positions go in-range

### Start Tracking Now!

You can start tracking your LP positions here: <https://t.me/stellaswap_position_tracker_bot>

St


# Single-Asset Deposits

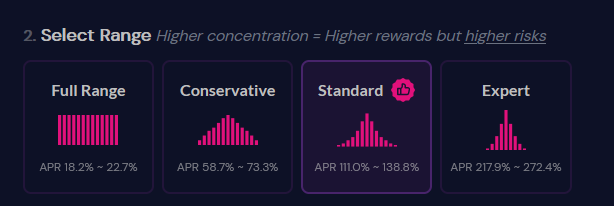
The launch of StellaSwap's V4 was a ground-breaking moment for AMM efficiency; we're at the point of maximum capital efficiency where slippage is minimized with a smaller capital base. Greater efficiency came at the cost of simplicity, as user's had to select the tradeoff between returns and liquidity concentration;&#x20;

> Greater LP concentration yields higher returns but entails a higher risk ro go out-of-range

The need to continually ensure your positions do not go OOR (and stop earning) increased the complexity for LP-ing.&#x20;

**Until now.**

### Say Hello to Single-Asset Deposits

<figure><img src="/files/QO3mvrCqzo3VxvYZoTkb" alt=""><figcaption></figcaption></figure>

Utilizing Ichi's advanced algorithmic strategies, we can finally offer single-asset deposits that rebalance on their own. Functioning as an automated liquidity manager Ichi's single-sided vaults offers token holders a streamlined avenue to generate earnings via single-token liquidity provision. Simply by depositing tokens, Ichi strategically allocates these assets into concentrated liquidity automated market makers (AMMs), bypassing the need for token swaps. Participants then acquire LP tokens, symbolizing their stake in the liquidity pool.

#### Features

* **Automated Management:** Effortless, algorithm-driven handling of assets.
* **Passive Income Generation:** Unlock potential earnings without active involvement.
* **Single-Token Liquidity Deposits:** Simplify participation by depositing a single token.
* **Real-Time Market Adjustments:** Dynamic strategy shifts in response to market fluctuations.
* **Flexibility:** Freedom to join or exit without lock-in periods or transaction fees.


# Decentralized Exchange

Swap & trade coins

![](/files/YeIWRz9sXN4xxB4W3eAq)

As an automated market-making (AMM), facilitating decentralized exchanges or swaps of various coin pairs is the core of what we do!

Users can trade coins in the Moonbeam network in a non-custodial manner without going through any centralized intermediary and paying excessive fees. With StellaSwap, the small trading fees that are charged will be fully distributed to liquidity providers. This ensures that liquidity providers are incentivized to provide the depth of liquidity needed to give you the best prices across the board.


# Zap (1-Click Staking)

Easy 1-click staking

![](/files/9V1wVKz6aIBD9UOdbtqg)

StellaSwap is proud to announce the first Zap feature on Moonbeam, allowing users to stake and yield farm in just 1-click! This monumental launch would make it **much easier for anyone to start yield farming, all in 1-click!**

### **What is the Problem ZAP Solves?**

Let’s face it, one of the pain points in DeFi yield farming is the **cumbersome** process of staking your coins in liquidity pools to start generating those delicious yields. In DeFi, one of the most common ways to start earning returns is *providing liquidity* to the protocol in exchange for rewards. This means that you can use stake your coins into liquidity pools — called ‘Farms — and be rewarded by the protocol.&#x20;

In order to start generating yields, you have to perform the following *manual* steps:

**Step 1: Farm Selection**

Select the Farms that you’re interested in. If you’re interested in the [STELLA-USDC pool](https://app.stellaswap.com/farm) that is earning 900% APR, you must ensure that you hold $STELLA tokens and $USDC tokens at parity, meaning equal value of those tokens at a 50/50 ratio.

**Step 2: Possess Two Underlying Tokens of the Your Selected Farm**

If you’re keen on staking $10,000 worth of your assets in STELLA-USDC farm on StellaSwap, you need to have $5,000 worth of $STELLA and $5,000 worth of USDC. If you don’t, [swap](https://app.stellaswap.com/exchange/swap) your existing assets to get both underlying tokens at a 50/50 value ratio.

**Step 3: Generate LP Token By Pooling Liquidity**

After having the same value of $STELLA and $USDC, you need to stake both assets to the STELLA-USDC liquidity pool (LP) on the [Pool section](https://app.stellaswap.com/exchange/pool). This means that you will start providing liquidity to the LP and in return, you will get STELLA-USDC LP token, which signifies your share of the LP relative to the entire STELLA-USDC liquidity. You will be rewarded according to the share of the liquidity you provided relative to everyone’s cumulative liquidity.

**Step 4: Stake Your STELLA-USDC LP Token into Farm**

Finally, after all that is done, you still need to stake your LP token into the STELLA-USDC farm, to start earning the juicy yields.

Now, that is a cumbersome process that is also complex to a new person interested in DeFi. You’re wasting precious minutes of your life and paying gas fees across all these steps that is frankly, unnecessary. Imagine a way to streamline the entire process by allowing you to start yield farming in less than a minute with no hassle and with as little steps as possible? What if you only had USDC and want to start yield farming without going through all those cumbersome process, wouldn’t that be awesome?

### Introducing Zap: 1-Click LP Token Generation & Withdrawal at Your Fingertips

Well, now you can. Imagine only having USDC in your wallet and you want to start yield farming on the STELLA-USDC farm. All you have to do is go to StellaSwap’s Zap page and “ZAP” your USDC automatically into the STELLA-USDC LP token in a blink!

Here’s a TLDR of what makes our ZAP feature ***unique***:

☑️ Convert your single token (USDC or GLMR at V1) directly into an LP token of your choice in one-click, without needing to manually get the underlying tokens, pooling them and then generating LP token. Hence, “ZAP!”

☑️ We’re the first 💸 in the DeFi space to have an **in-built calculator** for LP token generation through ZAP, so that you’ll know approximately *how many LP tokens you’ll be getting* even before you confirm the transaction!

☑️ Save gas fees and time when your “ZAP” your single-asset tokens!

☑️ V2 (future launch) will allow you to “ZAP” a wider variety of single-asset tokens into more LP token variety, even if the LP pool doesn’t have your single-asset tokens as the underlying!

{% hint style="info" %}
In summary, we have made life easier so you do not have to:

❎ Swap your USDC into the underlying tokens

❎ Pool liquidity and generate the LP token need to stake into the farm

❎ Waste gas fees (in GLMR) in numerous transactions
{% endhint %}

StellaSwap’s ZAP feature will automate the process! By converting your USDC > STELLA-USDC LP token, all that’s left for you to do is to stake the LP token into the STELLA-USDC farm. You save time, money and skip all the complexities associated with yield farming. This is especially helpful if you’re new to the space.

### How Can I Start Using Zap?

We’ve broken down the development of our ZAP feature into 2 phases: V1 and V2.

**V1: Single-Asset Conversion to LP Token with the Same Underlying**

Users that have USDC and wants to generate an LP token for yield farming can do so only on farms with USDC as one of the underlying coins.&#x20;

> This means that if you have **USDC** in your wallet, you can use ZAP to automatically convert to any LP token with a corresponding USDC pair, such as STELLA-USDC LP, GLMR-USDC LP, BNB-USDC.

&#x20;You will not be able to convert your USDC into LP farms that does not contain USDC in its pair, such as STELLA-GLMR. We will continue to extend the number of supported single-assets that can be used for ZAP.&#x20;

Here's the full list of supported single-asset coin that you can zap in or zap out at the start (V1 Launch):

![](/files/NlPd8eB6WLYcnfy4KuOV)

**V2: Single-Asset Conversion to Any LP Token**

Down the line, users would be able to convert their single asset, into **any LP token,** even if the is no corresponding asset within the LP pair. For instance, you can use your USDC to ‘ZAP’ into the BNB-GLMR easily. This affords total flexibility and autonomy in selecting whatever LP tokens they’re interested in getting, without the limitations of their single-asset. This requires heavy development in terms of routing an efficient methodology to convert the single-asset tokens into various LP tokens.

### Don’t Forget to Stake Your Newly-Zapped LP Tokens into Farms to Start Earning STELLA!

It is important to take note that you can only start generating yields only when you’ve staked your newly generated LP token from the ZAP feature directly into the Farms page. For example, if you’ve zapped USDC > USDC-STELLA LP , then you need to stake or deposit your USDC-STELLA LP token into the USDC-STELLA farm on the Farms page. [Here’s a guide to stake your LP token into your intended farm](https://stella-swap.gitbook.io/stellaswap/resources/how-to-guides/swap-pool-and-farm/how-to-farm-stake-lp-token).

***


# FAQ

Common Questions for Pulsar


# What is Impermanent Loss?

Impermanent loss (IL) is a common risk in DeFi for liquidity providers. The premise of IL is simple;

{% hint style="info" %}
Impermanent loss occurs when the price of your tokens changes compared to when you deposited them in the pool. The larger the change is, the bigger the loss.
{% endhint %}

In other words, IL occurs as a tradeoff when you choose to provide your tokens into a liquidity pool, as compared to another scenario where you simply held on to your tokens on your wallet (hodl). The reason why IL occurs is due to the inherent design of automated market makers (AMM), which is the basis of almost all DEXes that you see.

Here's an example for you to visualize better.

Assume you provided liquidity to StellaSwap on our standard AMM for a total of $100, supplying Token A and Token B;

* Price of Token A: $10
* Price of Token B: $1

<figure><img src="/files/YbLRIELzl6GlvmkxOJLJ" alt=""><figcaption></figcaption></figure>

Therefore, you're supplying 5x Token A (for a total value of $50) and 50x Token B (for another value of $50), with a total value of $100. **Assume Token A doubles in value, from $10 to $20, while Token B stays exactly the same.**

In this scenario, eventhough Token A doubled in value, as an liquidity provider, you're experiencing IL as you'd be better off holding your tokens in your wallet.

{% hint style="info" %}
The main reason why anyone would want to provide liquidity to a DEX is because they're putting their coins to "work" and **earning 1)trade fees and 2) farming rewards**. Therefore, it makes financial sense to LP if your total fees & rewards is more than the IL than you lose.
{% endhint %}

### Impermanent Loss on Pulsar's Concentrated Liquidity AMM

So now you've understood CL. On Pulsar, the risk of IL is higher. Why? It's a simple trade-off. Pulsar allows you to choose your range and concentrate your liquidity. Concentration of your liquidity allow you to capture more fees with significantly less liquidity. This means, you'll earn more but face higher IL.

{% hint style="info" %}
Important to note that on Pulsar, you can access be exposed to the **same** amount of IL as a standard AMM by providing *full range.* This means that you provide your liquidity across all liquidity ranges, which is what a standard AMM does. However, you earn lesser than someone that concentrates their liquidity.
{% endhint %}

Here's our Twitter thread for you to get a better idea;

{% embed url="<https://twitter.com/StellaSwap/status/1596168669691662336>" %}

#### What Happens When You're Out-of-Range?

On Pulsar, you have the ability to choose your range. You can choose from the preset ranges that we've created (e.g. *Full Range / Conservative / Recommended*) or you can create a custom range (recommended for pros). When the market price goes outside of your preset range, then you face an extreme situation of IL, called [Out-of-Range](https://docs.stellaswap.com/product/pulsar-concentrated-liquidity/faq/what-is-out-of-range) (OOR).

This means you stop earning any trade fees or rewards since your position is out-of-range. But more importantly, your OOR position now consists of only one asset.

Here's an example;

* You create a range on Pulsar for GLMR - USDC between $0.30 - $0.60, supplying 50% in GLMR and 50% in USDC
* Current market price is $0.40, so you're still in-range
* Went on a holiday and after 7 days, GLMR price went to $0.70
* All your GLMR is converted to USDC, and you're OOR (since $0.70 is outside of your range)

The above example shows how you're exposed to IL, as your position is now ALL in USDC, so there's no chance of capital appreciation.

#### What Can I Do if I'm Out-of-Range?

So if you're OOR, here's two options that you face;

1. Withdraw your LP position and re-add your liquidity by swapping some USDC > GLMR
2. Wait for the price of GLMR to fall back to your preset range. However, you will not earn anything as long as you're OOR

Your next steps depend on your own strategy and risk appetite.

#### Mitigate Against Impermanent Loss

So far, you've learnt the concept of IL and its context within Pulsar. Given the possibility of higher IL, it is vital that you constantly monitor and re-balance your positions to ensure it doesn't fall OOR.

Going forward we're partnering with automated liquidity managers to enable you to passively manage your Pulsar liquidity. This means that you won't have to monitor your positions. Think of it as an equivalent of Beefy; they manage your positions for your and ensure you don't OOR. Do await further announcements!


# What is Out-of-Range?

Out-of-range refers to the situation where the current market price falls outside of your initial price range that you set when adding liquidity.

{% hint style="info" %}
For example, if you provided liquidity for GLMR-USDC pool at a range of $0.30 - $0.60 at the start and after a few days, the market price goes to $0.70, then your position is considered "*Out-of-Range*".&#x20;
{% endhint %}

If your position is ***out-of-range,*** you WILL NOT earn any trade fees or farm rewards. It is important to re-manage your positions to be in range to start earning.&#x20;

In the event the market price goes outside of your LP's price bounds, your position will be singularly concentrated in the less valuable asset. For example, if you provided liquidity between the price range of $0.30 — $0.60 for GLMR/USDC and GLMR falls to $0.25, then your position will be **entirely** concentrated in GLMR. Conversely, if GLMR appreciates to $0.80, then your balance will be **entirely** concentrated in USDC.&#x20;

### What to Do if I'm OOR?

If you're OOR here are the list of possible actions you can undertake;

1. Do nothing and wait until prices **revert back** to your established range and you''' start to earn.
2. Actively manage your positions to ensure you don't face OOR
3. Use an Active Liquidity Manager (ALM) to automate your farming on Pulsar so you'll not OOR


# Pulsar APRs Calculations

Details of Pulsar APRs calculations

### How are fees generated in Pulsar?

Fees in Pulsar are dynamic than static fees such as 0.3% on each swap. The reason for this is to provide better returns to liquidity providers and combat impermanent loss.

The optimal fees depends on the nature of the asset's behavior, the following indicators are monitored:

1. Volatility
2. Liquidity
3. Trading Volume&#x20;

High liquidity is supported by beneficial conditions for providers, which consist of high trading volume with low volatility. In this case, the following situations are possible for providers.

<figure><img src="/files/fRUOHYnR34DYdECM29u5" alt=""><figcaption></figcaption></figure>

### How is volatility calculated?

The volatility is calculated based on time-weighted moving average (TWAPs)

The formula for volatility calculation is as follows:

<figure><img src="/files/VRd5BYZIQUExYy8DMrQ3" alt=""><figcaption></figcaption></figure>

τ - the time points corresponding to the available price observations,

𝑃(τ) - the value of the price at the τ moment,

∆𝑡(τ) - the time during which this price was maintained,

𝑇- time period (in seconds).

It’s to be noted that the price here is based on logarithm than absolute prices which means a price move from $100 to $120 is high volatility than from $10,000 to $12,000

So the actual formula for calculating volatility in Pulsar is:

<figure><img src="/files/aqIlcVpsce36liohq9fs" alt=""><figcaption></figcaption></figure>

<figure><img src="/files/zyS0DPgPlTvnUl6QhjJB" alt=""><figcaption></figcaption></figure>

<figure><img src="/files/B12anDlCo94bcznRyrip" alt=""><figcaption></figcaption></figure>

Once we receive the volatility, the fees is calculated by deriving sum of two sigmoids.

<figure><img src="/files/ezgshwbnLWuO0VqO0S9B" alt=""><figcaption></figcaption></figure>

α - allows scaling the maximum value of the sigmoid β - is responsible for the linear shift along the x-axis γ - regulates the "steepness" of the sigmoid

The final formula is:

<figure><img src="/files/AJ4YHHam8s3URDDvocRy" alt=""><figcaption></figcaption></figure>

This however doesn’t take into consideration two other important factors: volume and liquidity.

The liquidity is calculated as:

<figure><img src="/files/DylcKMPbUsOodM2TAiFP" alt=""><figcaption></figcaption></figure>

and the Volume is stored in the Pool’s data storage. Using this forumula we can get the amount of liquidity used:

<figure><img src="/files/x727GLkEPT2G0hfHOBuf" alt=""><figcaption></figcaption></figure>

The ratio of total liquidity and used liquidity is calculated as follows:

<figure><img src="/files/Ualwpy8S6WBr2qAyLLg7" alt=""><figcaption></figcaption></figure>

This can further be used into driving regulator sigmoid using:

<figure><img src="/files/T8AuoOv4YCdiApf4iBnO" alt=""><figcaption></figcaption></figure>

αR equal to 1

### How is effective fee calculated?

Now that we’ve volatility, volume and liquidity parameters. We can input them into final formula to calculate effective fees.

<figure><img src="/files/NEj5QTrzyEpNSDVNJROL" alt=""><figcaption></figcaption></figure>

The Fee base is the minimum possible fee value that is: **0.01**

### Positions & Ticks

To provide liquidity in ranges rather than 0 to infinity as compared to V2, the liquidity is divided into ticks. There is a tick at every 1 basis points (0.01%) of price. So if there’s a token which’s initial price is $5, there will be a tick at every $0.0005.

Liquidity providers can provide liquidity within tick ranges, the tick spacing in Pulsar is 60 which means the most concentrated position can at-least be within 60 ticks. So in our example LPs can provide liquidity within $0.06 - $0.03 price range.

Tick also provides us with granularity of prices.

### Fees for Positions

Swap fees are collected only when a price range is engaged (used in trades).

<figure><img src="/files/AmbxCJKU0kIhMtkgb0UJ" alt=""><figcaption></figcaption></figure>

If price of asset is increasing the ticks are crossed left → right

If price of asset is decreasing the ticks are crossed left ← right

The fees generated are stored globally at pool level rather than per position level. As on a single swap there can be multiple ticks moved either left→right or left ← right. To make accounting simpler and make contract gas efficient Ticks only keep track of how much fees were generated outside of them. Having ticks that know how much fees were accumulated outside of them will allow us to calculated how much fees were accumulated inside of a position

Since position is range of ticks, the fees is distributed the position to the amount of liquidity they provide.

### How are Pools APRs calculated?

The pools APRs are calculated by calculating fees generated in 24 hours over the active TVL.

<figure><img src="/files/CJNYYmfMQ6qr1zFxpf2Y" alt=""><figcaption></figcaption></figure>

Here feesInToken0Current is fetched from subgraph, and feeInToken0Previous is also fetched from subgraph by calculating block number of timestamp in last 24 hours.

The block number is calculated as:

<figure><img src="/files/OknoTJz9De6uad4Nbi0D" alt=""><figcaption></figcaption></figure>

Pool active TVL is calculate by iterating over positions under a pool and only considering in-range positions. The in range position condition is:

<figure><img src="/files/IlW8BrxoD8T1ekHqafzV" alt=""><figcaption></figcaption></figure>

The TVL for entire pool can be calculated as

<figure><img src="/files/5JTU3Yjqf8OSkk73eZao" alt=""><figcaption></figcaption></figure>

This will give us estimated APR for active TVL that has generated fees in last 24 hours.

### Positions APR

1. Get Position’s last fee via snapshot (where fee was collected) in GLMR
   1. Get collected fees in GLMR
   2. Get pending fees at that block # in GLMR
   3. Sum the total fees
2. Get Positions current fee in GLMR
   1. Get fee collected so far in GLMR
   2. Get pending fee in GLMR
   3. Sum the total fees
3. Subtract Current Fee by Previous Fee ( #2 - #1 )
4. Get the Time elapsed by last snapshot and current timestamp
5. Get Position’s TVL in GLMR
6. Calculate APR by

   <figure><img src="/files/7Zw0JCbPRK9TVrQTskWI" alt=""><figcaption></figcaption></figure>

### Farms APR

1. Get users share of liquidity pool by dividing user liquidity over the total liquidity of farming pool a.k.a virtual pool.
2. Calculate user’s liquidity value in GLMR
3. Calculate rewards per second value in GLMR.
4. Calculate APR by multiplying reward per second with 86400 and with 365. This will give reward in GLMR per year. Now divide this by user’s liquidity value in GLMR to get APR.

<figure><img src="/files/HLtqfGZfaejImvt8Rke8" alt=""><figcaption></figcaption></figure>


# Cool Tools


# Yield Farming

Passive earning by providing liquidity

![](/files/UYc0Rbgk86HuuuFwqNqT)

Users can earn returns passively by making their coins "work for them". StellaSwap provides a variety of features that allow users to yield farm and enhance their returns.

### What is Yield Farming?

Yield farming refers to the practice of staking or lending crypto assets in order to generate high returns or rewards in the form of additional cryptocurrency. On a high-level, it means putting your coins to work. This innovative yet risky and volatile application of decentralized finance (DeFi) has skyrocketed in popularity recently thanks to further innovations like liquidity mining.

StellaSwap incentivizes *yield farmers* or anyone who wants to generate yield by rewarding those that stake their coins into our liquidity pools and vaults. This effort entails adding liquidity to StellaSwap's network, and then staking liquidity provider tokens. Projects incentivize this behavior when it enables them to function more efficiently.

### How Can I Yield Farm on StellaSwap ?

Users can expect the following yields on StellaSwap by providing liquidity (LP) or by locking their $STELLA in Booster vaults;

1. **Swap Fee Profit-Sharing:** Whenever a trade is made on StellaSwap, 0.25% of the swap fees are distributed to liquidity providers (through our **Farms**) and 0.05% of swap fees are distributed to those who lock their $STELLA on **Booster Vaults**.
2. **Network Token Reward:** On top of the profit-sharing of swap fees, liquidity providers and lockers of $STELLA will also get additional rewards in the form of $STELLA native tokens.


# MAI Stablecoin Minting

Supercharge your DeFi yield farming

![](/files/NDY34wWCCvG4EBOant53)

We're excited to be the first protocol on Polkadot and Moonbeam to welcome Qidao into the ecosystem with the launch of their stablecoin, MAI. StellaSwap users would be able to supercharge their DeFi yields and optimize their capital efficiency!

We have streamlined the entire MAI minting process by allowing users to mint/borrow MAI directly on StellaSwap, without even needing to go to Qidao's application.

> **Start Minting/Borrowing MAI now >** <https://app.stellaswap.com/mai>

### What is MAI?

MAI is the brainchild of Qidao protocol, representing a stablecoin backed by collateral, and can only be minted with collateral backing it. MAI is created when users deposit accepted tokens (currently WGLMR & xSTELLA) as collateral in vaults and in turn receive a loan against that collateral. MAI is soft pegged to the USD, meaning that 1 MAI is around 1 USD.

### What are the Benefits of Using MAI?

At its core, MAI allows you to **be your own bank**. This means that on your own, you can undertake the function of a bank by borrowing and opening lines of credits on your own, in a decentralized and non-custodial way.

On a deeper level, MAI is a way for you to keep your crypto and still be able to spend its value. That means you're able to borrow stablecoins without having to sell your crypto assets

Here's some use-cases for MAI for StellaSwap users;

* **Borrow Stablecoin w/o Selling Your Favourite Coins:** Borrow stablecoins backed by your tokens to use the value of your tokens without exiting your long position.
* **Borrow to Buy Other Assets:** Borrow against your existing wealth and buy more assets, expanding your investment portfolio. You could, for example, borrow MAI to buy other tokens such as DOT.
* **Consolidating Debt:** Borrow MAI to pay down high-interest debt, saving on interest payments. The only fees you will incur through borrowing MAI will be a repayment fee at the end of your loan.
* **No scheduled payments:** You won’t need to commit to monthly payments or deadlines; you can repay your debt at any time that is convenient to you and your needs.
* **Instant lines of credit:** You don’t need credit checks or someone else's permission to borrow MAI. You are your own bank.‌
* **MAI as collateral:** Lending protocols require stablecoins to borrow tokens. You could use MAI as stablecoin collateral in those platforms, essentially using your original tokens as collateral for debt in lending protocols.

### How Do I Mint/Borrow Mai?

It is a simple 4-step process;

![](/files/TMbYpTEknVh5VvU2N8gI)

Here's a full-guide for minting MAI on StellaSwap: <https://docs.stellaswap.com/resources/how-to-guides/mint-mai>

### Additional Resources

For more information relating to MAI, please have a look at Qidao's documentation here:

[Qidao/MAI Documents](https://docs.mai.finance/)


# xSTELLA

Single-asset staking to maximize yields and value-accrual from Protocol revenue plus voting rights!

![](/files/D3vqtmLHYpapB4t96jFb)

We’re very excited to announce that we’re going to launch $STELLA’s single-asset staking facility: xSTELLA! This feature will confer governance rights to our community and allow all $STELLA holders to stake their $STELLA and earn a portion of every swap fee generated by StellaSwap’s DEX.

### Why the Transition Towards xSTELLA is Important

Strengthening our tokenomics requires a sustainable value-accrual mechanism that maximizes tokenholder value. Rather than just inflate our emissions for our current Vault feature, a more sustainable way for rewards distribution is through allocating a portion of profits made from every swap — aka swap fees — back to $STELLA tokenholders. This ensures that future STELLA yields is based on ongoing profits contributed by trade volume, not solely on emissions.

xSTELLA is the solution to fortifying our tokenomics and more importantly, create strong synergies across the DeFi space, in the form of composability. Furthermore, the xSTELLA pool would grow with time from daily STELLA buybacks from protocol revenues. In conceptualizing the xSTELLA feature, StellaSwap is also establishing the first step towards full governance.

Here’s a summary on why we will be transitioning from Vaults to xSTELLA and why it is important for StellaSwap:

* Recurring buybacks creates **continual demand for $STELLA**, resulting in strong price sustainability.
* xSTELLA rewards is **based on trade volume revenue** rather than purely emissions; this will alleviate inflation and sell pressure.
* **Convenience**; users can ‘set and forget’ while earning more $STELLA that accrues with time.
* xSTELLA will be the **core medium for access** to StellaSwap ecosystem like earning project partner tokens, earning boosted APRs on farms, exclusive access to IDO Launchpad, NFT minting etc.
* xSTELLA enables **composability**, which means it can be used as an underlying asset in various DeFi protocols that will ultimately strengthen $STELLA utility.
* First step towards **Governance**; holders of xSTELLA can now vote on major decisions.

### What is xSTELLA? <a href="#id-397c" id="id-397c"></a>

{% hint style="info" %}
**xSTELLA Feature:** A facility where users canvote in our governance & stake their $STELLA tokens to earn more STELLA. Users who stake STELLA will get xSTELLA, as fees from every swap is used to buyback STELLA and are distributed to xSTELLA holders.

**xSTELLA Token:** A yield-bearing token that will always increase in value, since xSTELLA token will accrue value from every trade (0.05%) on StellaSwap.
{% endhint %}

**Salient points of xSTELLA**

* Launch on March 7, while Vaults feature will be retired (*detailed transition plan to be announced in the next 48 hours*)
* Single-staking of $STELLA that will generate xSTELLA, which is a yield-bearing token that represents user’s share of the pool.
* In the long-run, xSTELLA holder’s share of the underlying $STELLA will always grow, since 0.05% of fees for every swap will be used to buyback $STELLA and distributed to xSTELLA holders.
* No impermanent loss since users need only to stake $STELLA to get xSTELLA
* No timelock; users are free to unstake anytime.

### How it Works <a href="#aaba" id="aaba"></a>

StellaSwap charges a 0.25% fee for every swap or trade on our DEX, which is the lowest fee of any DEX. 0.20% of the fees are distributed back to liquidity providers (i.e. stakers), while 0.05% is accrued to protocol’s treasury.

With the launch of xSTELLA, the 0.05% that was originally accrued to treasury will now be distributed to xSTELLA holders in the form of *more* $STELLA.

![](https://miro.medium.com/max/1400/1*09GPxvQ6KmyKcRgZ6S_SZw.png)

Every time a trade is executed on StellaSwap, 0.05% of trade fees will be used to buyback $STELLA from the market. This $STELLA is accrued to one single, shared pool and is divided pro-rata to xSTELLA stakers. xSTELLA can be unstaked at any time, upon which user’s allocated $STELLA will be sent back to their wallets.

{% hint style="info" %}
To put things in perspective, a daily $10M swap volume would result in a buyback of $5,000 worth of STELLA every day!
{% endhint %}

**Example of xSTELLA in Action**

On Day 1 of xSTELLA launching, the ratio between $STELLA : xSTELLA follows a 1:1 ratio. More specifically, for every STELLA staked, users would receive 1 xSTELLA. However, this ratio will change because of the effect of continuous buyback, resulting in more $STELLA accrued into the pool.

For instance, assume Bob is the *first and only user* to deposit into the xSTELLA feature. He would deposit 100 STELLA and receive 100 xSTELLA in return, as the starting ratio is 1:1.

After a few days, 0.05% of trade fees are used to buyback a total of 100 STELLA and sent to the xSTELLA pool, which now has 200 STELLA. The ratio now changes to 100 xSTELLA : 200 STELLA, which is a ratio of 1:2. Bob could very well unstake his 100 xSTELLA and redeem 200 STELLA. If he doesn’t, then anyone who deposits $STELLA will get xSTELLA according to the 1:2 ratio. This means Mary who staked 100 STELLA will get 50 xSTELLA.

The amount of xSTELLA users get back is based on the amount of STELLA already in the pool and the current total supply of xSTELLA. The ratio will change as fees are used to buyback $STELLA, which is then sent to the pool and split equally among all xSTELLA holders, since each xSTELLA will be worth more $STELLA.

### What it Will Look Like <a href="#f46f" id="f46f"></a>

When you stake $STELLA, you will get back xSTELLA. xSTELLA will represent your portion of the accumulated $STELLA that was bought back using the 0.05% of fees from every trade. This means that the rate of xSTELLA to $STELLA will change over time as more $STELLA is accumulated from fees.

![](https://miro.medium.com/max/1400/1*oTK0IJknZR02sIPaTtA6GA.png)

While your xSTELLA amount stays constant, you will continue to accumulate more $STELLA over time based on your share of the pool. When you unstake and unstake, you will receive more $STELLA than what you entered with (provided you remained staked for at least 24 hours, since we have automated the buyback to be executed minimum once daily).

### V1 Governance <a href="#c578" id="c578"></a>

<figure><img src="/files/2LzAjPoHAj432FwRzzQC" alt=""><figcaption></figcaption></figure>

We’re excited to embark on a new adventure with the upcoming launch of our **V1 governance mechanism**! 🔥

As we begin to experiment with decentralization, we’re taking the first steps towards a future governed by our community. Actualizing a core utility for STELLA token, our V1 governance will confer voting rights towards xSTELLA holders, empowering them with the ability to boost farm rewards of our existing pools.

We've partnered with Opensquare for our governance platform. You can vote [here](https://voting.opensquare.io/space/stellaswap?tab=all).&#x20;


# Tri-Rewards Pool

xSTELLA staking pool for double-dipped yield farming, with rewards in 3 tokens: STELLA, GLMR, USDC

![](/files/rbwdHQWZHTwALkbUX7rY)

We would start off our widely-anticipated [xSTELLA](https://stellaswap.medium.com/introducing-xstella-auto-compounding-single-asset-staking-to-maximize-yields-and-value-accrual-b3899895d3f7) launch with a triple-reward (tri-reward), single-asset pool that allows xSTELLA stakers to earn 3 kinds of rewards: $STELLA, $GLMR and $USDC. Talk about starting things off with a STELLAR BANG! 🚀

### First Use Case of xSTELLA Staking: xSTELLA Tri-Reward Pool <a href="#a21f" id="a21f"></a>

xSTELLA is a huge step in enhancing StellaSwap’s tokenomics, as it would directly maximize tokenholder-value. For every trade that occurs on StellaSwap, 0.05% of swap fees will be distributed back to xSTELLA holders. This means that there is a continuous buyback of $STELLA from the open market!

In order to make it sweeten the deal further, we have decided to launch an xSTELLA staking facility, so users can **earn additional APR yields by staking their xSTELLA**! This “double-dipping” would incentivize users to stake their $STELLA into xSTELLA and earn much more.

![](https://miro.medium.com/max/1400/1*vmi27BT-_QsxcPfnmWvOnQ.png)

#### **Details of Tri-Reward Pool** <a href="#f724" id="f724"></a>

Here’s the details of the pool:

**Total Rewards:** $115,000\
**Reward Tokens:** $STELLA + $GLMR + $USDC\
**Start Date:** 7 March, 00:00 AM UTC (*Same time with xSTELLA launch*)\
**Duration:** 30 Days\
**Staking Location:** [xSTELLA Page](https://app.stellaswap.com/xstella)

## How Can I Stake into Tri-Reward Pool? <a href="#id-11c2" id="id-11c2"></a>

In order to participate in the tri-reward pool and start earning double-dipped APRs, here’s exactly what you need to do;

Step 1: Ensure that you have $STELLA token.

Step 2: [Convert $STELLA into xSTELLA](https://app.stellaswap.com/xstella) when xSTELLA feature is launched.

Step 3: Stake xSTELLA into the Tri-Reward pool located on the same xSTELLA page.

Step 4: Start earning double-dipped rewards! 💸

<br>


# Bridge

Transfer coins from other blockchain networks <> Moonbeam

![](/files/dfOlu9JIe42LbZPph8zD)

Have tokens on other blockchain networks and want to migrate them to Moonbeam? StellaSwap's bridge feature supports moving tokens from a variety of blockchain networks that include  Ethereum, BSC, Avalanche, and Polygon to Moonbeam network and vice versa.

### What is a Bridge and Why Is It Important?

Bridges represents a core function in the DeFi world; they address the issue of fragmented liquidity  across blockchains by facilitating efficient transfer of capital across different networks. For example, if you want to exploit the high APYs on StellaSwap's ETH-USDT LP farm, the easiest way is to transfer your existing ETH or USDT from Ethereum network into Moonbeam network. This requires a bridge that support asset transfer of ETH or USDT between Ethereum blockchain and Moonbeam.


# Swap-For-Gas

Gasless Feature for Getting Gas After Bridging

![](/files/mq4MUrhXDnLErn6H53bF)

We’re proud to announce our Swap-for-Gas feature! 🎂 This will finally remove the complexities for new users requiring gas fees of GLMR. This gasless approach will streamline the simplicity for converting ANY coins > GLMR **without the need for GLMR at the start!**

Have a look here > [**Swap-for-Gas**](https://app.stellaswap.com/bridge/gas-swap)

## What is the problem we’re solving? <a href="#id-86e6" id="id-86e6"></a>

Swap-for-Gas (S4G) is a novel feature that allow users to *initially* trade **without the need for gas.** We’re aware that many people do not have GLMR the first time they’re entering the Moonbeam network. Having GLMR is an absolute necessity as you have to pay the network fees for every transaction on Moonbeam using GLMR.

So if you do not have GLMR for network (gas) fees, what can you do?

* **Use** [**StellaSwap’s Faucet**](https://app.stellaswap.com/bridge#) **to get free GLMR:** To get free GLMR to get you started for the first transaction, you can use Faucet to get a little bit of GLMR. It’s free, but it is a manual affair and can be intimidating for new users.
* **Beg for GLMR in the Community:** If you’re rushing and require GLMR asap, you may resort to asking the community for free GLMR. Some kind-hearted souls may help, but many would be out to scam you too.
* **Transfer GLMR from Centralized Exchanges:** This assumes that you already have existing GLMR sitting on Binance or any other centralized exchanges. If not, then setting everything up would take time.

## Introducing Swap-For-Gas: Finally, no need for Gas! <a href="#id-814c" id="id-814c"></a>

The above steps are solutions, but not really *effective* solutions. By that we mean there is varying degrees of complexity, manuality and inefficiencies. We’re hell-bent on creating solutions that *make life very easy for anyone and everyone.* That is why we decided to launch Swap-for-Gas.

![](/files/JRyTEdvGXpa4s5FyrbUY)

With Swap-for-Gas, you can skip all previously cumbersome solutions and just make your first few traders **without the need for GLMR gas.** Yes, you read that right 👉. Imagine [bridging USDC to Moonbeam](https://docs.stellaswap.com/resources/how-to-guides/bridge/bridge-erc-tokens-to-moonbeam) and converting your USDC straight into GLMR without requiring GLMR gas. That’s exactly why Swap-For-Gas will make live easier. No more stressing about how you’re gonna get GLMR.

## Supported Coins to Begin <a href="#aae2" id="aae2"></a>

Swap-for-Gas will be a one-way swap, where users will convert any coin > GLMR. The list of supported coins at first will be:

* BUSD
* AVAX
* WBTC
* MATIC
* FTM

## What about any other coins? <a href="#e823" id="e823"></a>

For unsupported coins, users can still get free GLMR manually through our [Faucet following this guide](https://docs.stellaswap.com/resources/how-to-guides/bridge/faucet-how-to-claim-free-glmr).


# Gas Refund

Everything to know about StellaSwap's gas refund program, including how to be eligible and claim

![](/files/MHXZuoPldGSQ0xzwCCMQ)

StellaSwap's has recently launched `Gas Refund` program to award xSTELLA holders and increase the utility for it's governance token. xSTELLA is StellaSwap's revenue-distribution token, where protocol revenues would be shared to those who stake STELLA.

Read the launch article [here](https://stellaswap.medium.com/stellaswap-launches-gas-refunds-on-moonbeam-polkadot-allowing-free-txns-by-staking-xstella-b139a5e3d99e).

### TLDR (Summary)

1\. If you hold xSTELLA you would be eligible for *partial* or *full* gas refund for any transaction you perform on StellaSwap

2\. Users spent gas amount will be refunded in $STELLA

3\. To be eligible you need to stake STELLA for the whole period between first transaction and refund claim

4\. Eligible refunds will be based on the amount of xSTELLA you hold;

![](/files/tXvvSc5QrCL8GLvCGGdK)

### How to Participate in Gas Refund

**Step 1:** First, you have to stake STELLA token. You can visit [xSTELLA page](https://app.stellaswap.com/xstella) to deposit your STELLA tokens and convert them to xSTELLA.&#x20;

![](/files/XdJb9NciNiUqRO7OkWjo)

Simply input the amount and click on `Stake` .

{% hint style="success" %}
Once you hold xSTELLA, you will be eligible for gas refunds for any transaction you do on StellaSwap based on the amount of xSTELLA staked
{% endhint %}

To Check, head to Swap page, input amount and you will see your gas refund level.

![](/files/er9mYzZWPSPz3m4zKK3d)

To claim rewards, click on your wallet address in the top right corner.

![](/files/wVVrgFgvBN91X3U8OteJ)

![](/files/zoD5oHdCXvlHni8Z2Oxa)

On your wallet information you will be able to see the refund level, amount of STELLA for refund and be able to claim it at the start of each month. i.e 1st of August.

{% hint style="warning" %}
You can only claim on the 1st of each subsequent month.
{% endhint %}


# Liquid Staking

{% tabs %}
{% tab title="stDOT" %}
Taking the baton from Lido's sunsetted liquid staked DOT, StellaSwap decided to relaunch stDOT to restore its former glory in fostering ecosystem growth.&#x20;

### What is stDOT?

stDOT is a liquid token that represents your share of the total DOT.xc pool deposited with StellaSwap. Any user that stakes DOT.xc will immediately receive newly minted stDOT. Over time, as your DOT delegation accrues rewards, the value of your stDOT increases. When a user delegates their DOT tokens on StellaSwap for stDOT, they do not need to perform or wait for the completion of any delegation or activation steps, as is the norm in traditional staking. The user can instantly exchange stDOT for DOT at any time in the open market.

### Traditional Staking vs Liquid Staking

In traditional Proof-of-Stake (POS) staking within Polkadot, a user has to perform several steps **manually**:

* Create a Stash Account and bond DOT to it;
* Nominate validators;
* Monitor validator's yield to maximize profit.

Staking on Polkadot requires **expert knowledge** and a great deal of resources, as well as incurring a core risk of slashing that can get very severe if the staking is managed improperly.

### Benefits of stDOT

Staking DOT via StellaSwap radically simplifies the staking process and absolves the need for users to maintain their own staking infrastructure. Users can;

:star: Start earning staking rewards easily in 1-click without locking in your assets\
:star: Instantly liquidate your stDOT w/o waiting for unbonding period\
:star: Supercharge their DeFi by using stDOT across numerous usecases like stacking farm rewards, lending/borrowing etc.\
:star: Use their Metamask or any ERC wallets as we're fully EVM compatible!

### APR Maximization

One of the core benefits of StellaSwap's stDOT is that our validation nomination strategy is optimized to keep a higher chance of getting into the active set w/o decreasing APRs. Here are the following metrrics that we constantly track to ensure we select the best validators in the ecosystem;

* Era points
* APR
* Stake amount
* Nominators list
* Slashing
* Payout rate

### Rebasing or Yield-Bearing?

Unlike Lido's stDOT, Stella's stDOT **is not a rebasing token.** Rebasing tokens change in balance as the token supply changes according to staking rewards or slashing penalties. stDOT is a yield-bearing token. Yield-bearing tokens reflect accrued yields through changes in **token values** rather than balances. This method of reward issuance breaks the 1:1 swap-rate between LSD assets and their underlying assets, allowing the rate to change in real-time as the income increases.

A benefit of being a yield-bearing token is the ease of integration across other DeFi protocols. This streamlines composability of stDOT across DeFi to unlock greater usecases much more easily compared to rebasing tokens.

### Stake Your DOT Now!

You can access our stDOT here: <https://app.stellaswap.com/stdot>

<figure><img src="/files/uwLqwyh7s06IFsdcK6hi" alt=""><figcaption></figcaption></figure>

### FAQs

<details>

<summary>How does stDOT work?</summary>

A [DOT.xc](https://docs.stellaswap.com/how-to-guides/native-transfer-xcm/how-to-send-polkadot-dot-to-moonbeam) token holder connects their wallet and deposits their tokens into [StellaSwap's stDOT](https://app.stellaswap.com/stdot). They immediately receive stDOT tokens that represent a share of the total pool, and StellaSwap delegates DOT to our selected validators on the Polkadot network. When these delegations accrue rewards on the allotted stake, the total DOT under management grows and this increases the value of stDOT tokens.

</details>

<details>

<summary>How the staking exchange rate is calculated?</summary>

The amount of stDOT that you will receive is calculated based on the ownership share. The reason you get slightly less stDOT than DOT.xc is due to rounding when dividing:

```
shares_amount = amount_of_DOT.xc * getTotalShares()
                / getTotalPooledKSM();
stDOT_amount = shares_amount * getTotalPooledKSM()
                / getTotalShares();
```

Where:

* `amount_of_DOT.xc` is a given DOT.xc you want to exchange
* `getTotalShares()` is a call to Lido contract
* `getTotalPooledKSM` is a call to StellaSwap's contract. This method works with KSM as well as with DOT.

</details>

<details>

<summary>Why should I prefer liquid staking over traditional?</summary>

In traditional Polkadot staking a user has to perform several steps manually:

* Create a Stash Account and bond DOT to it;
* Nominate validators;
* Monitor validator's yield to maximize profit.

Staking on Polkadot requires expert knowledge, the main being the fact that slashing can get very severe if the staking is managed improperly.

Staking DOT through StellaSwap will come with a variety of benefits:

* One-step process — just deposit into the pool with a single click.
* The pool takes care of validator diversification.
* Immediate appreciation — you start earning from the pool from the moment of deposit.

</details>

<details>

<summary>How can I redeem stDOT for DOT?</summary>

Withdrawals of DOT.xc from StellaSwap can be done through the `Unstake` tab. However, unstaking directly from StellaSwap will incur the Polkadot unbonding period, which is roughly 28 days. Immediate withdrawal options are available in the open market through liquidity pools on StellaSwap's [Pulsar V3](https://app.stellaswap.com/pulsar) where one will be able to immediately exchange stDOT for DOT.xc. If you wish to instantly receive DOT.xc, we recommend [trading stDOT directly on StellaSwap](https://app.stellaswap.com/exchange/swap).

DOT.xc can be instantly exchanged for DOT through the Transfer tab.

</details>

<details>

<summary>What are the risks involved?</summary>

* **Downtime risk:** Polkadot validators can go offline, in which case they do not earn staking rewards. To minimize this risk, StellaSwap stakes across multiple professional and reputable node operators with heterogeneous setups. This will also serve to mitigate potential slashing risks.
* **stDOT Price Risk:** As mentioned above, withdrawals from StellaSwap take some time to deactivate. Liquidity pools in the open market will be available for instantly redeeming stDOT for DOT. On such pools, users risk an exchange price of stDOT, which is lower than the inherent value due to withdrawal restrictions on StellaSwap, making arbitrage and risk-free market-making impossible. We driven to mitigate the above risks and eliminate them to the extent possible. Despite this, they may still exist, and hence it is our duty to communicate them.

</details>

<details>

<summary>What fee is applied to stDOT?</summary>

StellaSwap applies a 10% fee on a user's DOT staking rewards.

</details>

<details>

<summary>How long is the DOT unbonding period?</summary>

In the Polkadot network unbonding period usually takes 28-30 days.

</details>

<details>

<summary>How can I claim my DOT.xc tokens after unbonding?</summary>

When unbonding period is over, you can claim your DOT.xc tokens, that your request for redeem, simply by clicking on the "Claim" button on the "Unstake" page.

</details>
{% endtab %}

{% tab title="stGLMR" %}
Say Hello :hand\_splayed: to GLMR's native LSD!&#x20;

### What is stGLMR?

stGLMR by StellaSwap is a liquid staking protocol that issues a derivative token, stGLMR, for GLMR (Moonbeam's native token). The protocol enables users to stake GLMR while retaining liquidity, with stGLMR representing their staked position and accruing staking rewards over time.<br>

The stGLMR protocol employs an interest-bearing token model, akin to Yearn vaults. Users deposit GLMR and receive stGLMR tokens, whose balance grows as staking rewards are accumulated. The protocol maintains multiple ledgers to delegate stakes to various collator candidates on Moonbeam, optimizing rewards while managing risk.&#x20;

### Traditional Staking vs Liquid Staking

In traditional Proof-of-Stake (POS) staking on Moonbeam, a user has to perform several steps **manually**:

* Create a Stash Account and bond GLMR to it;
* Nominate validators;
* Monitor validator's yield to maximize profit.

Staking on Moonbeam requires **expert knowledge** and a great deal of resources, as well as incurring a core risk of slashing that can get very severe if the staking is managed improperly.

### Benefits of stGLMR

Staking GLMR via StellaSwap radically simplifies the staking process and absolves the need for users to maintain their own staking infrastructure. Users can;

:star: Start earning staking rewards easily in 1-click without locking in your assets\
:star: Instantly liquidate your stGLMR w/o waiting for unbonding period (hence "Liquid")\
:star: Supercharge their DeFi by using stGLMR across numerous usecases like stacking farm rewards, lending/borrowing etc.\
:star: Use their Metamask or any ERC wallets as we're fully EVM compatible!

### APR Maximization

One of the core benefits of StellaSwap's stGLMR is that our validation nomination strategy is optimized to keep a higher chance of getting into the active set w/o decreasing APRs. Here are the following metrrics that we constantly track to ensure we select the best validators in the ecosystem;

* Era points
* APR
* Stake amount
* Nominators list
* Slashing
* Payout rate

### Rebasing or Yield-Bearing?

StellaSwap's stGLMR **is not a rebasing token.** Rebasing tokens change in balance as the token supply changes according to staking rewards or slashing penalties. stGLMR is a yield-bearing token. Yield-bearing tokens reflect accrued yields through changes in **token values** rather than balances. This method of reward issuance breaks the 1:1 swap-rate between LSD assets and their underlying assets, allowing the rate to change in real-time as the income increases.

A benefit of being a yield-bearing token is the ease of integration across other DeFi protocols. This streamlines composability of stGLMR across DeFi to unlock greater usecases much more easily compared to rebasing tokens.

### FAQs

<details>

<summary>How does stGLMR work?</summary>

A GLMR token holder connects their wallet and deposits their tokens into StellaSwap's stGLMR page. They immediately receive stGLMR tokens that represent a share of the total pool, and StellaSwap delegates GLMR to our selected validators on the Moonbeam network. When these delegations accrue rewards on the allotted stake, the total GLMR under management grows and this increases the value of stGLMR tokens.

</details>

<details>

<summary>How the staking exchange rate is calculated?</summary>

The amount of stGLMR that you will receive is calculated based on the ownership share. The reason you get slightly less stGLMR than GLMRis due to rounding when dividing:

```
shares_amount = amount_of_GLMR * getTotalShares()
                / getTotalPooledGLMR();
stGLMR_amount = shares_amount * getTotalPooledGLMR()
                / getTotalShares();
```

Where:

* `amount_of_GLMR` is a given GLMR you want to exchange
* `getTotalShares()` is a call to our contract
* `getTotalPooledGLMR` is a call to StellaSwap's contract.&#x20;

</details>

<details>

<summary>Why should I prefer liquid staking over traditional?</summary>

In traditional Polkadot staking a user has to perform several steps manually:

* Create a Stash Account and bond GLMR to it;
* Nominate validators;
* Monitor validator's yield to maximize profit.

Staking on Moonbeam requires expert knowledge, the main being the fact that slashing can get very severe if the staking is managed improperly.

Staking GLMR through StellaSwap will come with a variety of benefits:

* One-step process — just deposit into the pool with a single click.
* The pool takes care of validator diversification.
* Immediate appreciation — you start earning from the pool from the moment of deposit.

</details>

<details>

<summary>How can I redeem stGLMR for GLMR?</summary>

Withdrawals of DOT.xc from StellaSwap can be done through the `Unstake` tab. However, unstaking directly from StellaSwap will incur the Polkadot unbonding period, which is roughly 28 days. Immediate withdrawal options are available in the open market through liquidity pools on StellaSwap's [Pulsar V3](https://app.stellaswap.com/pulsar) where one will be able to immediately exchange stDOT for DOT.xc. If you wish to instantly receive DOT.xc, we recommend [trading stDOT directly on StellaSwap](https://app.stellaswap.com/exchange/swap).

DOT.xc can be instantly exchanged for DOT through the Transfer tab.

</details>

<details>

<summary>What are the risks involved?</summary>

* **Downtime risk:** Polkadot validators can go offline, in which case they do not earn staking rewards. To minimize this risk, StellaSwap stakes across multiple professional and reputable node operators with heterogeneous setups. This will also serve to mitigate potential slashing risks.
* **stGLMR Price Risk:** As mentioned above, withdrawals from StellaSwap take some time to deactivate. Liquidity pools in the open market will be available for instantly redeeming stGLMR for GLMR. On such pools, users risk an exchange price of stGLMR, which is lower than the inherent value due to withdrawal restrictions on StellaSwap, making arbitrage and risk-free market-making impossible. We driven to mitigate the above risks and eliminate them to the extent possible. Despite this, they may still exist, and hence it is our duty to communicate them.

</details>

<details>

<summary>What fee is applied to stGLMR?</summary>

StellaSwap applies a 10% fee on a user's DOT staking rewards.

</details>

<details>

<summary>How long is the GLMR unbonding period?</summary>

In the Moonbeam network unbonding period usually takes 7 days.

</details>
{% endtab %}
{% endtabs %}


# Contracts

{% tabs %}
{% tab title="stDOT" %}

```
ProxyAdmin: 0xe8A5C0039226269313c89C093a6c3524c4d39fa4

Controller: 0x002D34d6a1b4A8E665fEc43Fd5D923F4d7Cd254f

AuthManager: 0x5927e31Cd0b8213892fb0C44F7C1c94DCB830263
 
Oracle: 0x0Fa8cdE3e0cDDF150d79add0f3d63CB6E0F2F079

OracleMaster: 0x3B23F0675fFc45153ECA239664CCaEFc5E816B9C

Withdrawal: 0xa2D7009eA7502cD796d174fFaA7e26eCe8edEAcF

Nimbus: 0xbc7E02c4178a7dF7d3E564323a5c359dc96C4db4

Ledger: 0xDE5925DC4Fb300c886330DE31E19826F22a9CE40

LedgerBeacon: 0xB7c3E26785CBf145Ed77b86d281817BaFB719752

LedgerFactory: 0xa732097E1C284Fc4E64F077dD5360DA81E1F2C68

```

{% endtab %}

{% tab title="stGLMR" %}
Coming soon!
{% endtab %}
{% endtabs %}


# Audit

{% tabs %}
{% tab title="stDOT" %}
There's a total of 3 audits that have been done on the stDOT codebase;

### Audit #1: Mixbytes

<figure><img src="/files/EVIVuLUzriN8Sti1wqCG" alt=""><figcaption></figcaption></figure>

Report: [https://github.com/mixbytes/audits\_public/tree/master/Lido/Lido%20KSM 1](https://github.com/mixbytes/audits_public/tree/master/Lido/Lido%20KSM)

### Audit #2: Peckshield

<figure><img src="/files/nAEqPQTJGiN59ogAX38m" alt=""><figcaption></figcaption></figure>

{% file src="/files/6fz5ymCCFsxZ8ttcyhih" %}

### Audit #3: SolidProof

<figure><img src="/files/xxTuJgbC7Cvwap13sVa0" alt=""><figcaption></figcaption></figure>

{% file src="/files/ZnQEbKm7jwrpu4dau6VZ" %}
{% endtab %}

{% tab title="stGLMR" %}
We've completed a full external audit round on our stGLMR codebase.

### Audit #1: AstraSec

<figure><img src="/files/m5zKNjzjx6vMSJh3Voj1" alt=""><figcaption></figcaption></figure>

Audit Report:&#x20;

<https://github.com/astrasecai/audit-reports/blob/main/AstraSec-AuditReport-StellaSwap-stGLMR.pdf>
{% endtab %}
{% endtabs %}


# Native STELLA: Updated

In the spirit of true decentralization and unequivocal fairness, Stella has decided to adopt a fair launch model for token distribution.

{% hint style="success" %}
The primary goal of a fair launch, as its name suggest, is to distribute almost all of the tokens to users on our platform. This is in contrast to the frequently used model for token distribution such as Initial Coin Offerings (ICO), Token Generating Events (TGE) or Initial Decentralized Offerings (IDO) that allocates a considerable chunk of their tokens to initial investors and institutional investors. Stella wants everyone to have access to our tokens in a fair and transparent manner.
{% endhint %}

StellaSwap's native token - STELLA - will be a governance token that is embedded with various value-accrual mechanisms and utility to maximize tokenholder value. The token distribution follows a fixed supply, linear emission model that is coupled with burning or deflationary mechanisms to reduce overall supply.

### Tokenomics Breakdown

| Breakdown              | Details                   |
| ---------------------- | ------------------------- |
| Ticker                 | STELLA                    |
| Initial Maximum Supply | 500,000,000 STELLA        |
| Current Maximum Supply | 250,000,000 STELLA        |
| Burn Event             | 250,000,000 STELLA        |
| Weekly Emissions       | See VE Emissions schedule |
| Distribution Period    | 3 Years+                  |
| Token Allocation       | As seen below             |

#### Supply Reduction

Total STELLA supply was cut from 500M STELLA to 250M. The excess STELLA was minted and burned and can be tracked [here](https://moonbeam.moonscan.io/token/0x0e358838ce72d5e61e0018a2ffac4bec5f4c88d2).

**New Allocation**

The new STELLA allocation is based on the new Total Supply of 250M STELLA. The following allocation will be vested across 5 years with quarterly unlocks, starting from the inception of the protocol, from Jan 2022 to Jan 2027;

* Ecosystem Growth: 10%
* Treasury: 12.5%
* Development: 12.5%

<figure><img src="https://lh7-rt.googleusercontent.com/docsz/AD_4nXcNyKYbSZchT8lrAYdl9dw2a-qZRbYrI_S_uBerusLq9Yf2MqOMrL5TgiwANmSNW0DSF3zuc82G4mYz6P5yIasKEoRWSXrgZmFsoPbuKZmC-99yW7vm5s5KXtoO_LxrrAQ2YLYRgg?key=_Q9LweOiIdCvlEpekKTixA" alt=""><figcaption></figcaption></figure>


# veSTELLA

Start earning protocol revenue by being an active member of our ecosystem. Our vote-escrow model allows you to lock your STELLA in return for voting power, as denominated in veSTELLA.&#x20;

> **The longer the lock time = the more veSTELLA you’ll get = the higher your share of protocol revenue.**

Follow our step-by-step guides to get you on your way.


# Lock

Here’s a step-by-step guide to create a lock:

### Step 1: Get STELLA

The first step is to ensure that you have STELLA. If you do not, please [swap](https://app.stellaswap.com/exchange/swap) for STELLA to get started.&#x20;

<figure><img src="/files/gbex25HBkRlceHnLDEGK" alt=""><figcaption></figcaption></figure>

Once you have STELLA, you can start locking.

### Step 2: Create Lock

Click on `Create Lock` button to begin creating your lock.

<figure><img src="/files/BVTO1isJ6QIJV8sUpzsg" alt=""><figcaption></figcaption></figure>

You can then select then select the amount of STELLA to lock and the Lock duration. Selecting the maximum lock time of **2Y** will grant you maximum voting power; 1 STELLA : 1veSTELLA.

{% hint style="info" %}

* The more STELLA you lock, the more veSTELLA (Voting Power) you’ll get
* The longer you lock, the more veSTELLA you’ll get
  {% endhint %}

The voting power schedule can be seen [here](https://docs.stellaswap.com/dex-core/vote-escrow-stella-3-3/how-it-works).

<figure><img src="/files/nr0CEPiC12fR7vtK0jZA" alt="" width="375"><figcaption></figcaption></figure>

### Step 3: Approve & Lock

Click on `Approve` and the `Lock` button to create your lock. Once you've confirmed the txn on your wallet, you'll see your NFT:

<figure><img src="/files/6LNeUbj6jUQ2iRQ836OB" alt="" width="375"><figcaption></figcaption></figure>

You can manage your locks in your Lock Dashboard section.<br>


# Auto-Strategy

Here's a summary of Auto-Strategies for veSTELLA:

* Auto strategies **automate** your voting process passively by voting on the highest-performing pools to **maximize your returns**
* Auto strategies will continually compound your Lock to 2yrs, so anytime you withdraw your Lock its duration will be 2yrs
* There's a 1% fee for depositing your Locks into auto strategies (deducted from rewards)

Here’s a step-by-step guide for using our Auto-Strategy:

### Step #1: Ensure you have a Lock

You need to have a Lock before depositing it into an Auto-Strategy. [Create a Lock if you have not done so](https://docs.stellaswap.com/how-to-guides/vestella/lock).

<figure><img src="/files/92sW9GhqTyAxsbk1nbbC" alt=""><figcaption></figcaption></figure>

### Step #2: Select an Auto-Strategy

Scroll below the [Lock page](https://app.stellaswap.com/vestella?tab=lock) to view the Auto-Strategy section and select an Auto-Strategy that you prefer.

{% hint style="info" %}

* STELLA Optimizer: Compound earnings into STELLA to maximize power & earn more
* USDC Optimizer: Convert all earnings into USDC, which can be claimed anytime. Exposed to voting decay (voting power goes down with time, and therefore earnings)
  {% endhint %}

<figure><img src="/files/B6mFt0tduJ6GcOJbrSu9" alt=""><figcaption></figcaption></figure>

Select on `Deposit Lock` button.

### Step #3: Deposit Lock

Select your Lock from the list of existing Locks you have. Once done, select the tickbox after ensuring that you fully understand the Auto-Strategy you're about to deposit in.&#x20;

<figure><img src="/files/ZlEYaHnemPl3GholUTWj" alt=""><figcaption></figcaption></figure>

You can then select `Deposit` button.

### Step #4: Done

Once you've deposited, you can track your Lock on your your Auto-Strategy dashboard.

<figure><img src="/files/aFxMoKyFMeZZ0SaMWMgT" alt=""><figcaption></figcaption></figure>

{% hint style="info" %}
Any deposited Locks can be claimed after the first epoch passes. In the case of USDC Optimizer strategy, you can claim your USDC any time after the first epoch.
{% endhint %}


# Vote

Actively vote on the most productive pools to maximize your earnings. You’ll earn directly from the pools that you voted as all trade fees accumulated will be given to Voters of that pool.

{% hint style="info" %}
Important Note: **Vote Power Decay**

Your voting power will decay linearly with time. This means your veSTELLA power will decrease everyday. For example, a Lock duration of 1-Month means that your veSTELLA power reduces by 1/30 everyday. Depositing your Lock into an Auto-Strategy mitigates the decay as your STELLA is continually compounded to ensure it is not affected by daily decay.
{% endhint %}

Here’s a step-by-step guide to start voting:

### Step #1: Select a Pool(s)

Go to **Vote** page and you can see a list of pools to vote on. You should select the pool(s) that you want to vote on. You can select a single pool or multiple pools by clicking on the Select button.

{% hint style="info" %}
Voting on a pool will entitle you to the trading fees that pool generates. For example, voting only for STELLA-GLMR means you'll share in the cumulative trading fees for the epoch.If *no one else* votes for STELLA-GLMR, you'll technically earn **all trade fees** for STELLA-GLMR pool.
{% endhint %}

Once you've selected the pools, it should show that you've **Selected** the pools in green.

<figure><img src="/files/Z7vQp8s9VRqX7q8bGl2u" alt=""><figcaption></figcaption></figure>

### Step #2: Click on Vote

Once you've selected your pools, click on `Vote` (Bottom right hand corner) to finalize your selection and prepare the onchain transaction.

<figure><img src="/files/l89kOJ97nqOA8GmG5GHB" alt=""><figcaption></figcaption></figure>

### Step #3: Select Voting Weight for Pool(s)

A pop-up will appear that will allow you to finalize the voting weight. If you're only voting for a single pool, selecting a **100%** weight means that all voting power goes to that pool.

Voting for multiple pools require you to select a weight for each pool. For example, if you're voting for 2 pools with equal weight, then each pool will receive a 50%/50% weight.

{% hint style="info" %}
Make sure that the total voting weight adds up to 100%. This ensures all your voting power goes into the selected pools so you can maximize your earnings.
{% endhint %}

<figure><img src="/files/vLPJYqaTtPemJnB01nGr" alt=""><figcaption></figcaption></figure>

Once you've finalized the weight, you can select the `Vote` button to initiate an onchain transaction.

{% hint style="info" %}
Your Votes are final and once the onchain transaction goes through, you **cannot reverse it** until the epoch ends.
{% endhint %}

### Step #4: Check Lock Dashboard

Once the onchain transaction has gone through, the status of your lock should reflect as **Voted** :white\_check\_mark: under your [Lock dashboard](https://app.stellaswap.com/vestella?tab=lock).

<figure><img src="/files/vgZ1pxtqnDS2f0BhQ47d" alt=""><figcaption></figcaption></figure>


# Liquidity Staking

Guides for Interacting with our DEX


# Add Liquidity (Manual)

Step by step guide to adding liquidity in Pulsar

Adding liquidity in Pulsar AMM V3 or concentrated liquidity is similar to standard AMM with just a few more steps. Here's what you'll need;\
\
1\. Pair of tokens to add liquidity (*e.g. GLMR + DOT if you select GLMT-DOT farm*)\
2\. GLMR to pay **gas** transaction

<figure><img src="/files/Cl7t2vYx3xjAvtfcaRrG" alt=""><figcaption></figcaption></figure>

Adding liquidity in Pulsar AMM V3 or concentrated liquidity is similar to standard AMM with just a few more steps. Here's what you'll need;\
\
1\. Pair of tokens to add liquidity\
2\. GLMR to pay gas transaction

### Step 1: Create New Position

In Pulsar Pools page, click on `+ New Position` or click on a featured pool's `Deposit` button.

<figure><img src="/files/ODW0dUrBFxzMPY2Tk1FN" alt=""><figcaption></figcaption></figure>

If you have an existing position in the same farm you will see this pop-up otherwise you will get to the one-pager to add liquidity directly. `Click on Create New Position`

<figure><img src="/files/hSWFdeRDNGnp5c03H1nP" alt=""><figcaption></figcaption></figure>

### Step 2: Select a Pair

Now you can select a pair by choosing tokens or from clicking any of the popular pairs. Once done, the next section will be auto-shown.

<figure><img src="/files/hqmlguQjZW1eh4e5UVmj" alt=""><figcaption></figcaption></figure>

<figure><img src="/files/mfvFwbAH1QczjK53nhEb" alt=""><figcaption></figcaption></figure>

### Step 3: Select Range

Selecting range is a crucial step and would directly affect [risk and return](https://docs.stellaswap.com/product/pulsar-concentrated-liquidity/faq/what-is-impermanent-loss) so choose carefully. You will have a list of ranges on the left with potential risk and profit to choose from, the smaller the range the more potential return. However that would also mean you will need to actively manage the position and might be out of range if the price of the token changes.

So for most users the standard range is **recommended**.&#x20;

<figure><img src="/files/J35PaT3WAxVG4iRUHWTo" alt=""><figcaption></figcaption></figure>

<figure><img src="/files/hK0aphXnjjfKWJLLlqM3" alt=""><figcaption></figcaption></figure>

If you click on `Expert` option you can set your own range on the right by manually inputting the minimum and maximum price.&#x20;

<figure><img src="/files/IYCXDQofBSplwM4qwIEt" alt=""><figcaption></figcaption></figure>

<figure><img src="/files/xwc7uVk4PsRfyrZuXOqf" alt=""><figcaption></figcaption></figure>

Once you have selected the range you want to go with, move on to the next section.

### Step 4: Enter Amount

Input the amount you would like to provide as liquidity. Bear in mind that the deposit ratio isn't usually 50/50, so you'll often need a greater amount of one token. You can use our Swap page to get the necessary input that is ideal to you.

<figure><img src="/files/E34aydVKXHlL6HrnQMS5" alt=""><figcaption></figcaption></figure>

A pop-up message will appear with your selected position, amount and range. Double check the numbers and click `Confirm Supply`. Then confirm your wallet transaction. If you are adding liquidity for the first time you will need to aprove contract first.

<figure><img src="/files/2pTqOlIXxMocNJufkP8Y" alt=""><figcaption></figcaption></figure>

<figure><img src="/files/cZ5GYxljhzc578JGeEOp" alt=""><figcaption></figcaption></figure>

Once done click on `Review & Confirm`

A pop-up message will appear with your selected position, amount and range. Double check the numbers and click `Confirm Supply`. Then confirm your wallet transaction. If you are adding liquidity for the first time you will need to aprove contract first.

### Success! You Have Managed to Add Liquidity

Once the transaction is confirmed you will see this unique NFT representing your position. Once you've successfully created an LP position, you're earning immediately!&#x20;

{% hint style="info" %}
Thanks to advances in our rewarding infrastructure, we've removed the need for you to "farm" to start earning rewards. Immediately after you've provided liquidity you'll be earning.
{% endhint %}

<figure><img src="/files/biitsTX4oHmpl8FORKfE" alt=""><figcaption></figcaption></figure>

You can also go to Dashboard by clicking `View Portfolio` to view and manage your position.&#x20;

<figure><img src="/files/Vcvih71QC4a6XUshQ1Uc" alt=""><figcaption></figcaption></figure>


# Add Liquidity (Auto)

You can automate the management of your liquidity positions to ensure that it never goes out-of-range (OOR). We've partnered with the top ALM, Beefy, to support StellaSwap pools!

Here's what you'll need;\
\
1\. Any or both token (*e.g. GLMR + DOT if you select GLMT-DOT farm*)\
2\. GLMR to pay **gas** transaction

### Step 1: Select a Pool and Pick "Auto" Strategy&#x20;

Go to our [Pool](https://app.stellaswap.com/pulsar) page and select any pool that you're interested to deposit in.

<figure><img src="/files/UTySMcm4e3LfP9MdrE4F" alt=""><figcaption></figcaption></figure>

Once you've clicked on a pool, select the "Auto" strategy. Auto vaults manages your LP positions for you so you're always earning (never go out-of-range), and it is run by **Beefy**, the leading ALM in DeFi.

<figure><img src="/files/viFkNw05HhKwgv2H3p13" alt=""><figcaption></figcaption></figure>

### Step 2: Deposit Both or Single Token into Vault

Select the token that you wish to deposit. What's great about Beefy is that it allows you to deposit both tokens or a single-token, so you don't have to worry about depositing!

<figure><img src="/files/q79ZvjaWP7dBRw2NjqZx" alt=""><figcaption></figcaption></figure>

Once you've selected the tokens to deposit, you can click on **Deposit** button. You're done!

<figure><img src="/files/JaAafzkkQIIkV0MjxSxu" alt=""><figcaption></figcaption></figure>


# Create Limit Orders

{% tabs %}
{% tab title="Overview" %}
Pulsar's robust infrastructure now allows you to add an important tool in your trading arsenal; limit orders.&#x20;

Similar to an orderbook system of centralized exchanges (CEXs), limit orders allow you to buy/sell an asset at a specific predetermined price, allowing the order to be filled at an indeterminate time in the future.

With limit orders on StellaSwap's V3, users can now create limit orders decentrally by providing a single asset as liquidity within a specific range.

<figure><img src="/files/x5mHx9PXESDObwEVH5ru" alt=""><figcaption></figcaption></figure>

### Out-of-Range (OOR) is Your Friend

Creating limit orders entail the use of **deliberately** being [OOR](https://docs.stellaswap.com/product/pulsar-concentrated-liquidity/faq/what-is-out-of-range).&#x20;

Previously, a normal liquidity position goes OOR when the market price falls outside of your initial price range that you set when adding liquidity.

> For example, if you provided liquidity for GLMR-USDC pool at a range of $0.30 - $0.60 at the start and after a few days, the market price goes to $0.70, then your position is considered "*Out-of-Range*".&#x20;

Although *accidental* OOR isn't good (since you need to amend your positions), *intentional* OOR for limit orders serves a vital tool in allowing you to mitigate your risks.

With this new enhancement, you could create an OOR position from the outset. All you need is a single asset! While you would not be getting any rewards when you are out of range; there is an important function enabled by this OOR position which are limit orders.

### What's a Limit Order?

In centralized trading, a limit order is a specified price for selling an asset that would only be triggered once the asset reaches set price in the order.&#x20;

> In simple words, creating a conditional trade that only executes if the price for an asset reaches the predetermined point. An example is creating a limit buy order for BTC at $40,000; your buy order **only executes** if BTC;s price reaches $40,000.

Since a DEX is fundamentally different compared to a traditional orderbook system, a new way to achieve the same outcome of limit orders need to be created.&#x20;

> Example: Price for 1 GLMR is now $0.26. If I'm holding USDC and is keen to buy GLMR only below $0.25, I can do so by providing OOR to the pair and set my range to below $0.25. Therefore, my liquidity would only be utilized once it is in range. The best part is that I would only be providing USDC since my OOR is below the current price!

The opposite can also be done, where you could provide GLMR and only **sell** it at a certain price higher than the prevailing market price; AKA sell limit order.&#x20;

> Example: You could create a position on GLMR-USDC pair that only sells GLMR for at least $0.3 by setting the range to that amount. In this case you would only be providing GLMR tokens when depositing liquidity.
> {% endtab %}

{% tab title="Buy Limit Orders" %}

### How To Create a Buy Limit Order with OOR

(Context: Buying GLMR below market price)

**Step 1:** On Pulsar click + New Position button, or Deposit on desired pool.

<figure><img src="https://lh5.googleusercontent.com/YF17GDbBZLYdywiGtcljmlMubVt3a8tqswG7V-5TtZ2elFnQvnlQVOEg_82--4GjjExSbiXirBMghZJgwQlbE9-_uH7jZNwmt873QqsyNUCCa57lwzYCnZ4zUVnw5PL-jl8IZR2OH0blNWQeW6YG4s4" alt=""><figcaption></figcaption></figure>

**Step 2:** On the `Add Liquidity` page, select your pair and choose **expert** on `Select Range` to set a custom OOR position.

<figure><img src="https://lh5.googleusercontent.com/1h3JbtOBDXHKLZbTWhPzmAFVRQD_tMvXXRqJ8bxcT3QlPGrV_kppbt-fJhPrpnXajyF3JHOIKS2CUUH6cm0sR9EB5XnoaxhLJd2j00Tq5e9SEBmC2TnLIgxUFScmRW1pGl4fqU2HtXAal8LY3Djnstc" alt=""><figcaption></figcaption></figure>

**Step 3:** Set your range manually. The current price for GLMR when making this tutorial is 0.266 USDC. Therefore, we will select a lower `max price`.&#x20;

<figure><img src="https://lh4.googleusercontent.com/fzQRSMQtzAYFP31uRT1N3riMbKlcGk0_lTtCdQodKHm-ID85f3aEE3qL_LqIfu6nYdhyDz4UqMH3gwkp3xgpB2KcxOvY1Xw4TcvwI51jzKGVZmmio1EWMNYviQAYViWqpdfQynI6ARJRF7K0yHRRf5k" alt=""><figcaption></figcaption></figure>

**Step 4:** Input the amount you want to deposit. Since we are going below the current price, we will only be able to deposit USDC. The GLMR amount field won’t be available to input.

<figure><img src="https://lh4.googleusercontent.com/frEvW4uLQw3z05d8DAssrwR2DeFjHr1gvqArmz5FwkDstqySNUlvXTTlDZ4pw719Kr9oQ9Gs_QUbaZ23uZE3NLDxr5OS6p-WF2_Px9HczUdMs11iHnDlq9VAy3ky5f8zjLgebeX2M8O2E1SBfiSjwDk" alt=""><figcaption></figcaption></figure>

You should see the deposit ratio to be 100% in USDC.

<figure><img src="https://lh6.googleusercontent.com/Kwo06Yxo-NzVRtadJXdo2enhbEwgB_d-EwC-fHVu-9j08CGwJ02vSIde_g8UDs-aVoaiU08cRcQevda1Q_-ZSctNmR0eyoAlUG4VFHR0Al_0VQ3s7zvOvPOUw7POvj1-r87G6MT58XnNIVrf8ouU5T8" alt=""><figcaption></figcaption></figure>

**Step 5:** Click on Review & Confirm to proceed, double check information and Confirm Supply

<figure><img src="https://lh3.googleusercontent.com/xWcRCymPyzstLO0gV-zjeyCOdNTXdNWeyz3rrJmdOaX-hz3qSMClgsSCbPVFrJvEfOvU8ZgJew1ijPbH6HHN96pmpfOYL0KFsFaJvy8F8orfNoVAzJiWgzWdb4MH8boUz4T155thtloidCI-WjN5Imw" alt=""><figcaption></figcaption></figure>

That’s it you now have OOR limit order position that will be triggered once price hits your set range.&#x20;

**Note:** While your position is OOR you will not be earning trade or farm rewards. However, once it gets in range you will start earning, so you could stake your OOR position in the farm.

<figure><img src="https://lh5.googleusercontent.com/Jv_wfv-e86YSZ42UUBFHPZnoKfv48-uNNZLeP10o8aBf3c2BuKo61w18FVmexzE4u52ERVdIqSc9CUz5JdGDsrz3tQu3dWupEaGo7yB37D17Cx28qapQBcb1miqmfH80V95o8ObIu_3X7DgUz2HZUhk" alt=""><figcaption></figcaption></figure>
{% endtab %}

{% tab title="Sell Limit Orders" %}

### How To Create Sell Limit Order on Pulsar

(Context: Selling GLMR above market price)

**Step 1:** On Pulsar click + New Position button to create new position

<figure><img src="https://lh5.googleusercontent.com/YF17GDbBZLYdywiGtcljmlMubVt3a8tqswG7V-5TtZ2elFnQvnlQVOEg_82--4GjjExSbiXirBMghZJgwQlbE9-_uH7jZNwmt873QqsyNUCCa57lwzYCnZ4zUVnw5PL-jl8IZR2OH0blNWQeW6YG4s4" alt=""><figcaption></figcaption></figure>

**Step 2:** On the add liquidity page, select your pair and choose expert on Select Range to set a custom OOR position.

<figure><img src="https://lh5.googleusercontent.com/1h3JbtOBDXHKLZbTWhPzmAFVRQD_tMvXXRqJ8bxcT3QlPGrV_kppbt-fJhPrpnXajyF3JHOIKS2CUUH6cm0sR9EB5XnoaxhLJd2j00Tq5e9SEBmC2TnLIgxUFScmRW1pGl4fqU2HtXAal8LY3Djnstc" alt=""><figcaption></figcaption></figure>

**Step 3:** Set your range manually. The current price for GLMR when making this tutorial is 0.265 USDC. Therefore, we will select a higher min price.

<figure><img src="https://lh4.googleusercontent.com/pcG1wLcDSwOD5nUfW5lWtnZaZpulF8YpenAgzDZBeCIMNEMPD34N9u1KmG4Y9rPGGbca6Hbyv8RgPO8zhUiLr5fTkorm4zZefrTEYByoytg5tBr_SRZaq7LgzP3m30iDDfECgqWDawcvuclZ8GKdn0M" alt=""><figcaption></figcaption></figure>

**Step 4:** Input the amount you want to deposit. Since we are going above current price, you will only be able to deposit GLMR. The USDC field will not be available to select.

<figure><img src="https://lh3.googleusercontent.com/BlU1uENJcHH9K-26qLyAHtp6PYZjfEDPEtPu6cC3OBsM0iqA7lvrD1Tzp0Gecam3tYm83qTxSmm--fM9zkPNQFa0RymbHF6ecqOM77UpYFyPMNjVQzNsUNkNWm95jtkJPVXIjbfBE_To_cs83coOjJc" alt=""><figcaption></figcaption></figure>

The deposit ratio should be 100% in GLMR.&#x20;

<figure><img src="https://lh3.googleusercontent.com/uB5JRK5EmMibbuDMPBzb7lt7LJnYHRA_SbixJ9wb66U2V65VMGGrT_o8RuzhhIis2J181kE_-5Tl8Y6rcZnSGzGJAX_zkrCLmJqnTDaQcJHKY06cn5NFQwecaQpuG9msrmtVUL2KnC4413Lm6yfSTVk" alt=""><figcaption></figcaption></figure>

**Step 5:** Click on Review & Confirm to proceed, double check information and Confirm Supply

<figure><img src="https://lh5.googleusercontent.com/Dp-0JCe3hHwKsa_4iA4kvseicYdum_pyNiGGcEg1DwllGKh8b1m73nOFBfe25JKJMtrbtwRt0wwpzObIXH9Y1GeLZbXtT8esF2AfJVzUK98RG0ZeImEaddbKkrgqMehL0hCdAJjkuN2BSTspGiLLBcg" alt=""><figcaption></figcaption></figure>

You now have OOR limit order position that will be triggered once price hits your set range!

**Note**: while your position is OOR you will not be earning trade or farm rewards. However once it gets in range you will start earning, so you could stake your OOR position in the farm.

<figure><img src="https://lh3.googleusercontent.com/pHT7j17rGkG2HRfc-bvCdQk3UNjcL6MfOTHTByzC4MGtuteLbwksSeelo6UDxEaBKJeAHY1Csf-oLQjumESIjbuWBOZzSjMj850sQBYq6S38Jw5RgCBWACqofmSh_gNcdKtGPv5VcUR5yR73bL6H1G4" alt=""><figcaption></figcaption></figure>

<br>
{% endtab %}
{% endtabs %}


# Create Community Pool

A new tab in Pulsar just appeared labeled as Community Pools. Featured Pools is where bluechip and partner farms exist, community pools is the place where a group or an individual can launch their own farm and have it appear on community pools tab for others to see APRs and join.

<figure><img src="/files/qI1qjxBUqUcjluw1Lvct" alt=""><figcaption></figcaption></figure>

Here is how to create a community pool

### Step 1: Create New Position

On Pulsar, click `+ New Position` to create a new position.

<figure><img src="/files/O3ZCIVlmqAzAMcWDf1mX" alt=""><figcaption></figcaption></figure>

### Step 2: Choose Pair

You will be directed to Add liquidity page, select the two tokens you want to create a pair for.

<figure><img src="/files/TDel5SuTxn8vic1lZELk" alt=""><figcaption></figcaption></figure>

### Step3: (Only applicable for new pairs) Set Initial Price

If you happen to be the first to provide liquidity for this pair ever, you will need to set the initial price for it. Our pair of choice is FRAX-DOT, and the initial price was extrapolated form USDT-DOT. Just enter how many A tokens needed to buy 1 B token to set the price.

<figure><img src="/files/SHTECGz2Ox4KKxIgI4PK" alt=""><figcaption></figcaption></figure>

### Step 4: Select Range

Here you can select your range in relation to the current price. Hover over each range to see the description. the recommended range to go with is standard.

<figure><img src="/files/OoVWoXgOmZWsGtcwmBkP" alt=""><figcaption></figcaption></figure>

### Step 5: Deposit Amounts

Input the desired amounts you want to deposit. The ratio between tokens is affected by your selected range.

&#x20;

<figure><img src="/files/pzCKBNb5IrUPlTxA9lih" alt=""><figcaption></figcaption></figure>

### Step 6: Review & Confirm

Click on `Review & Confirm` to proceed, a pop-up will appear with your choices, double check your selection and click `Confirm Supply`. Then Sign the wallet transaction

<figure><img src="/files/7lYOImfJ6C32nbNILMl8" alt=""><figcaption></figcaption></figure>

### Success! You have created your position, if your pool  has over $100 worth of liquidity it will automatically be populated in community pools.

<figure><img src="/files/qebvK0fhRSbCuVvtFuQx" alt=""><figcaption></figcaption></figure>

Now other users and your community can see your pool, if there are swaps utilizing your pool you will see APR from trade fees. And anyone who clicks `Deposit` can enter your pool.

<figure><img src="/files/2t9ArnU1o4asqBJbc6zr" alt=""><figcaption></figcaption></figure>


# Migrate Liquidity From V2 to Pulsar

How to use the liquidity migrator tool to easily transfer your V2 LP to V3

<figure><img src="/files/USxMw7qnJfZkFNQdzUjf" alt=""><figcaption></figcaption></figure>

### Step1: Click to Migrate LP

More than one way to migrate your liquidity, either head to the link the banner on farm page, or find your V2 farm that you want to migrate and click `migrate LP to Pulsar` on that farm.

<figure><img src="/files/MZ0DId0vhhwPTpRq77RI" alt=""><figcaption></figcaption></figure>

### Step 2: Confirmation Pop-up

A confirmation pop-up will come up, asking you to only proceed if you have already unstaked tokens from farm, as migrating will not work if you are still in farm. If you have already unstaked proceed to migration tool. If not click No, and unstake from farm first.

<figure><img src="/files/9Q4ArJQHUrAUWNnADPoo" alt=""><figcaption></figcaption></figure>

### Step 3: Unstake From Farm

To unstake from farm click on MAX and Unstake, then sign the confirmation transaction. Simple as that.

<figure><img src="/files/S8xbO7RPacHFFmJ1aO5m" alt=""><figcaption></figcaption></figure>

### Step 4: Migrate Now

After you unstake successfully, click on Migrate LP to Pulasr and click on Migrate Now to head to migration tool. On the page you will see your V2 positions ready for migration, click on it to expand and then click migrate.

<figure><img src="/files/PheVl7s7sWjhdyLkRf5y" alt=""><figcaption></figcaption></figure>

### Step 5: Choose Range

In this step you have to choose the range you want to provide we recommend going with conservative range. Feel free to read more about Pulsar and setting ranges.&#x20;

<figure><img src="/files/ZEhnUrmuYJKl5QgeNByp" alt=""><figcaption></figcaption></figure>

After choosing range click on approve to approve contract, once done sign the transaction and you will have successfully migrated your liquidity to Pulsar.&#x20;


# Manage Out of Range Position

With Pulsar your already existing position might come out of range due to price action. This means that that you will **no longer be receiving swap fees or farm rewards**. Here is how to rectify an out of range position.

{% hint style="warning" %}
If your position is ***out-of-range,*** you WILL NOT earn any trade fees or farm rewards. It is important to re-manage your positions to be in range to start earning.&#x20;

In the event the market price goes outside of your LP's price bounds, your position will be singularly concentrated in the less valuable asset. For example, if you provided liquidity between the price range of $0.30 — $0.60 for GLMR/USDC and GLMR falls to $0.25, then your position will be **entirely** concentrated in GLMR. Conversely, if GLMR appreciates to $0.80, then your balance will be **entirely** concentrated in USDC.&#x20;
{% endhint %}

### Step 1: Identify Out of Range Position

Head to Dashboard page, you can see the status for In range and Out of range positions

<figure><img src="/files/39gIkyka8N8JlawaoC4C" alt=""><figcaption></figcaption></figure>

### Step 2: Remove Liquidity

Click on the Out of range position and remove liquidity. If you have deposited your NFT in farm withdraw liquidity from farm by clicking on `Claim & Withdraw` at the bottom then proceed to remove liquidity by clicking `Remove`&#x20;

<figure><img src="/files/bWYvurVa9j57NxnVwQoN" alt=""><figcaption></figcaption></figure>

<figure><img src="/files/VBFxlckO1VqNRsbcWUug" alt=""><figcaption></figcaption></figure>

### Step 3: Add In Range Liquidity

Re-do the steps for [adding liquidity](https://docs.stellaswap.com/how-to-guides/pulsar/add-liquidity) and add it in range.


# Cross-Chain Swap

Step by step guide to using 0xSQUID widget to swap assets cross-chain across Moonbeam and other EVM chains

[StellaSwap have partnered with Squid and Axelar to give its users Cross-Chain swaps](https://medium.com/@squidrouter/moonbeam-users-rejoice-stellaswap-enables-seamless-cross-chain-swaps-via-squid-and-axelar-b28e39ba1ae4). Here is how to use it. In this guide we are swapping MATIC on Polygon to GLMR on Moonbeam.

<figure><img src="/files/odLZ5EUXr2AB5u209Z1M" alt=""><figcaption></figcaption></figure>

### Step 1: Open Cross-Chain Swap Widget

Navigate to StellaSwap swap page and click the toggle `Cross-Chain Swap` or directly open <https://app.stellaswap.com/exchange/cross-chain-swap>.

<figure><img src="/files/UlT52HjX0GZEuieBqldZ" alt=""><figcaption></figcaption></figure>

### Step 2: Select Chains and Assets

Once on Cross-Chain swap page select your source asset and source chain, we have chosen Polygon and USDC. then select your output chain and asset. we have chosen GLMR on Moonbeam so simply buying GLMR using USDC.

<figure><img src="/files/s49FUW1n1Nex5NYnMEsk" alt=""><figcaption></figcaption></figure>

### Step 3: Enter Amount&#x20;

At this point you might get asked to switch to source network, click `Switch Network` and approve confirm in your wallet. Enter the amount you would like to swap and Click `Submit.`

<figure><img src="/files/tILPoL8EbpzJYNSFLeAK" alt=""><figcaption></figcaption></figure>

### Step 4: Confirm Transaction

Once you click Submit you will get few wallet transactions to sign including approving contract and sending tokens.

<figure><img src="/files/Co2lCIwQorfpgxTEfbFe" alt=""><figcaption></figcaption></figure>

### Step 5: Follow Progress

Your tokens are on their way, you can follow the progress at the bottom of the page and see the estimated usual time for your transaction type. As soon as you get all green ticks your transaction is done!

Now we have GLMR on Moonbeam coming from USDC on MATIC.

<figure><img src="/files/ye3UnGcpe4tcvdtsg24b" alt=""><figcaption></figcaption></figure>


# Wallet & Network

Guides around wallet and network connection


# Create and Fund Polkadot .js Wallet

This guide will take you through setting a Polkadot Wallet and funding it through Binance. A necessary step before being able to use XCM cross bridge to send assets to XC-20 assets to Moonbeam.

### Step1: Open Polkadot Dashboard

Head to <https://polkadot.js.org/apps/#/accounts>. Click on `Polkadot-js extension` to download if you don't already have one.&#x20;

![](/files/FNFQPukmmDK6DQ04OSj6)

### Step2: Connect to Polkadot

After creating or importing your wallet in Polkadot .js extension, click on the three dots to open options and select `Polkadot` as network.

![](https://lh6.googleusercontent.com/oVHihDfcJPQI5SnVWzlKdMFIeFSb7d78mGRyLOMpBF_vQI2IV9PZlP-u1BgvlKL_uGztnV7zzjn0vR_ce25meDVPQOIbjx-A0ny6faSWwn6mbSuGyoCaHGn9GjO151chIGmxR7Y)

### Step 3: Copy Address

Once on Polkadot network, copy your address by clicking the `copy` icon&#x20;

![](https://lh5.googleusercontent.com/MEeC4uzlezlFqb1Va3nkmQMSp3DQ1ZT6_lc-czJKacVdbpGyhmM1Y5ASvw2PYhKSKW6JO518Rxi2kUFa3s3963P600dRRnoSagKSdqILBGMcaxXaboZz3qfk8QTgTQwP6wZeOE4)

### Step 4: Find Polkadot on Binance

On Binance, head to spot wallet. Look for Dot and click `Withdraw`

![](https://lh5.googleusercontent.com/DIh3xHcbOS3Cc6BtuEpki4CnBAk4lf19r40MfuMa660eK4rcyd_INekUoJj6-HGCbqG9PK361mNMsUuP0cqpc51KPjZ1XxttAXoSc1Wvb7Dy5pScJyDpQUDFFQKjWuC17LfxK4I)

### Step 5: Fill Withdrawal Information

Paste your copied address, make sure network is set to Polkadot (DOT), then input the amount and confirm withdrawal.

![](https://lh4.googleusercontent.com/eGlESw4d1AaPLWsZ--KZIGjZ6hBO27DG9CsS1oQHNfBbm4QJCROdY2bMvEeNjZmkPkANegxogIYaefpGKDqwP5gScXrMbwFvr8-T0zGkzCtINq_lQrm-bXIr3j5-Fih9gpN6kCM)

### Success!&#x20;

Once transaction is confirmed you can find your DOT in the wallet. Continue to this [guide ](https://docs.stellaswap.com/resources/how-to-guides/bridge/how-to-send-polkadot-dot-to-moonbeam-using-xcm)to learn how to send DOT assets to Moonbeam network.&#x20;


# Create Metamask Wallet

Here's the exact process in creating your Metamask wallet:

### Step #1: Install Metamask Extension

First, we start with a fresh and default [MetaMask](https://metamask.io/) installation from the Chrome store. After downloading, installing, and initializing the extension, follow the **Get Started** guide. In there, you need to create a wallet, set a password, and store your secret backup phrase (this gives direct access to your funds, so make sure to store these in a secure place).

Step #2: Create a Wallet

After installing [MetaMask](https://metamask.io/), the setup will automatically open a new task with a welcome screen. Click **Get Started** to begin the setup process.

![](/files/SoFjGxEOh154A9lMjHe3)

When prompted, you are given the option to import a wallet using a recovery seed phrase. For this exercise, set up a new wallet.

![](/files/aQg3Bq5aNj1TjvwFwWHJ)

### Step #3: Import Account (If you have an existing Metamask Wallet)

Instead of creating an account, you also have the option of importing any account into MetaMask you hold the private keys to. For this example, you'll import a development account.

![](/files/cglBbUPkByDX4gl5ClnN)

On the import screen, select **Private Key** and paste in your keys.&#x20;

![](/files/DV0VWXdI5FuJ61qmaOKC)

You should end up with an imported **Account 2** that looks like this:

![](/files/kPFReUnCSXn68qD6MJWE)


# Connect Metamask to Moonbeam

If you do not have MetaMask installed, or would like to follow a tutorial to get started, please check out our Metamask Creation guide.

If you already have MetaMask installed, you can easily connect MetaMask to Moonbeam by manually providing the network information as such:

* Network Name: `Moonbeam`
* RPC URL: `https://rpc.api.moonbeam.network`
* ChainID: `1284` (hex: `0x504`)
* Symbol (Optional): `GLMR`
* Block Explorer (Optional): `https://moonscan.io`


# Token Address List for Manual Import

For users that are trying to manually input the individual token addresses, please find the list of tokens on Moonbeam here:

<table><thead><tr><th width="209.57142857142856">Token</th><th>Contract Address</th></tr></thead><tbody><tr><td>STELLA</td><td>0x0E358838ce72d5e61E0018a2ffaC4bEC5F4c88d2</td></tr><tr><td>xSTELLA</td><td>0x06A3b410b681c82417A906993aCeFb91bAB6A080</td></tr><tr><td>WGLMR</td><td>0xAcc15dC74880C9944775448304B263D191c6077F</td></tr><tr><td>DAI.multi | Multichain</td><td>0x765277EebeCA2e31912C9946eAe1021199B39C61</td></tr><tr><td>ETH.multi | Multichain</td><td>0xfA9343C3897324496A05fC75abeD6bAC29f8A40f</td></tr><tr><td>ETH.mad | Nomad</td><td>0x30D2a9F5FDf90ACe8c17952cbb4eE48a55D916A7</td></tr><tr><td>USDC .multi | Multichain</td><td>0x818ec0A7Fe18Ff94269904fCED6AE3DaE6d6dC0b</td></tr><tr><td>USDC.mad | Nomad</td><td>0x8f552a71EFE5eeFc207Bf75485b356A0b3f01eC9</td></tr><tr><td>xcDOT (Polkadot)</td><td>0xFfFFfFff1FcaCBd218EDc0EbA20Fc2308C778080</td></tr><tr><td>USDT.multi | Multichain</td><td>0xeFAeeE334F0Fd1712f9a8cc375f427D9Cdd40d73</td></tr><tr><td>WBTC.mad | Nomad</td><td>0x1DC78Acda13a8BC4408B207c9E48CDBc096D95e0</td></tr><tr><td>WBTC.multi | Multichain</td><td>0x922D641a426DcFFaeF11680e5358F34d97d112E1</td></tr><tr><td>BUSD.multi | Multichain</td><td>0xA649325Aa7C5093d12D6F98EB4378deAe68CE23F</td></tr><tr><td>BNB.multi | Multichain</td><td>0xc9BAA8cfdDe8E328787E29b4B078abf2DaDc2055</td></tr><tr><td>MATIC (anyMATIC | Multichain)</td><td>0x3405a1bd46b85c5c029483fbecf2f3e611026e45</td></tr><tr><td>FTM (anyFTM| Multichain)</td><td>0xC19281F22A075E0F10351cd5D6Ea9f0AC63d4327</td></tr><tr><td>AVAX  (anyAVAX | Multichain)</td><td>0x4792C1EcB969B036eb51330c63bD27899A13D84e</td></tr><tr><td>CELR (Celer Network)</td><td>0x3795C36e7D12A8c252A20C5a7B455f7c57b60283</td></tr><tr><td>ceUSDT (Celer USDT)</td><td>0x81ECac0D6Be0550A00FF064a4f9dd2400585FE9c</td></tr><tr><td>ceBUSD (Celer BUSD)</td><td>0xCb4A7569a61300C50Cf80A2be16329AD9F5F8F9e</td></tr><tr><td>BCMC (Blockchain Monster Hunt)</td><td>0x8ece0d14d619fe26e2c14c4a92c2f9e8634a039e</td></tr><tr><td>ATOM (axATOM | Axelar)</td><td>0x27292cf0016E5dF1d8b37306B2A98588aCbD6fCA</td></tr><tr><td>LDO</td><td>0x9Fda7cEeC4c18008096C2fE2B85F05dc300F94d0</td></tr><tr><td>xcINTERLAY</td><td>0xFffFFFFF4C1cbCd97597339702436d4F18a375Ab</td></tr><tr><td>xcaUSD</td><td>0xfFfFFFFF52C56A9257bB97f4B2b6F7B2D624ecda</td></tr><tr><td>MAI</td><td>0xdFA46478F9e5EA86d57387849598dbFB2e964b02</td></tr><tr><td>Frax (Cannonical)</td><td>0x322E86852e492a7Ee17f28a78c663da38FB33bfb</td></tr><tr><td>UST (axUST | Axelar)</td><td>0x085416975fe14C2A731a97eC38B9bF8135231F62</td></tr><tr><td>ApeCoin (anyAPE | Multichain)</td><td>0x3D632d9e1a60a0880Dd45E61f279D919b5748377</td></tr><tr><td>STELLA-GLMR           </td><td>0x7F5Ac0FC127bcf1eAf54E3cd01b00300a0861a62</td></tr><tr><td>USDC-USDT</td><td>0x8BC3CceeF43392B315dDD92ba30b435F79b66b9e </td></tr><tr><td>DAI-USDC</td><td>0x5Ced2f8DD70dc25cbA10ad18c7543Ad9ad5AEeDD </td></tr><tr><td>USDC-BNB</td><td>0xAc2657ba28768FE5F09052f07A9B7ea867A4608f </td></tr><tr><td>USDC-GLMR</td><td>0x555B74dAFC4Ef3A5A1640041e3244460Dc7610d1 </td></tr><tr><td>STELLA-USDC</td><td>0x81e11a9374033d11Cc7e7485A7192AE37D0795D6 </td></tr><tr><td>GLMR-ETH</td><td>0x49a1cC58dCf28D0139dAEa9c18A3ca23108E78B3 0</td></tr><tr><td>BUSD-GLMR</td><td>x367c36dAE9ba198A4FEe295c22bC98cB72f77Fe1 </td></tr><tr><td>STELLA-AVAX</td><td>0x2AB268c6025F7Cd76A4B6a8A5bc7fE780Fbbfe98 </td></tr><tr><td>AVAX-GLMR</td><td>0x2F412C140080039eaF9dE01c95e84cFb1c8D98aD </td></tr><tr><td>wBTC-GLMR</td><td>0x4CDf77828b839506bF6B6e219017B65623042400 </td></tr><tr><td>MATIC-GLMR </td><td>0x6775ff3828a19EB5926C0C4D572183cA15Aa4C08 </td></tr><tr><td> STELLA-MATIC</td><td>0xF69F219ad163d66e7300731AF3C6b9E5B44954B9 </td></tr><tr><td>USDC-ETH</td><td>0x0Aa48bF937ee8F41f1a52D225EF5A6F6961e39FA </td></tr><tr><td>GLMR-FTM      </td><td>0x2Afab635EA2DC4B498EF1C00E63b7a7dBa9c93C6 </td></tr><tr><td>USDC-FTM</td><td>0x077Fc7B4455050249D7F5511ED588a665E03e6C5 </td></tr><tr><td>ceUSDT-BNB</td><td>0x2f6F833fAb26Bf7F81827064f67ea4844BdEa03F </td></tr><tr><td>ceUSDT-ceBUSD</td><td>0xEc8aC4CCBBAe310f9e83D102b35178d6C10EDFeA </td></tr><tr><td>BCMC-GLMR</td><td>0x6f71389426efe6fF4e357Ca6DD012B210A6a3c9c </td></tr><tr><td>GLMR-LUNA</td><td>0xe2bfe2f1437f249b15b7111011219995ecc43155 </td></tr><tr><td>UST-GLMR </td><td>0xb6835036C9A2A96D3BfB8DBE1722971fEb456a83 </td></tr><tr><td>ATOM-GLMR </td><td>0xf4C10263f2A4B1f75b8a5FD5328fb61605321639 </td></tr><tr><td>ATOM-USDC </td><td>0x051FcF8986B30860a1341e0031e5622Bd18d8A85  </td></tr><tr><td>ceUSDT-ceWBTC </td><td>0xAac208af698A620047EBe75C50A4fd8d71192731 </td></tr><tr><td>WBTC.mad-GLMR xc</td><td>0xE28459075c806b1bFa72A38E669CCd6Fb4125f6a </td></tr><tr><td>DOT-GLMR </td><td>0xa927E1e1E044CA1D9fe1854585003477331fE2Af </td></tr><tr><td>madETH-GLMR </td><td>0x9d19EDBFd29D2e01537624B25806493dA0d73bBE </td></tr><tr><td>madUSDC-GLMR R xcaUSD-GLMR xcINTR-GLMR LDO-GLMR</td><td>0x9bFcf685e641206115dadc0C9ab17181e1d4975c </td></tr><tr><td>CRYSTL-GLMR </td><td>0x48F2D5f75Ce88a1acd262658d06ba8500D171e2c </td></tr><tr><td>ATH-GLMR</td><td>0x420aaA13722A191765D86bc55212A54D9f8b5ceb </td></tr><tr><td> IBTC-GLMR </td><td>0x4C5f99045AF91D2b6d4fa0Ea89FC47cF42711555 </td></tr><tr><td>xcAUSD-GLMR</td><td>0xd95cab0Ed89269390f2aD121798e6092Ea395139</td></tr><tr><td>LUNA (axLUNA | Axelar)</td><td>0x31DAB3430f3081dfF3Ccd80F17AD98583437B213</td></tr></tbody></table>


# Moonbeam Block Explorer List

For Moonbeam network, you can use any of the following block explorers:

* **Ethereum API (Etherscan Equivalent)** — [Moonscan](https://moonbeam.moonscan.io/)
* **Ethereum API with Indexing** — [Blockscout](https://blockscout.moonbeam.network/)
* **Ethereum API JSON-RPC based** — [Moonbeam Basic Explorer](https://moonbeam-explorer.netlify.app/?network=Moonbeam)
* **Substrate API** — [Subscan](https://moonbeam.subscan.io/) or [Polkadot.js Apps](https://polkadot.js.org/apps/?rpc=wss%3A%2F%2Fwss.api.moonbeam.network#/explorer)

### What are Block Explorers?

Block explorers can be thought of as search engines for the blockchain. They allow users to search information such as balances, contracts, and transactions. More advanced block explorers even offer indexing capabilities, which enable them to provide a complete set of information, such as ERC-20 tokens in the network. They might even offer API services to access it via external services.

Moonbeam provides two different kind of explorers: ones to query the Ethereum API, and others dedicated to the Substrate API. All EVM-based transactions are accessible via the Ethereum API wheras the Substrate API can be relied upon for Substrate-native functions such as governance and staking. The Substrate API also includes information about the EVM-based transactions, but only limited information is shown.


# Swap, Pool & Farm

Guides around Swap, Pool and Farm feature on StellaSwap


# How to Swap

As a decentralized exchange (DEX), the core of StellaSwap entails facilitating swaps or trades between different coin pairs. This guide will walk you through the process of trading on our Swap feature.

{% hint style="warning" %}
Ensure that you have your wallet set up and that you have coins in your wallet balance.  If you just bridged into the Moonbeam network and do not have GLMR, use our Faucet to get free GLMR. [Here's a guide for using the Faucet and getting GLMR](https://stella-swap.gitbook.io/stellaswap/resources/how-to-guides/faucet-how-to-claim-free-glmr).
{% endhint %}

### Step 1: Possess Coins in Your Wallet

Ensure that you have a cryptocurrency balance in your wallet. If you participated in the Moonbeam crowdloan, you will be sent GLMR tokens. If not, you'll need to bridge your coins from other blockchain networks into Moonbeam using [StellaSwap's bridge](https://app.stellaswap.com/bridge). Once you have cryptocurrency in your Moonbeam wallet, you're ready to swap

### Step 2: Go to StellaSwap and Connect Wallet

Visit [StellaSwap's app](https://app.stellaswap.com/exchange/swap) and you'll be redirected to our `Swap` feature. Connect your wallet by clicking on the "Connect Wallet" pink button on the top right.&#x20;

![](/files/VaWiDuvoICsxy320UcOK)

### Step 3: Choose Coins and Amount to Swap

After connecting your wallet, choose the coins you want to `Swap From` and `Swap To`. For example, if you want to buy STELLA using 100 GLMR, here is how it should look like:

![](/files/DU0mZt5ia8IkBsn6uAkF)

### Step 4: Confirm Transaction

Confirm your transaction by clicking on the `Confirm Swap` button that comes with a pop-up display. After than sign the transaction with your wallet.

![](/files/DTtuYJqOFTNQITxmIYO6)

### Step 5: Wait Until Transaction Status is Completed

It will take a few moments for your transaction to ne confirmed. Until then, it will be `Pending`, which you can see at the top-right of the website. If you want to see your transaction status, you can click on the link `View on explorer`, where it will take you to Blockscout to view the status of your transaction.

![](/files/ujSmEODzCZr0QNeUutGh)


# How to Add Liquidity (Get LP Token)

{% tabs %}
{% tab title="Standard AMM" %}
In order to participate in StellaSwap's Farm and start generating yields, you have to provide liquidity first by staking two assets to get an LP token. An LP token is a token that you will receive for providing liquidity of 2 coins into a specific pool. For instance, staking GLMR and STELLA will generate GLMR-STELLA LP token, which can be used to stake on StellaSwap's Farms to start earning APR returns.

### Step 1: Ensure You Possess 2 Underlying Pool Tokens

If you want to stake GLMR-STELLA under the Farm section, you first need to have GLMR and STELLA coins in your Moonbeam wallet. If not, get the coins by using StellaSwap's Swap feature. [Here's a guide for Swap](https://stella-swap.gitbook.io/stellaswap/resources/how-to-guides/swap-and-pool/how-to-swap).

### Step 2: Go to StellaSwap and Connect Wallet

Visit [StellaSwap's `Pool` section](https://app.stellaswap.com/exchange/pool). As its name suggest, `Pool` allows users to "pool together" their 2 assets for providing liquidity. Connect your wallet by clicking on the "Connect Wallet" pink button on the top right, or click the button at the center of the page under `My Liquidity Positions`.<br>

![](/files/7n0e2d0oGyBLdBxs64MC)

### Step 3: Click "Add" to Add Liquidity

After connecting your wallet, you should see this page if this is the first time you're providing liquidity. Click on the `Add` button to start adding liquidity.<br>

![](/files/U26GHY4Gx3yMTlyueCtj)

### Step 4: Select the Coins and Amount to Pool

Select the two coins you want to provide liquidity towards. You only need to specify the amount in either field, and the other field will automatically populate. Understand that you will be providing liquidity at a 50/50 ratio. Once done, proceed by clicking on the button `Confirm Adding Liquidity`.<br>

![](/files/YJpHvEWJjbHRZhw48IbU)

### Step 5: Confirm Transaction

There will be a pop-up for final confirmation. Click on that and sign the transaction on your wallet. <br>

![](/files/XSVMZoZhL038OUMlJKFl)

### Step 6: Wait Until Transaction Status is Completed

It will take a few moments for your transaction to ne confirmed. Until then, it will be `Pending`, which you can see at the top-right of the website. If you want to see your transaction status, you can click on the link `View on explorer`, where it will take you to Blockscout to view the status of your transaction.<br>

![](/files/ZCiBddXBFOgK0BxykWFZ)

### Step 7: Success! You Have Generated an LP Token

After transaction completion, you would have an LP token that signifies your share into the GLMR-STELLA pool or any pool you decide to provide liquidity to. The most frequent use of the LP token is to stake it in StellaSwap's Farm section, where you can earn high APR returns.
{% endtab %}

{% tab title="Stable AMM Basepool " %}
In order to participate in StellaSwap's farms and start generating yields, you have to provide liquidity first by staking assets to get an LP token. An LP token is a token that you will receive for providing liquidity of two or multiple coins into a specific pool. For instance, staking USDC.mad (under the correlated-asset/stable AMM) will generate 4Pool LP token, which can be used to stake on StellaSwap's farms to start earning APR returns. Staking on correlated-asset/stable AMM is simlar to the regular pool except for two things;<br>

1. You can get LP token by depositing **only one token**
2. Swap fees are 0.04% instead of 0.25%

### Step 1: Ensure you Posses Underlying Pool Token(s)

If you want to stake in the 4Pool Stable Pool you will need to have at least one of the four assets making the pool:

1. USDC.mad
2. USDT.mad
3. DAI.mad
4. FRAX

If not, you can get the tokens by using StellaSwap's Swap feature. [Here is a guide for Swap](https://docs.stellaswap.com/resources/how-to-guides/swap-pool-and-farm/how-to-swap).

### Step 2: Go to StellaSwap and Connect Wallet

Visit StellaSwap's [Pool Page](https://app.stellaswap.com/exchange/pool). As its name suggest, `Pool` allows users to "pool together" their assets for providing liquidity. Connect your wallet by clicking on the `connect wallet` pink button on the top right. **Make sure to click the toggle button `Stable AMM` if you want to provide liquidity for 4Pool.**

![](/files/YJfCb6h87LDZZBAtNkhP)

### Step 3: Add Liquidity

On this page you can choose to add multiple assets at once or just one of the assets. For adding just one asset. In the picture example we are depositing only Frax, but will receive LP token representing all assets in the 4Pool. Click `Add` to add liquidity. Approve contract if using for the first time.<br>

![](/files/ZsQOUynJBYvDsvSR0TAk)

### Step 4: Confirm MetaMask Message

Confirm transaction pop-up message on your wallet.

### Success! You Have Dont it!

When transaction gets confirmed, you will have successfully pooled your assets in StellaSwap's Stable AMM and received your LP token representing your deposit.
{% endtab %}

{% tab title="Stable AMM Metapool" %}
In order to participate in StellaSwap's farms and start generating yields, you have to provide liquidity first by staking assets to get an LP token. An LP token is a token that you will receive for providing liquidity of two or multiple coins into a specific pool. For instance, staking USDC.mad (under the correlated-asset/stable AMM) will generate 4Pool LP token, which can be used to stake on StellaSwap's farms to start earning APR returns. Staking on correlated-asset/stable AMM is simlar to the regular pool except for two things;<br>

1. You can get LP token by depositing **only one token**
2. **Swap fees are 0.05% instead of 0.25%**

### **Step 1: Ensure You Posses Underlying Pool Token(s)**

If you want to stake in the MAI-4POOL you will need to have at least one of the two assets making the pool:

1. MAI (You can [mint MAI by staking xSTELLA or WGLMR](https://docs.stellaswap.com/resources/how-to-guides/mint-mai))
2. Basepool 4Pool LP Token (Liquidity provider token for depositing in 4Pool). [Here is a guide to adding liquidity to 4Pool](https://docs.stellaswap.com/resources/how-to-guides/swap-pool-and-farm/how-to-add-liquidity-to-4pool-stable-swap-amm).

If not, you can get the tokens by using StellaSwap's `Swap` feature. Here is a guide for [Swap](https://docs.stellaswap.com/resources/how-to-guides/swap-pool-and-farm/how-to-swap).&#x20;

### **Step 2: Go to StellaSwap and Connect Wallet**

Visit StellaSwap's [**Pool Page**](https://app.stellaswap.com/exchange/pool/stable)**.** Pool allows users to "Pool Together" their assets for providing liqudity. Connect your wallet by clicking on the `connect wallet` pink button on the top right. Make sure to click the toggle button `Stable AMM` when you want to add liqudity into MAI-4POOL

![](/files/jbVfU4hNxNpLOjGFCfQm)

### Step 3: Add liquidity

On this page you can choose to add both assets at once or just one of the assets. In the picture example we are adding only MAI, but will receive LP token representing both assets in the MAI+B4P Pool. Click `Add` to add liquidity. Approve contract if using for the first time.<br>

![](/files/jASqSMLwM2ltVZ4kJoml)

###

### Step 4: Confirm MetaMask Message

Confirm transaction pop-up message on your wallet.<br>

### Success! You Have Done It!

When transaction gets confirmed, you will have successfully pooled your assets in StellaSwap's Stable AMM and received your LP token representing your deposit.
{% endtab %}

{% tab title="Dual Pool (Stable AMM)" %}
In order to participate in StellaSwap's farms and start generating yields, you have to provide liquidity first by staking two assets to get an LP token. An LP token is a token that you will receive for providing liquidity of 2 coins into a specific pool. For instance, staking anyETH and madETH (under the correlated-asset/stable AMM) will generate Dual ETH LP token, which can be used to stake on StellaSwap's Farms to start earning APR returns. Staking on  correlated-asset/stable AMM is similar to the regular pool except for two things:In order to participate in StellaSwap's farms and start generating yields, you have to provide liquidity first by staking assets to get an LP token. An LP token is a token that you will receive for providing liquidity of two or multiple coins into a specific pool. For instance, staking USDC.mad (under the correlated-asset/stable AMM) will generate 4Pool LP token, which can be used to stake on StellaSwap's farms to start earning APR returns. Staking on correlated-asset/stable AMM is simlar to the regular pool except for two things;<br>

1. You can get LP token by depositing **only one token**
2. **Swap fees are 0.05% instead of 0.25%**<br>

### **Step 1: Ensure You Posses Underlying Pool Token(s)**

If you want to stake in the MAI-4POOL you will need to have at least one of the two assets making the pool:<br>

1. MAI (You can [mint MAI by staking xSTELLA or WGLMR](https://docs.stellaswap.com/resources/how-to-guides/mint-mai))
2. Basepool 4Pool LP Token (Liquidity provider token for depositing in 4Pool). [Here is a guide to adding liquidity to 4Pool](https://docs.stellaswap.com/resources/how-to-guides/swap-pool-and-farm/how-to-add-liquidity-to-4pool-stable-swap-amm).

If not, you can get the tokens by using StellaSwap's `Swap` feature. Here is a guide for [Swap](https://docs.stellaswap.com/resources/how-to-guides/swap-pool-and-farm/how-to-swap).&#x20;

### **Step 2: Go to StellaSwap and Connect Wallet**

Visit StellaSwap's [**Pool Page**](https://app.stellaswap.com/exchange/pool/stable)**.** Pool allows users to "Pool Together" their assets for providing liquidity. Connect your wallet by clicking on the `connect wallet` pink button on the top right. Make sure to click the toggle button `Stable AMM` when you want to add liquidity into MAI-4POOL.

![](/files/jbVfU4hNxNpLOjGFCfQm)

###

### Step 3: Add liquidity

On this page you can choose to add both assets at once or just one of the assets. In the picture example we are adding only MAI, but will receive LP token representing both assets in the MAI+B4P Pool. Click `Add` to add liquidity. Approve contract if using for the first time.<br>

![](/files/jASqSMLwM2ltVZ4kJoml)

###

### Step 4: Confirm MetaMask Message

Confirm transaction pop-up message on your wallet.<br>

### Success! You Have Done It!

When transaction gets confirmed, you will have successfully pooled your assets in StellaSwap's Stable AMM and received your LP token representing your deposit.
{% endtab %}
{% endtabs %}


# How to Farm (Stake LP Token)

StellaSwap's Farm feature allows users to generate (APR) returns. Here's the guide on how to start generating returns.

To participate in StellaSwap's farms that generates yields in STELLA, you have to stake two underlying coins into a liquidity pool and generate an LP token, which represents your share of the liquidity pool. For example, if you're keen on earning rewards in GLMR-STELLA Farm, you need to provide your GLMR and STELLA into the liquidity pool and generate an LP token. Once done, you can stake the LP token into the farm.

{% hint style="info" %}
LP tokens are proof you own part of the liquidity pool which you can use to remove your crypto tokens from the liquidity pool at any time. The fees earned from transactions go directly into the liquidity pool, so your token holdings will appreciate proportionately with the growth of the liquidity pool.&#x20;
{% endhint %}

### **Step 1: Ensure you have the LP Token**&#x20;

If you want to farm GLMR-STELLA you first need to have the LP token by adding your liquidity in the pool. Here’s a guide for [adding liquidity in StellaSwap pools](https://stella-swap.gitbook.io/stellaswap/resources/how-to-guides/swap-pool-and-farm/how-to-add-liquidity-get-lp-token).

### Step 2: Go to StellaSwap and Connect Wallet

Visit [<mark style="color:blue;">StellaSwap’s</mark> <mark style="color:blue;"></mark><mark style="color:blue;">`farm`</mark> <mark style="color:blue;"></mark><mark style="color:blue;">page</mark>](https://app.stellaswap.com/farm) and connect your wallet by clicking on the top right button. Then, choose the farm that you want to stake in.

![](https://lh4.googleusercontent.com/i9fj4f2ieQCRhZ5q3-sK--alDR1vO5gCi9MunPlZ-gMQw6FlvMdFliVditolLyP6RWIZIWHZDUdG7SPpyg1YNstm59ULXDkGKoJi88IjqSecjDDdHTIa84Z-mqC-osSOBwL2WlE)

### Step 3: Select Amount to Stake

Enter the amount you want to stake or click on `MAX` button to stake all LP tokens

![](https://lh5.googleusercontent.com/-4cuWf3hhPNXt5sjU2HPBkteVTFgVAcvCRo-DMoEcTosPR9RUeGGNRtMoBMpBtmOw7F0IVeL0eB8CTk8dTz_Nn0nkkn4XyVJalz0PV0igY59lz8KisAkKO4yqbXRGwN7JBLdMYs)

### Step 4: Approve Farm Contract

Click on `Approve` and confirm the message on your web 3.0 wallet.

### Step 5: Stake LP in the Farm

It will take few moments for your transaction to be confirmed. Once the transaction is approved, you will be able to click the stake button. After confirming the transaction you will immediately start earning STELLA based on the amount staked in the pool.

![](https://lh5.googleusercontent.com/AUhCUTN1ZX4oxqcjdSNx4FGzbWk3uzjJzvCQLSi6A4GGWOnongrAB09RWxFUWBiyD5TvfCceiylBSPFt1fWYU-3Qzp6GUDMqldpIMVX_G-r3nP1QtiVjECM2Hipi5bg7rOPmsyU)

### Step 6: Success! You have staked in the farm

After the transaction is completed, you will start earning STELLA rewards for your stake in the farm and you can harvest or unstake at any time. To compound your stake investment, you can harvest your rewards and repeat the process.


# ZAP

Guides for 1-click staking for LP token generation and withdrawal with ZAP


# How to ZAP In (1-Click LP Token Generation)

[ZAP](https://zap-stellaswap.netlify.app/exchange/zap) is an innovative feature launched on StellaSwap meant to simplify the DeFi investment process. With ZAP, users can provide (pool) liquidity and generate LP tokens in just 1-click. This would significantly streamline and simplify the yield farming process.

{% hint style="warning" %}
There is relatively high slippage by using ZAP. *Slippage* refers to the difference between the expected price of a trade and the price at which the trade is executed. Exercise caution in using ZAP.
{% endhint %}

{% hint style="info" %}
Ensure you have enough GLMR in your wallet for gas fees.
{% endhint %}

This guide will explain how you can use ZAP to generate your LP Token in 1-Click.

### Step 1: Posses Supported Coins in Your Moonbeam Wallet

Ensure you have one supported coin in your Moonbeam wallet. Currently, the ZAP V1 supports STELLA, USDC, GLMR and MATIC. If you do not have coins in your Moonbeam wallet, here's a [guide to start bridging your coins into Moonbeam network](https://stella-swap.gitbook.io/stellaswap/resources/how-to-guides/bridge).

### Step 2: Go to [ZAP](https://zap-stellaswap.netlify.app/exchange/zap) and Connect Wallet

Visit StellaSwap's [ZAP page](https://zap-stellaswap.netlify.app/exchange/zap) and connect your wallet by clicking on the `Connect Wallet` pink button on the top right.

![](/files/uz6unOPX0Xur9pgVYu7Y)

### Step 3: Select Coin and LP Pool to ZAP Into

Select your single-asset coin on the `From Token` field that you want to use to ZAP into the LP token. In this example, we'll assume that you're trying to ZAP with your MATIC tokens. After that, select the LP Pool that you want to enter on the `To LP` field. In this example, assume that you're interested in the MATIC-GLMR pool because it generates high APR. There will be an estimate on how much LP that you'll be getting.

![](/files/jfT7NBVuWl2p2ovEmy2I)

### Step 4: Select Coin Amount to ZAP

In the `From Token` field, input the amount of MATIC coin you want to use for the ZAP feature. If you want to use all your MATIC, press the `MAX` button. In this example, 100 MATIC coins will be used to generate approximately 26.73 MATIC-GLMR LP tokens. Press `ZAP` to complete the transaction.

![](/files/vZghxVGgsMtWObbCJzJo)

### Step 5: You're Done! Don't Forget to Stake Your LP Token in Farms

After clicking the `ZAP` button, your transaction will be completed! The next step before you start earning yields is to stake your newly-generated LP token into the MATIC-GLMR farm on [Farms page](https://app.stellaswap.com/farm).


# How to ZAP Out (1-Click LP Token Withdrawal)

[ZAP](https://zap-stellaswap.netlify.app/exchange/zap) is an innovative feature launched on StellaSwap meant to simplify the DeFi investment process. With ZAP, users can remove liquidity and destroy LP tokens to get back their two underlying coins in just 1-click. This would significantly streamline and simplify the yield farming process.

{% hint style="warning" %}
There is relatively high slippage by using ZAP. *Slippage* refers to the difference between the expected price of a trade and the price at which the trade is executed. Exercise caution in using ZAP.
{% endhint %}

{% hint style="info" %}
Ensure you have enough GLMR in your wallet for gas fees.
{% endhint %}

This guide will explain how you can use ZAP to destroy your LP token and get back both of your underlying coins in only 1-Click!

### Step 1: Go to [ZAP](https://zap-stellaswap.netlify.app/exchange/zap) and Connect Wallet

Visit StellaSwap's [ZAP page](https://zap-stellaswap.netlify.app/exchange/zap) and connect your wallet by clicking on the `Connect Wallet` pink button on the top right.

![](/files/uz6unOPX0Xur9pgVYu7Y)

### Step 2: Withdraw/Unstake Your LP Token from Farms Page

Ensure that you have already withdrawn or unstaked your LP token from the [farm ](https://app.stellaswap.com/farm)you want to exit from. Only when you have withdrawn your LP token from the farm can you proceed to use ZAP.

### Step 3: Click on Unstake Toggle in Zap

Click on the Unstake toggle button on ZAP. This means that you want to withdraw your liquidity but breaking your LP token into the two underlying coins, which will be sent directly to your wallet.

![](/files/gUQl6XIiRy2JWNS5M03K)

### Step 4: Select the LP Token You Want to Destroy/Unstake and the Amount

Select the LP token that you want to destroy or unstake so that you can get back your underlying 2 coins. After that, input the `Amount to remove`. If you want to unstake all of your LP tokens, then click on the `MAX` button.

![](/files/2UC9dbc9XQSifF1IzZ3r)

Assume that you want to unstake/destroy your MATIC-GLMR LP token, it should look like this. You'll get an estimate on how much MATIC and GLMR tokens that you will automatically get into your wallet if you proceed with the ZAP.

![](/files/eYjR0dzznFLjI1lct8Sc)

### Step 5: Select `Withdraw` Button and You're Good to Go!

The last thing for you to do is to click on the yellow `Withdraw` button and wait for your transaction to complete. It should just take a few seconds. Congratulations!


# Bridge

Guides around StellaSwap's Bridge&#x20;


# How to Bridge Ethereum Assets to Moonbeam

Step by step guide for bridging ETH, WBTC, USDC and other ERC-20 assets from Ethereum network to Moonbeam using [StellaSwap's native bridge](https://app.stellaswap.com/bridge): <https://app.stellaswap.com/bridge>

### Step 1: Possess ETH Tokens

Ensure you have ETH in your wallet to cover gas cost for the bridge transaction.&#x20;

### Step 2: Open Bridge Page

On StellaSwap dapp, navigate to Transfer then [Bridge](https://app.stellaswap.com/bridge).

<figure><img src="/files/JXYmL3xDpLuJWRiH7Mba" alt=""><figcaption></figcaption></figure>

### Step 3: Select Source and Destination Chains

Connect your wallet by clicking on `CONNECT` button, set the right source and target chain. Since we are bridging from Ethereum to Moonbeam we have set the source chain as Ethereum and Target chain as Moonbeam as in the picture.

<figure><img src="/files/yF4zpQQX0xs9VVRUlCSA" alt=""><figcaption></figcaption></figure>

### Step 4: Select Asset

Click on `Token to bridge` and choose the asset you would like to bridge. after selecting asset input the amount desired to bridge and hit `Bridge`

<figure><img src="/files/P5oO50DBT4bdz9ml5OY2" alt=""><figcaption></figcaption></figure>

##

### Step 5: Bridge Assets

A confirmation message will appear, click `Bridge` , and approve wallet message. After signing the transaction you will be able to see the status of your bridge transaction, wait for it to complete. Note that bridging from Ethereum might take up to 20 minutes.

<figure><img src="/files/hNsu5fDqIu9TDh5LQUcp" alt=""><figcaption></figcaption></figure>

<figure><img src="/files/m2gWwqef7cU6VYPWAzTS" alt=""><figcaption></figcaption></figure>

### Step 6: Redeem Assets&#x20;

Once bridge transaction is done you will be able to redeem your tokens. Click `Next` to proceed.

<figure><img src="/files/S33oFzHpqj26PfDASc1V" alt=""><figcaption></figcaption></figure>

Then click `Auto Redeem`.

<figure><img src="/files/0w7qJySVLJa6TKrB4wMD" alt=""><figcaption></figcaption></figure>

##

### Success! You Have Bridged Your Assets

Thats it! You will have your assets in your wallet on Moonbeam.

<figure><img src="/files/S6NqGVxr9ddDvVjsBV1h" alt=""><figcaption></figcaption></figure>

###

###


# How to Bridge Solana (SOL)  to Moonbeam

Step by step guide for bridging SOL from Solana Chain to Moonbeam. Using Wormhole Portal bridge.

### Step 1: Possess SOL Tokens

Ensure you have SOL in your Solana wallet to cover gas cost for the bridge transaction.&#x20;

### Step 2: Open Bridge Page

Head to [Portal Bridge](https://portalbridge.com/) page.

<figure><img src="/files/CVjYt39nTIm0KVbGHYAm" alt=""><figcaption></figcaption></figure>

### Step 3: Select Source and Destination Chains

Connect your Solana Wallet and your Moonbeam Wallet, then set the `from Network` to Solana and the `To Network` to Moonbeam

<figure><img src="/files/dKJ6RKCcVSkjOw2Qskma" alt=""><figcaption></figcaption></figure>

### Step 4: Select Asset

Click on Asset and choose Solana. after selecting asset input the amount desired to bridge and hit `Approve and proceed with transaction`. After that a wallet-pop will come up, click confirm to proceed.

<figure><img src="/files/hdgGHIeDJRtqMduQ2MbC" alt=""><figcaption></figcaption></figure>

##

### Step 5: Bridge Transaction Progress

&#x20;As soon as you sign the bridge transaction, you will be able to watch it's progress. It should take few minutes for the transaction to go through.

<figure><img src="/files/KIjZCDLKSlFXaVdZFyzm" alt=""><figcaption></figcaption></figure>

##

### Success! You Have Bridged Your Assets

Once you see Transaction Complete. Means your assets arrived to Moonbeam successfully.

<figure><img src="/files/zdyQqi2CgR86VYUBjd6B" alt=""><figcaption></figcaption></figure>

###

###


# How to Bridge MANTA to Moonbeam from Manta ATLANTIC

### Step-by-Step Guide for Bridging MANTA from Manta Atlantic to Moonbeam

Note, if you have MANTA on Pacific all you need to do is bridge it to Atlantic using same bridge and then you can follow this guide to bridge from Atlantic to Moonbeam.

### Step 1: Posses MANTA Tokens

Ensure you have MANTA in your MANTA wallet to cover gas cost for the bridge transaction.&#x20;

### Step 2: Open Bridge Page

Head to [Manta Bridge](https://app.manta.network/manta/bridge) page.

<figure><img src="/files/ASJpvrF7BkHzP5seCosY" alt=""><figcaption></figcaption></figure>

### Step 3: Select Source and Destination Chains

Connect your Manta Wallet and your Moonbeam Wallet, then set the `from Network` to Atlantic and the `To Network` to Moonbeam

<figure><img src="/files/cC5DfQoYmRQWuCVQD7rV" alt=""><figcaption></figcaption></figure>

### Step 4: Select Asset

Click on Asset and choose MANTA. after selecting asset input the amount desired to bridge and hit Connect MetaMask to or enter your Moonbeam wallet address manually. Switch network to Moonbeam if you are not already on it and proceed with bridging transaction.

<figure><img src="/files/zemEHnyJMVblQQUbBntg" alt=""><figcaption></figcaption></figure>

## Step 5: Bridge Assets

After entering amount of tokens to bridge and selecting your Moonbeam wallet, proceed with the bridging transaction by clicking on `Submit` and signing the transaction.&#x20;

<figure><img src="/files/qTXYUuRvS12Sy8WEbmcB" alt=""><figcaption></figcaption></figure>

### Step 5: Bridge Transaction Progress

&#x20;As soon as you sign the bridge transaction, you will be able to watch it's progress. It should take less than a minute to finish

<figure><img src="/files/alwxU90W9SYrPKWvu5yE" alt=""><figcaption></figcaption></figure>

##

### Success! You Have Bridged Your Assets

Once you see Transaction Complete. Means your assets arrived to Moonbeam successfully.

<figure><img src="/files/id7Iowf5ljbWZn2XI5XL" alt=""><figcaption></figcaption></figure>

###

###


# How to Bridge BUSD from Binance Chain

Step by step guide to bridging assets from Binance Chain to Moonbeam.&#x20;

### Step 1: Head to Bridge Page&#x20;

On StellaSwap Dapp navigate to Transfer and click `Bridge` or simply visit <https://app.stellaswap.com/bridge>

<figure><img src="/files/h1zYoiJuUx7MZH2A0Bt4" alt=""><figcaption></figcaption></figure>

### Step 2: Input Chain and Token Info

Set From to Binance Smart Chain and `To` to Moonbeam Chain and Select BUSD as Token. Once set input the token amount you would like to bridge and hit `Bridge BUSD`.

<figure><img src="/files/9HR17BIdOMR5ssPng54D" alt=""><figcaption></figcaption></figure>

### Step 3: Confirm Bridge Details

A pop up will appear with summarized bridge information, click `Bridge BUSD` after double checking all, and confirm transaction in your wallet. <br>

Note: This window will show you the status of the bridge transaction and will also allow you to redeem your assets on target chain so keep it open.<br>

<figure><img src="/files/CCpsmwojdKPDufObJtzb" alt=""><figcaption></figcaption></figure>

### Step 4: Redeem Tokens

Once transaction is confirmed on origin chain, you will be able to click `Next`&#x20;

<figure><img src="/files/SGemjWGcu74JKJLYtV3X" alt=""><figcaption></figcaption></figure>

Then you will be able to click `Auto Redeem` which will automatically transfer your bridged assets to your wallet. Just click the button and confirm transaction in wallet.

<figure><img src="/files/28ZBELN8eoVYtHXpxBna" alt=""><figcaption></figcaption></figure>

### Success! You Have Successfully Bridged Your Assets

Once you see this screen, it will mean that you have received the assets on Moonbeam. You can click to view it in Moonbeam block explorer.

<figure><img src="/files/KUiIWf9AaKdDmsvqDRsx" alt=""><figcaption></figcaption></figure>

###


# How to Bridge $ATOM to Moonbeam

Easy step by step guide to bridging ATOM to Moonbeam

### Step 1: Posses ATOM Tokens

Ensure that you have ATOM in your COSMOS wallet to cover gas fees, since you will need to transfer your ATOM from COSMOS network.

### Step 2: Open Bridge Page

Navigate to StellaSwap's [Bridge](https://app.stellaswap.com/bridge) and click on `Bridge COSMOS (ATOM)` :&#x20;

![](/files/tyDg9YfBz9k0q4ZTnYnZ)

or directly visit <https://satellite.money/?source=cosmoshub&destination=moonbeam&asset_denom=uatom&destination_address=>

### Step 3: Select ATOM to send from Cosmoshub to Moonbeam

Set `Source Chain` to Cosmoshub and `Destination Chain` to Moonbeam. Then select ATOM asset.

![](/files/q2J9h0lov8TATkQP87BF)

### Step 4: Enter Destination Address

Enter your Moonbeam wallet address. Or click on `Autofill destination address` (***recommended).***

![](/files/qdkE8uMAjLAdPbW9moTv)

Connect with Metamask will appear, click **next** on the first message and **connect** on the second message.

### Step 5: Connect Wallet & Transfer

With your Moonbeam address entered manually or autofilled and after double checking. Click on `Connect Wallet & Transfer`

![](/files/Mhef6FpC8xkxBfwkJ8dr)

### Step 6: Sign Metamask Message

A confirmation message from your wallet is needed. Click `sign` on Metamask to proceed.

![](/files/bNs30JVZcjS9WroOSvgv)

### Step 7: Send **ATOM** Assets

Transfer process will begin, the bridge will generate a one-time deposit address to send ATOM to or you can connect COSMOS wallet to fill in automatically ***(Recommended)*** by clicking on `connect Keplr`

![](/files/Kpq6tY00m37hukQWVY7e)

### Step 8: Enter Amount and Deposit

Enter deposit amount or click on Max, and click on `Send Deposit`

![](/files/LzvHGxU5zDHtnpSrTJwL)

### Step 9: Approve Message on (Keplr)

Click `Approve` on `COSMOS` wallet Keplr to confirm transaction.

![](/files/pJARyZ8kLEn1zoAKwxmz)

### Step 10: Wait for Transaction to Complete

Check Status of transaction, should take 1\~3 minutes to complete.

![](/files/veCbwEONj3O0A8ha656E)

### Step 11: Success!

You have completed the bridge process and should have your ATOM on Moonbeam.

![](/files/C5ZxvL4FKITIC4WDgHwx)


# How to Bridge AVAX to Moonbeam

If you're looking to bridge over AVAX token from Avalanche network to Moonbeam, here is the exact process:

### Step 1: Possess AVAX Tokens

Ensure that you have AVAX in your AVAX wallet. Here’s a list of venues to get [AVAX](https://coinmarketcap.com/currencies/avalanche/markets/).

### Step 2: Go to StellaSwap's Bridge and Connect Wallet

Visit the [StellaSwap's Bridge](https://app.stellaswap.com/bridge) to start the bridging process. Connect your wallet by clicking on the "Connect Wallet" pink button on the top right.&#x20;

![](/files/Un0hTF2ZJ34a3kvtrG7p)

### Step 3: Select AVAX to send from Avalanche to Moonbeam

Select the `From: Avalanche` and `To: Moonbeam` and choose `Token to Bridge: AVAX.`Enter the AVAX token amount and click "Bridge AVAX" button. Approve the transfer your wallet and you're all done!

![](/files/iocjPIjIuChiaeVWqRcc)

### Step 4: Wait for Bridge TXN to Complete in History

After confirming the transaction, you can wait for the bridge to complete your transaction. It could take anywhere from 5 mins to 15 mins. Once completed, the `Status` should be `Completed`.

![](/files/dxONxmOFMSS4hHpZRL1B)

### Step 5: \[Optional] Import AVAX Token on Wallet Manually to View Balance <a href="#id-7fe9" id="id-7fe9"></a>

For new networks, you would usually need to import tokens to view the balance on Metamask. When you’ve bridged your AVAX for the first time, don’t worry if you don’t see your AVAX balance on Metamask because you need to manually import the token for it to be viewable. You can do so by clicking on `Import Token` on your metamask:

![](https://miro.medium.com/max/1400/1*RjMFxO9hNTrHSI14crCbkg.png)

Thereafter, enter the contract address for AVAX at the `Token Contract Address` field which is 0x4792C1EcB969B036eb51330c63bD27899A13D84e. The rest of the information will be automatically populated. Once done, click on the `Add Custom Token.`

![](https://miro.medium.com/max/1400/1*QQdHYheghThGWo3UXUp7gw.png)

Click on `Import Tokens.`

![](https://miro.medium.com/max/1400/1*-dqbHJLDJ9XLlNFvEW84wQ.png)

You’re done!

![](https://miro.medium.com/max/1400/1*Io83GhTw9Z0msFT4Ekd2IA.png)


# Faucet: How to Claim Free GLMR

In order to streamline the transfer of your assets from other blockchain networks to Moonbeam, StellaSwap has developed a Faucet to help you start your first transaction by giving you FREE GLMR tokens.

### Why do I Need GLMR Tokens?

Interacting with a blockchain network, in this case the Moonbeam network, requires you to have GLMR, which is the native token of Moonbeam. You need to pay every transaction with gas. Therefore, a common issue for first users on a new blockchain is the difficulty in getting the native token. That is why we have decided to launch Faucet to help you get started.

### How to Claim Free GLMR from StellaSwap's Faucet

#### Step 1: Bridge Asset to Moonbeam

Ensure that you have bridged your asset using [StellaSwap's bridge](https://app.stellaswap.com/bridge). After bridging, do ensure that the `status` of your bridged transaction to Moonbeam is `Complete`.

![](/files/dUp2y1kFVjslbGXnFTZ4)

#### Step 2: Click on StellaSwap's Faucet

Click on StellaSwap's `Faucet` at the page header and there will be a pop-up that looks like this:

![](/files/8KNngQ3i3nIWNU5i7c2j)

#### Step 3: Input Transaction Hash (ID) of Moonbeam's Bridge Transaction

Copy and paste the transaction ID of the completed bridge transaction **on Moonbeam,** found on [Blockscout](https://blockscout.moonbeam.network/), which is the block explorer for Moonbeam network.&#x20;

{% hint style="warning" %}
Please do not input the transaction ID of the originating blockchain network (e.g. ETH or BSC). We can only process the transaction has (ID) of Moonbeam network found on Blockscout.
{% endhint %}

&#x20;You can find the transaction ID by going to Blockscout and entering your wallet address, which should be the same address as your Metamask wallet address in other chains. Then, go to `Token Transfer` section on Blockscout and copy the TXID of the latest address. This is highlighted in black below:

![](/files/8usDugIbPwMH1LYISNZ9)

#### Step 4: Done! GLMR Will Be Deposited to Your Wallet

Once done, you will be given 0.05 GLMR towards your Moonbeam wallet to start your first transaction!


# How to Send Frax to Moonbeam using Frax Ferry

Using Frax's new Ferry you can send Frax across and get native Frax on Moonbeam wihtout worrying about different bridge risks.

Here is a guide using Frax Ferry, sending Frax from Ethereum to Moonbeam.

**Step 1:** Visit <https://app.frax.finance/fraxferry>

**Step 2:** Set Right Chain Info

Select Departure as the chain you are sending Frax from and Destination to Moonbeam.

<figure><img src="/files/oNXHTcgMaSgrOFRmYaAO" alt=""><figcaption></figcaption></figure>

**Step 3:** Amount and Recipient Address

If you don't have your wallet connected yet make sure you do before proceeding further, set your amount and click `use my address` to send to the same wallet address on Moonbeam.&#x20;

<figure><img src="/files/Ix3LSfwQFhpMdnLA6Acf" alt=""><figcaption></figcaption></figure>

**Step 4:** Send Frax

Click on `Embark` to proceed. You will get a summary of your transaction, confirm all accurate details then hit `approve`, then sign transaction in your wallet.

<figure><img src="/files/DYBMoV4KHfuMW2JUobxS" alt=""><figcaption></figcaption></figure>

**Step 5:** Success! You have Successfully Sent Frax to Moonbeam. The summary page will show when to expect receiving your Frax.

<figure><img src="/files/HCxgZUvzMtgZhB4CagfC" alt=""><figcaption></figcaption></figure>


# Native Transfer (XCM)

Step-by-step guide on transferring Polka-native assets to Moonbeam

{% tabs %}
{% tab title="DOT" %}

## How to Send Polkadot (DOT) to Moonbeam Using XCM

<figure><img src="/files/a498WNCAgoEp9e3eHPFE" alt=""><figcaption></figcaption></figure>

### Step 1: Open XCM Page

From StellaSwap Dapp navigate to `Transfers` then `Cross-Chain XCM Transfer` or directly head to <https://app.stellaswap.com/bridge/xctransfer>

<figure><img src="/files/xQP6wYsiqmfpjIgawfbM" alt=""><figcaption></figcaption></figure>

### Step 2: Select DOT Token

Click on `tokens to transfer`, and select DOT. Then to send tokens from Polkadot to Moonbeam choose `Deposit`

<figure><img src="/files/dh6POTjc5IRikzDwvHSZ" alt=""><figcaption></figcaption></figure>

### Step 3: Connect Wallet

After clicking deposit, you will be prompted to connect your substrate wallet. You can choose your wallet from three options, the tutorial is using Polkadot.js wallet. If you are unfamiliar with Substrate wallets click [here ](https://wiki.polkadot.network/docs/wallets#treasury-funded-wallets)to learn more&#x20;

<figure><img src="/files/6md14QRBWrd6LwTz8SdM" alt=""><figcaption></figcaption></figure>

### Step 4: Input Required Info

On this page you have to enter the desired amount you would like to send and the account you are sending from. Once done you can go ahead and click `Send`. You will be prompted to sign the transaction in your wallet.

<figure><img src="/files/4t6zOinAQR0mH6fxufNK" alt=""><figcaption></figcaption></figure>

### Step 5: Check Status

After submitting the transaction it usually takes less than a minute to go through, once you see the message `Transaction Submitted` you are done!

<figure><img src="/files/isRuIHBi7NMWsEJyp63a" alt=""><figcaption></figcaption></figure>
{% endtab %}

{% tab title="USDT" %}

## How to Get Native USDT(.xc) On Moonbeam

<figure><img src="/files/djWJUo3XuDJXM7HktW2t" alt=""><figcaption></figcaption></figure>

Here is a step by step guide on how to get native USDT (xcUSDT) on Moonbeam network directly from Binance Exchange. This guide will walk you through withdrawing USDT from Binance all the way to getting USDT on your Metamask wallet to do DeFi things on StellaSwap.

### What You Will Need:

\
1\. USDT on Binance

2\. Polkadot Wallet, guide is using Polkadot.js extension

3\. MetaMask Wallet

4\. Small amount of DOT

### Step 1: Ensure You Have DOT on StateMint

Make sure you have at least 0.1 DOT on the Polkadot address you want to withdraw to on Statemint, without DOT the withdrawal will not succeed. To send funds from Polkadot or any parachain to Statemint you can use <https://polkadot.js.org/apps>, under Accounts select `Teleport`&#x20;

<figure><img src="/files/O24hXSJ0DOXLzmZjjCQe" alt=""><figcaption></figcaption></figure>

Set destination to Statemint and input at least 0.1 DOT  and `send`.

<figure><img src="/files/5WDLQ1e0ucozwa1i456j" alt=""><figcaption></figcaption></figure>

### 2. Withdraw USDT from Binance to Statemint

Head to Binance, go to spot wallet then find Tether USDT and click on withdraw. Make sure ot select the right network: STATEMINT(Polkadot), Input your Address, amount and request withdrawal. Once done you will be able to see it on Statemint block explorer, head to <https://statemint.subscan.io/> and paste your address in the search bar.

<figure><img src="/files/5siKsrh2wC14V1mYBy8A" alt=""><figcaption></figcaption></figure>

### 3. Send USDT to Moonbeam

Once you have USDT on Statemint you can use XCM channel (Cross-chain XC Transfer) to send it across Polkadot parachains. Head to <https://app.stellaswap.com/bridge/xctransfer>, or simply navigate to Transfer, Cross-chain Transfer if you are already on StellaSwap Dappp.

<figure><img src="/files/l6PWD6TPqJR5rNXsg5Aq" alt=""><figcaption></figcaption></figure>

Select USDt.xc as token and click on `Deposit`, connect to a wallet prompt may come up if you don't already have your polkadot wallet connected.

<figure><img src="/files/V3ZupTbveOUJyQJcrW43" alt=""><figcaption></figcaption></figure>

Input the amount you would like to send to Moonbeam and click `Send`, once you sign transaction in your wallet it will take few moments for the transaction to arrive.

<figure><img src="/files/c0htmQlknYeH7UTSOKGb" alt=""><figcaption></figcaption></figure>

### 4. Add Token to Metamask

Once transaction is done you will have xcUSDT on Moonbeam, you can add token contract address to Metamask to easily interact with it and see your balance. Just click on `add xcUSDT to MetaMask` and confirm add token on the metamask prompt.

<figure><img src="/files/vazcZN2HquyLJTLjtcWK" alt=""><figcaption></figcaption></figure>

### 5. Sucess you have successfully sent Native USDT to Moonbeam!

{% endtab %}

{% tab title="CFG" %}

## How to Get Centrifuge (CFG) Token On Moonbeam

<figure><img src="/files/1ot1BUCWCucNX218cqHG" alt=""><figcaption></figcaption></figure>

### Step 1: Open XCM Page

From StellaSwap Dapp navigate to `Transfers` then `Cross-Chain XCM Transfer` or directly head to <https://app.stellaswap.com/bridge/xctransfer>

<figure><img src="/files/xQP6wYsiqmfpjIgawfbM" alt=""><figcaption></figcaption></figure>

### Step 2: Select CFG Token

Click on `tokens to transfer`, and select CFG. Then to send tokens from Centrifuge to Moonbeam choose `Deposit`

<figure><img src="/files/nWeeM9yrBYvxtEmA1gZD" alt=""><figcaption></figcaption></figure>

### Step 3: Connect Wallet

After clicking deposit, you will be prompted to connect your substrate wallet. You can choose your wallet from three options, the tutorial is using Polkadot.js wallet. If you are unfamiliar with Substrate wallets click [here ](https://wiki.polkadot.network/docs/wallets#treasury-funded-wallets)to learn more.

<figure><img src="/files/6md14QRBWrd6LwTz8SdM" alt=""><figcaption></figcaption></figure>

### Step 4: Input Required Info

On this page you have to enter the desired amount you would like to send and the account you are sending from. Once done you can go ahead and click `Send`. You will be prompted to sign the transaction in your wallet.

<figure><img src="/files/IMFHwrpbAy1aDvan7DAM" alt=""><figcaption></figcaption></figure>

### Step 5: Check Status

After submitting the transaction it usually takes less than a minute to go through, once you see the message `Transaction Submitted` you are done!

<figure><img src="/files/3CsUggXDJLKstsBYsXJN" alt=""><figcaption></figcaption></figure>
{% endtab %}

{% tab title="iBTC" %}

## How to Send INTR & iBTC to Moonbeam

<figure><img src="/files/ODdfKrUQRcp1vYIeCY9f" alt=""><figcaption></figcaption></figure>

Step by step walk through to sending INTR & iBTC token on StellaSwap XCM Channel

#### Step 1: Open XCM Page <a href="#step-1-open-xcm-page" id="step-1-open-xcm-page"></a>

From StellaSwap Dapp navigate to `Transfers` then `Cross-Chain XCM Transfer` or directly head to <https://app.stellaswap.com/bridge/xctransfer>​

<figure><img src="https://2598174527-files.gitbook.io/~/files/v0/b/gitbook-x-prod.appspot.com/o/spaces%2Fk79kvXbQmvjLmP78Scbp%2Fuploads%2FQvv5WJDeeQ6DeVgi2Z5E%2Fimage.png?alt=media&#x26;token=d7ec8e7b-933c-424d-802e-0de3abbb7fc7" alt=""><figcaption></figcaption></figure>

#### Step 2: Select INTR/iBTC Token <a href="#step-2-select-pha-token" id="step-2-select-pha-token"></a>

Click on `tokens to transfer`, and select INTR or iBTC. Then to send tokens from Interlay to Moonbeam choose `Deposit`

<figure><img src="https://2598174527-files.gitbook.io/~/files/v0/b/gitbook-x-prod.appspot.com/o/spaces%2Fk79kvXbQmvjLmP78Scbp%2Fuploads%2FNkGOeIM5TyAyzyyEfWgq%2Fimage.png?alt=media&#x26;token=74dc37c8-db14-4f56-a4b4-d8ae8a5094dd" alt=""><figcaption></figcaption></figure>

#### Step 3: Connect Wallet <a href="#step-3-connect-wallet" id="step-3-connect-wallet"></a>

After clicking deposit, you will be prompted to connect your substrate wallet. You can choose your wallet from three options, the tutorial is using Polkadot.js wallet. If you are unfamiliar with Substrate wallets click [here ](https://wiki.polkadot.network/docs/wallets#treasury-funded-wallets)to learn more

<figure><img src="https://2598174527-files.gitbook.io/~/files/v0/b/gitbook-x-prod.appspot.com/o/spaces%2Fk79kvXbQmvjLmP78Scbp%2Fuploads%2FCTdeaKOvkx7FMAloWALW%2Fimage.png?alt=media&#x26;token=9b2d6de8-8a4c-42ba-9955-cfb59aa0df09" alt=""><figcaption></figcaption></figure>

#### Step 4: Input Required Info <a href="#step-4-input-required-info" id="step-4-input-required-info"></a>

On this page you have to enter the desired amount you would like to send and the account you are sending from. Once done you can go ahead and click `Send`. You will be prompted to sign the transaction in your wallet.

<figure><img src="https://2598174527-files.gitbook.io/~/files/v0/b/gitbook-x-prod.appspot.com/o/spaces%2Fk79kvXbQmvjLmP78Scbp%2Fuploads%2FKK4uh2pJasYsh8ygHKMK%2Fimage.png?alt=media&#x26;token=ad0ceb59-0d57-4058-a011-381befe915ae" alt=""><figcaption></figcaption></figure>

#### Step 5: Check Status <a href="#step-5-check-status" id="step-5-check-status"></a>

After submitting the transaction it usually takes less than a minute to go through, once you see the message `Transaction Submitted` you are done!​

<figure><img src="https://2598174527-files.gitbook.io/~/files/v0/b/gitbook-x-prod.appspot.com/o/spaces%2Fk79kvXbQmvjLmP78Scbp%2Fuploads%2FZGJCL3nSQIQbGWftgIPi%2Fimage.png?alt=media&#x26;token=2340c81d-669c-4771-b895-58aa0cd9ba0f" alt=""><figcaption></figcaption></figure>
{% endtab %}

{% tab title="PHA" %}

## How to Get Phala(.xc) Token On Moonbeam

<figure><img src="/files/x8Whcrfngmdn3JMYiZ5c" alt=""><figcaption></figcaption></figure>

### Step 1: Open XCM Page

From StellaSwap Dapp navigate to `Transfers` then `Cross-Chain XCM Transfer` or directly head to <https://app.stellaswap.com/bridge/xctransfer>

<figure><img src="/files/xQP6wYsiqmfpjIgawfbM" alt=""><figcaption></figcaption></figure>

### Step 2: Select PHA Token

Click on `tokens to transfer`, and select PHA. Then to send tokens from Phala to Moonbeam choose `Deposit`

<figure><img src="/files/wQrjk3IgBzk4mdfR5SSl" alt=""><figcaption></figcaption></figure>

### Step 3: Connect Wallet

After clicking deposit, you will be prompted to connect your substrate wallet. You can choose your wallet from three options, the tutorial is using Polkadot.js wallet. If you are unfamiliar with Substrate wallets click [here ](https://wiki.polkadot.network/docs/wallets#treasury-funded-wallets)to learn more.

<figure><img src="/files/6md14QRBWrd6LwTz8SdM" alt=""><figcaption></figcaption></figure>

### Step 4: Input Required Info

On this page you have to enter the desired amount you would like to send and the account you are sending from. Once done you can go ahead and click `Send`. You will be prompted to sign the transaction in your wallet.

<figure><img src="/files/VQR0MQYfp4l3k5cHQAop" alt=""><figcaption></figcaption></figure>

### Step 5: Check Status

After submitting the transaction it usually takes less than a minute to go through, once you see the message `Transaction Submitted` you are done!

<figure><img src="/files/utS29i0cxQPYfCXrPFgr" alt=""><figcaption></figcaption></figure>
{% endtab %}

{% tab title="ASTAR" %}

## How to Get ASTAR Token on Moonbeam

<figure><img src="/files/r4lhT3z9IJAnp50jlwkY" alt=""><figcaption></figcaption></figure>

### Step 1: Open XCM Page

From StellaSwap Dapp navigate to `Transfers` then `Cross-Chain XCM Transfer` or directly head to <https://app.stellaswap.com/bridge/xctransfer>

<figure><img src="/files/xQP6wYsiqmfpjIgawfbM" alt=""><figcaption></figcaption></figure>

### Step 2: Select CFG Token

Click on `tokens to transfer`, and select Astar. Then to send tokens from Astar to Moonbeam choose `Deposit`

<figure><img src="/files/xoRWh0rjtAf3mrFHYDrR" alt=""><figcaption></figcaption></figure>

### Step 3: Connect Wallet

After clicking deposit, you will be prompted to connect your substrate wallet. You can choose your wallet from three options, the tutorial is using Polkadot.js wallet. If you are unfamiliar with Substrate wallets click [here ](https://wiki.polkadot.network/docs/wallets#treasury-funded-wallets)to learn more&#x20;

<figure><img src="/files/6md14QRBWrd6LwTz8SdM" alt=""><figcaption></figcaption></figure>

### Step 4: Input Required Info

On this page you have to enter the desired amount you would like to send and the account you are sending from. Once done you can go ahead and click `Send`. You will be prompted to sign the transaction in your wallet.

<figure><img src="/files/K8LaO9NxzVs5J6DxQKut" alt=""><figcaption></figcaption></figure>

### Step 5: Check Status

After submitting the transaction it usually takes less than a minute to go through, once you see the message `Transaction Submitted` you are done!

<figure><img src="/files/yXCjCvA2j1fncRmp66fM" alt=""><figcaption></figcaption></figure>
{% endtab %}

{% tab title="BNC" %}

### How to Get Bifrost (BNC) Token On Moonbeam

<figure><img src="/files/A98KjqT73oONzO9fu88I" alt=""><figcaption></figcaption></figure>

### Step 1: Open XCM Page

Head to <https://apps.moonbeam.network/moonbeam/xcm>

<figure><img src="/files/JGip7d7e7Q9k6xHCUohM" alt=""><figcaption></figcaption></figure>

### Step 2: Select BNC Token and Bifrost Network

Click on `Token` and from the drop down menu select BNC. Under `From` section choose Bifrost, and make sure the `To` is set to Moonbeam.

<figure><img src="/files/Xl41LJabOVWqLuknuFlS" alt=""><figcaption></figcaption></figure>

### Step 3: Enter Amount To Send

Enter amount you would like to send and click `Send`, then sign the transaction.

<figure><img src="/files/Fz9YGkbnpD48W0pPNCLD" alt=""><figcaption></figcaption></figure>

### Step 4: Wait For Transfer To Complete

After signing the transaction you will see this `transaction status` page, where you can wait for your funds to get through. It should not take long.

<figure><img src="/files/nfPG8aE1rEPwsULbszk8" alt=""><figcaption></figcaption></figure>

### Step 5: Success! You Now Have BNC on Moonbeam

Once Transaction is done and you see the status changed to Transaction Completed, you now have BNC on Moonbeam and can start trading, farming on StellaSwap Dapp.

<figure><img src="/files/ns3M6cRWPtUMkGLgTwWb" alt=""><figcaption></figcaption></figure>
{% endtab %}
{% endtabs %}


# How to Get Phala (PHA.xc) Token On Moonbeam

Step by step walk through to sending Phala Network token on StellaSwap XCM Channel

### Step 1: Open XCM Page

From StellaSwap Dapp navigate to `Transfers` then `Cross-Chain XCM Transfer` or directly head to <https://app.stellaswap.com/bridge/xctransfer>

<figure><img src="/files/xQP6wYsiqmfpjIgawfbM" alt=""><figcaption></figcaption></figure>

### Step 2: Select PHA Token

Click on `tokens to transfer`, and select PHA. Then to send tokens from Phala to Moonbeam choose `Deposit`

<figure><img src="/files/wQrjk3IgBzk4mdfR5SSl" alt=""><figcaption></figcaption></figure>

### Step 3: Connect Wallet

After clicking deposit, you will be prompted to connect your substrate wallet. You can choose your wallet from three options, the tutorial is using Polkadot.js wallet. If you are unfamiliar with Substrate wallets click [here ](https://wiki.polkadot.network/docs/wallets#treasury-funded-wallets)to learn more&#x20;

<figure><img src="/files/6md14QRBWrd6LwTz8SdM" alt=""><figcaption></figcaption></figure>

### Step 4: Input Required Info

On this page you have to enter the desired amount you would like to send and the account you are sending from. Once done you can go ahead and click `Send`. You will be prompted to sign the transaction in your wallet.

<figure><img src="/files/VQR0MQYfp4l3k5cHQAop" alt=""><figcaption></figcaption></figure>

### Step 5: Check Status

After submitting the transaction it usually takes less than a minute to go through, once you see the message `Transaction Submitted` you are done!

<figure><img src="/files/utS29i0cxQPYfCXrPFgr" alt=""><figcaption></figcaption></figure>


# How to Get Pendulum (xcPEN) Token On Moonbeam

Step by step walk through to sending Pendulum token on StellaSwap XCM Channel

### Step 1: Open XCM Page

From StellaSwap Dapp navigate to `Transfers` then `Cross-Chain XCM Transfer` or directly head to <https://app.stellaswap.com/bridge/xctransfer>

<figure><img src="/files/xQP6wYsiqmfpjIgawfbM" alt=""><figcaption></figcaption></figure>

### Step 2: Select PEN Token

Click on `tokens to transfer`, and select PEN. Then to send tokens from Pendulum to Moonbeam choose `Deposit`

<figure><img src="/files/jd4ME6LtVNZTgeYjOq2n" alt=""><figcaption></figcaption></figure>

### Step 3: Connect Wallet

After clicking deposit, you will be prompted to connect your substrate wallet. You can choose your wallet from three options, the tutorial is using Polkadot.js wallet. If you are unfamiliar with Substrate wallets click [here ](https://wiki.polkadot.network/docs/wallets#treasury-funded-wallets)to learn more&#x20;

<figure><img src="/files/6md14QRBWrd6LwTz8SdM" alt=""><figcaption></figcaption></figure>

### Step 4: Input Required Info

On this page you have to enter the desired amount you would like to send and the account you are sending from. Once done you can go ahead and click `Send`. You will be prompted to sign the transaction in your wallet.

<figure><img src="/files/DTnK6MqVt8PbF1OTOGue" alt=""><figcaption></figcaption></figure>

### Step 5: Check Status

After submitting the transaction it usually takes less than a minute to go through, once you see the message `Transaction Submitted` you are done!

<figure><img src="/files/3gXhl5HSfuzkx2Fe9tlR" alt=""><figcaption></figcaption></figure>


# How to Get ZTG Token On Moonbeam (xcZTG)

Step by step walk through to sending ZTG token on StellaSwap XCM Channel

### Step 1: Open XCM Page

From StellaSwap Dapp navigate to `Transfers` then `Cross-Chain XCM Transfer` or directly head to <https://app.stellaswap.com/bridge/xctransfer>

<figure><img src="/files/xQP6wYsiqmfpjIgawfbM" alt=""><figcaption></figcaption></figure>

### Step 2: Select ZTG Token

Click on `tokens to transfer`, and select PHA. Then to send tokens from Phala to Moonbeam choose `Deposit`

<figure><img src="/files/kLv0ywUoI96CL8aU7Qil" alt=""><figcaption></figcaption></figure>

### Step 3: Connect Wallet

After clicking deposit, you will be prompted to connect your substrate wallet. You can choose your wallet from three options, the tutorial is using Polkadot.js wallet. If you are unfamiliar with Substrate wallets click [here ](https://wiki.polkadot.network/docs/wallets#treasury-funded-wallets)to learn more&#x20;

<figure><img src="/files/6md14QRBWrd6LwTz8SdM" alt=""><figcaption></figcaption></figure>

### Step 4: Input Required Info

On this page you have to enter the desired amount you would like to send and the account you are sending from. Once done you can go ahead and click `Send`. You will be prompted to sign the transaction in your wallet.

<figure><img src="/files/LAvZUkzkw793I78IR3j0" alt=""><figcaption></figcaption></figure>

### Step 5: Check Status

After submitting the transaction it usually takes less than a minute to go through, once you see the message `Transaction Submitted` you are done!

<figure><img src="/files/TEyYoZuwgAdDtWlRLecQ" alt=""><figcaption></figcaption></figure>


# How to Get Bifrost (BNC) Token On Moonbeam

Step by step walk through to sending Bifrost BNC token on XCM Channel

### Step 1: Open XCM Page

Head to <https://apps.moonbeam.network/moonbeam/xcm>

<figure><img src="/files/JGip7d7e7Q9k6xHCUohM" alt=""><figcaption></figcaption></figure>

### Step 2: Select BNC Token and Bifrost Network

Click on `Token` and from the drop down menu select BNC. Under `From` section choose Bifrost, and make sure the `To` is set to Moonbeam.

<figure><img src="/files/Xl41LJabOVWqLuknuFlS" alt=""><figcaption></figcaption></figure>

### Step 3: Enter Amount To Send

Enter amount you would like to send and click `Send`, then sign the transaction.

<figure><img src="/files/Fz9YGkbnpD48W0pPNCLD" alt=""><figcaption></figcaption></figure>

### Step 4: Wait For Transfer To Complete

After signing the transaction you will see this `transaction status` page, where you can wait for your funds to get through. It should not take long.

<figure><img src="/files/nfPG8aE1rEPwsULbszk8" alt=""><figcaption></figcaption></figure>

### Step 5: Success! You Now Have BNC on Moonbeam

Once Transaction is done and you see the status changed to Transaction Completed, you now have BNC on Moonbeam and can start trading, farming on StellaSwap Dapp.

<figure><img src="/files/ns3M6cRWPtUMkGLgTwWb" alt=""><figcaption></figcaption></figure>


# How to Get Bifrost Voucher FileCoin (xcvFIL) Token On Moonbeam

Step by step walk through to sending vFIL token on XCM Channel

{% hint style="warning" %}

#### Before starting make sure you have BNC tokens to pay for transaction fees on Bifrost Network, you can swap to BNC on StellaSwap and then send it to Bifrost using the same XCM channel.

{% endhint %}

### Step 1: Open XCM Page

Head to <https://apps.moonbeam.network/moonbeam/xcm>

<figure><img src="/files/JGip7d7e7Q9k6xHCUohM" alt=""><figcaption></figcaption></figure>

### Step 2: Select vFIL Token and Bifrost Network

Click on `Token` and from the drop down menu select FIL. Under `From` section choose Bifrost, and make sure the `To` is set to Moonbeam.

<figure><img src="/files/fVjYqXp1ZrYpvX4Rpgre" alt=""><figcaption></figcaption></figure>

### Step 3: Enter Amount To Send

Enter amount you would like to send and click `Send`, then sign the transaction.

<figure><img src="/files/56gZgmDLYLHsmboU69ey" alt=""><figcaption></figcaption></figure>

### Step 4: Wait For Transfer To Complete

After signing the transaction you will see this `transaction status` page, where you can wait for your funds to get through. It should not take long.

<figure><img src="/files/M2UkuqukhU0i2bB0cNa3" alt=""><figcaption></figcaption></figure>

### Step 5: Success! You Now Have xcvFIL on Moonbeam

Once Transaction is done and you see the status changed to Transaction Completed, you now have vFIL on Moonbeam and can start trading, farming on StellaSwap Dapp.

<figure><img src="/files/OSb1pOZLBQ6IsiDxPfSf" alt=""><figcaption></figcaption></figure>


# How to Send Polkadot (DOT) to Moonbeam

Step by step walk through to sending Polkadot (DOT) token on StellaSwap XCM Channel

### Step 1: Open XCM Page

From StellaSwap Dapp navigate to `Transfers` then `Cross-Chain XCM Transfer` or directly head to <https://app.stellaswap.com/bridge/xctransfer>

<figure><img src="/files/xQP6wYsiqmfpjIgawfbM" alt=""><figcaption></figcaption></figure>

### Step 2: Select DOT Token

Click on `tokens to transfer`, and select DOT. Then to send tokens from Polkadot to Moonbeam choose `Deposit`

<figure><img src="/files/dh6POTjc5IRikzDwvHSZ" alt=""><figcaption></figcaption></figure>

### Step 3: Connect Wallet

After clicking deposit, you will be prompted to connect your substrate wallet. You can choose your wallet from three options, the tutorial is using Polkadot.js wallet. If you are unfamiliar with Substrate wallets click [here ](https://wiki.polkadot.network/docs/wallets#treasury-funded-wallets)to learn more&#x20;

<figure><img src="/files/6md14QRBWrd6LwTz8SdM" alt=""><figcaption></figcaption></figure>

### Step 4: Input Required Info

On this page you have to enter the desired amount you would like to send and the account you are sending from. Once done you can go ahead and click `Send`. You will be prompted to sign the transaction in your wallet.

<figure><img src="/files/4t6zOinAQR0mH6fxufNK" alt=""><figcaption></figcaption></figure>

### Step 5: Check Status

After submitting the transaction it usually takes less than a minute to go through, once you see the message `Transaction Submitted` you are done!

<figure><img src="/files/isRuIHBi7NMWsEJyp63a" alt=""><figcaption></figcaption></figure>


# How to Get INTR & iBTC On Moonbeam

Step by step walk through to sending INTR & iBTC token on StellaSwap XCM Channel

### Step 1: Open XCM Page

From StellaSwap Dapp navigate to `Transfers` then `Cross-Chain XCM Transfer` or directly head to <https://app.stellaswap.com/bridge/xctransfer>

<figure><img src="/files/xQP6wYsiqmfpjIgawfbM" alt=""><figcaption></figcaption></figure>

### Step 2: Select PHA Token

Click on `tokens to transfer`, and select INTR or iBTC. Then to send tokens from Interlay to Moonbeam choose `Deposit`

<figure><img src="/files/VhFgf1H6YsPxw6AK0yTe" alt=""><figcaption></figcaption></figure>

### Step 3: Connect Wallet

After clicking deposit, you will be prompted to connect your substrate wallet. You can choose your wallet from three options, the tutorial is using Polkadot.js wallet. If you are unfamiliar with Substrate wallets click [here ](https://wiki.polkadot.network/docs/wallets#treasury-funded-wallets)to learn more&#x20;

<figure><img src="/files/6md14QRBWrd6LwTz8SdM" alt=""><figcaption></figcaption></figure>

### Step 4: Input Required Info

On this page you have to enter the desired amount you would like to send and the account you are sending from. Once done you can go ahead and click `Send`. You will be prompted to sign the transaction in your wallet.

<figure><img src="/files/kypERWML4iYh7zkRlMXZ" alt=""><figcaption></figcaption></figure>

### Step 5: Check Status

After submitting the transaction it usually takes less than a minute to go through, once you see the message `Transaction Submitted` you are done!

<figure><img src="/files/DrFK2S9M5ZfypzAuvHKx" alt=""><figcaption></figcaption></figure>


# How to Get Centrifuge (CFG) Token On Moonbeam

Step by step walk through to sending Centrifuge token on StellaSwap XCM Channel

### Step 1: Open XCM Page

From StellaSwap Dapp navigate to `Transfers` then `Cross-Chain XCM Transfer` or directly head to <https://app.stellaswap.com/bridge/xctransfer>

<figure><img src="/files/xQP6wYsiqmfpjIgawfbM" alt=""><figcaption></figcaption></figure>

### Step 2: Select CFG Token

Click on `tokens to transfer`, and select CFG. Then to send tokens from Centrifuge to Moonbeam choose `Deposit`

<figure><img src="/files/nWeeM9yrBYvxtEmA1gZD" alt=""><figcaption></figcaption></figure>

### Step 3: Connect Wallet

After clicking deposit, you will be prompted to connect your substrate wallet. You can choose your wallet from three options, the tutorial is using Polkadot.js wallet. If you are unfamiliar with Substrate wallets click [here ](https://wiki.polkadot.network/docs/wallets#treasury-funded-wallets)to learn more&#x20;

<figure><img src="/files/6md14QRBWrd6LwTz8SdM" alt=""><figcaption></figcaption></figure>

### Step 4: Input Required Info

On this page you have to enter the desired amount you would like to send and the account you are sending from. Once done you can go ahead and click `Send`. You will be prompted to sign the transaction in your wallet.

<figure><img src="/files/IMFHwrpbAy1aDvan7DAM" alt=""><figcaption></figcaption></figure>

### Step 5: Check Status

After submitting the transaction it usually takes less than a minute to go through, once you see the message `Transaction Submitted` you are done!

<figure><img src="/files/3CsUggXDJLKstsBYsXJN" alt=""><figcaption></figcaption></figure>


# How to Get Acala Dot (xcLDOT) Token on Moonbeam

Step by step walk through to sending LDOT token on StellaSwap XCM Channel. Before starting make sure you have enough Acala for transaction cost.

### Step 1: Open XCM Page

From StellaSwap Dapp navigate to `Transfers` then `Cross-Chain XCM Transfer` or directly head to <https://app.stellaswap.com/bridge/xctransfer>

<figure><img src="/files/xQP6wYsiqmfpjIgawfbM" alt=""><figcaption></figcaption></figure>

### Step 2: Select LDOT Token

Click on `tokens to transfer`, and select LDOT. Then to send tokens from Acala to Moonbeam choose `Deposit`

<figure><img src="/files/0Wq9vnhlTx64gNM5VPyg" alt=""><figcaption></figcaption></figure>

### Step 3: Connect Wallet

After clicking deposit, you will be prompted to connect your substrate wallet. You can choose your wallet from three options, the tutorial is using Polkadot.js wallet. If you are unfamiliar with Substrate wallets click [here ](https://wiki.polkadot.network/docs/wallets#treasury-funded-wallets)to learn more&#x20;

<figure><img src="/files/6md14QRBWrd6LwTz8SdM" alt=""><figcaption></figcaption></figure>

### Step 4: Input Required Info

On this page you have to enter the desired amount you would like to send and the account you are sending from. Once done you can go ahead and click `Send`. You will be prompted to sign the transaction in your wallet.

<figure><img src="/files/T2holCIIhYnRRoQGshnP" alt=""><figcaption></figcaption></figure>

### Step 5: Check Status

After submitting the transaction it usually takes less than a minute to go through, once you see the message `Transaction Submitted` you are done!

<figure><img src="/files/u14XWpjRVTmdE3JOoosf" alt=""><figcaption></figcaption></figure>


# How to Get Astar Token on Moonbeam

Step by step walk through to sending Astar token on StellaSwap XCM Channel

### Step 1: Open XCM Page

From StellaSwap Dapp navigate to `Transfers` then `Cross-Chain XCM Transfer` or directly head to <https://app.stellaswap.com/bridge/xctransfer>

<figure><img src="/files/xQP6wYsiqmfpjIgawfbM" alt=""><figcaption></figcaption></figure>

### Step 2: Select CFG Token

Click on `tokens to transfer`, and select Astar. Then to send tokens from Astar to Moonbeam choose `Deposit`

<figure><img src="/files/xoRWh0rjtAf3mrFHYDrR" alt=""><figcaption></figcaption></figure>

### Step 3: Connect Wallet

After clicking deposit, you will be prompted to connect your substrate wallet. You can choose your wallet from three options, the tutorial is using Polkadot.js wallet. If you are unfamiliar with Substrate wallets click [here ](https://wiki.polkadot.network/docs/wallets#treasury-funded-wallets)to learn more&#x20;

<figure><img src="/files/6md14QRBWrd6LwTz8SdM" alt=""><figcaption></figcaption></figure>

### Step 4: Input Required Info

On this page you have to enter the desired amount you would like to send and the account you are sending from. Once done you can go ahead and click `Send`. You will be prompted to sign the transaction in your wallet.

<figure><img src="/files/K8LaO9NxzVs5J6DxQKut" alt=""><figcaption></figcaption></figure>

### Step 5: Check Status

After submitting the transaction it usually takes less than a minute to go through, once you see the message `Transaction Submitted` you are done!

<figure><img src="/files/yXCjCvA2j1fncRmp66fM" alt=""><figcaption></figcaption></figure>


# How to Get Native USDT (xcUSDT) On Moonbeam

Here is a step by step guide on how to get native USDT (xcUSDT) on Moonbeam network. This guide will walk you through withdrawing USDT from Bitfinex all the way to getting USDT on your Metamask wallet to do DeFi things on StellaSwap.

### What You Will Need:

\
1\. USDT on [Bitfinex](https://www.bitfinex.com/)

2\. Polkadot Wallet, guide is using Polkadot.js extension

3\. MetaMask Wallet

4\. Small amount of DOT

### Step 1: Ensure You Have DOT on StateMint

Make sure you have at least 0.1 DOT on the Polkadot address you want to withdraw to on Statemint, without DOT the withdrawal will not succeed. To send funds from Polkadot or any parachain to Statemint you can use <https://polkadot.js.org/apps>, under Accounts select `Teleport`&#x20;

<figure><img src="/files/O24hXSJ0DOXLzmZjjCQe" alt=""><figcaption></figcaption></figure>

Set destination to Statemint and input at least 0.1 DOT  and `send`.

<figure><img src="/files/5WDLQ1e0ucozwa1i456j" alt=""><figcaption></figcaption></figure>

### 2. Withdraw USDT from Bitfenix to Statemint

Head to Bitfenix, go to `Withdraw` and make sure you have Tether(USD) on Polkadot selected as Transport. Input your Address, amount and request withdrawal. Once done you will be able to see it on Statemint block explorer, head to <https://statemint.subscan.io/> and paste your address in the search bar.

<figure><img src="/files/vL6w7Q3EkM0OgYwyLhQE" alt=""><figcaption></figcaption></figure>

### 3. Send USDT to Moonbeam

Once you have USDT on Statemint you can use XCM channel (Cross-chain XC Transfer) to send it across Polkadot parachains. Head to <https://app.stellaswap.com/bridge/xctransfer>, or simply navigate to Transfer, Cross-chain Transfer if you are already on StellaSwap Dappp.<br>

<br>

<figure><img src="/files/l6PWD6TPqJR5rNXsg5Aq" alt=""><figcaption></figcaption></figure>

Select USDt.xc as token and click on `Deposit`, connect to a wallet prompt may come up if you don't already have your polkadot wallet connected.

<figure><img src="/files/V3ZupTbveOUJyQJcrW43" alt=""><figcaption></figcaption></figure>

Input the amount you would like to send to Moonbeam and click `Send`, once you sign transaction in your wallet it will take few moments for the transaction to arrive.

<figure><img src="/files/c0htmQlknYeH7UTSOKGb" alt=""><figcaption></figcaption></figure>

###

### 4. Add Token to Metamask

Once transaction is done you will have xcUSDT on Moonbeam, you can add token contract address to Metamask to easily interact with it and see your balance. Just click on `add xcUSDT to MetaMask` and confirm add token on the metamask prompt.

<figure><img src="/files/vazcZN2HquyLJTLjtcWK" alt=""><figcaption></figcaption></figure>

### 5. Sucess you have successfully sent Native USDT to Moonbeam!


# How to Send USDT From Binance To Moonbeam

Here is a step by step guide on how to get native USDT (xcUSDT) on Moonbeam network directly from Binance Exchange. This guide will walk you through withdrawing USDT from Binance all the way to getting USDT on your Metamask wallet to do DeFi things on StellaSwap.

### What You Will Need:

\
1\. USDT on Binance

2\. Polkadot Wallet, guide is using Polkadot.js extension

3\. MetaMask Wallet

4\. Small amount of DOT

### Step 1: Ensure You Have DOT on StateMint

Make sure you have at least 0.1 DOT on the Polkadot address you want to withdraw to on Statemint, without DOT the withdrawal will not succeed. To send funds from Polkadot or any parachain to Statemint you can use <https://polkadot.js.org/apps>, under Accounts select `Teleport`&#x20;

<figure><img src="/files/O24hXSJ0DOXLzmZjjCQe" alt=""><figcaption></figcaption></figure>

Set destination to Statemint and input at least 0.1 DOT  and `send`.

<figure><img src="/files/5WDLQ1e0ucozwa1i456j" alt=""><figcaption></figcaption></figure>

### 2. Withdraw USDT from Binance to Statemint

Head to Binance, go to spot wallet then find Tether USDT and click on withdraw. Make sure ot select the right network: STATEMINT(Polkadot), Input your Address, amount and request withdrawal. Once done you will be able to see it on Statemint block explorer, head to <https://statemint.subscan.io/> and paste your address in the search bar.

<figure><img src="/files/5siKsrh2wC14V1mYBy8A" alt=""><figcaption></figcaption></figure>

### 3. Send USDT to Moonbeam

Once you have USDT on Statemint you can use XCM channel (Cross-chain XC Transfer) to send it across Polkadot parachains. Head to <https://app.stellaswap.com/bridge/xctransfer>, or simply navigate to Transfer, Cross-chain Transfer if you are already on StellaSwap Dappp.

<figure><img src="/files/l6PWD6TPqJR5rNXsg5Aq" alt=""><figcaption></figcaption></figure>

Select USDt.xc as token and click on `Deposit`, connect to a wallet prompt may come up if you don't already have your polkadot wallet connected.

<figure><img src="/files/V3ZupTbveOUJyQJcrW43" alt=""><figcaption></figcaption></figure>

Input the amount you would like to send to Moonbeam and click `Send`, once you sign transaction in your wallet it will take few moments for the transaction to arrive.

<figure><img src="/files/c0htmQlknYeH7UTSOKGb" alt=""><figcaption></figcaption></figure>

### 4. Add Token to Metamask

Once transaction is done you will have xcUSDT on Moonbeam, you can add token contract address to Metamask to easily interact with it and see your balance. Just click on `add xcUSDT to MetaMask` and confirm add token on the metamask prompt.

<figure><img src="/files/vazcZN2HquyLJTLjtcWK" alt=""><figcaption></figcaption></figure>

### 5. Sucess you have successfully sent Native USDT to Moonbeam!


# How to Send INTR & iBTC to Moonbeam (XCM)

&#x20;A quick step by step guide to sending Interlay and iBTC assets from Interlay parachain to Moonbeam.

### Step 1: Open Moonbeam App

Navigate to Stella Bridge, under Bridge click `XCM transfer`. Or head directly to <https://apps.moonbeam.network/moonbeam>

![](/files/plE5aojB4OEAnmayaP85)

### Step 2: Find iBTC or INTR

Locate iBTC or INTR in the cross-chain assets table and click on `Deposit`.

![](https://lh6.googleusercontent.com/9S-dcMoAkzKcLzvoSRZPbDkqel6TFyaMtZxasob1X5qItiutYs5kcM1PbB3d_4VaL51vi4gN7jSOJEY3nLzqikwwTc_PBSpP4lxy_B2cJIYd6iICiHEJ3rv6suU-UVA2AxIRE7Doi1mCPdFsTbnC7Q)

### Step 3: Deposit Amount

Enter the value you would like to send and connect your dot wallet. Once done click `Send` and sign the transaction on your dot wallet.

![](https://lh4.googleusercontent.com/uoskfF0C1FIK_A7vxvK-WYbsUqy25-1TJPEY9ElbvCw-T_FBp4gFFNhNnHZY5dn-rzgdCWCuZ1QyJCmugm2YJyY-biAgcmokD7WmWgyZblres4ZqQtCC8cgfa5KOX8XWmeu2j2rHNeV5EPya3rS5Ig)

### Step 4: Wait For Transaction Confirmation

After signing the message it should take less than one minute for your funds to reach, you can follow the progress on the right of the screen.&#x20;

![](https://lh5.googleusercontent.com/VBFxe-MwMkSWlZsCJTAQWegh4IjmfiFEXam7cTnBezc_7KXBIoU8N1JUdtk-VM7lZQHeag1TxrUfpllEUhgqwxjW2m3osr0alvNp1ILtIakMgm8OaTgzDvV_ZLfEWvnbvqwAg5k3xPuLqVo25GcszA)

![](https://lh5.googleusercontent.com/DxDcbyBCEGkCUg3Ku_8_UIYEgEK5PqPW1xGyJ0LsVzsxHIsyyNZYMiG_JtLawk6ehNHJwofDyQVNhI02bQGI7hYj6s4pCzca4KftGjFAq36A1ad7-5JOZ_bmFLw_pzkFqHP8ahSb2YynFZLhnTbvLQ)

### Step 5: Add Token to Metamask (optional)

Once you have sent over your funds you can add the token addresses in Metamask to view your tokens in wallet. To do that click on `add to wallet` next to the token name you sent (iBTC or INTR) and approve the Metamask messages. Once done you should be able to see the tokens in your wallet.

![](https://lh5.googleusercontent.com/kH7lIq9pOfRtHlqEfKyWY4nHlcbgRz7yAH2kYavE3qhkCgRPgtwL3z6Ggu5dKgE2J14hERNIJc5xpmEn09PDgM5MVSPqEWp3Ta8z3qLIMXEJz_muZpJG7t_WvEcgtgqdYia8kDLrSs_SAdITSjxWPw)

![](https://lh5.googleusercontent.com/bixnVRgUaBg2Nxbwonn3gkmrmWgvLc24KdB2Kwnghzogab6xQY0F1oThShlE6BziXG5XMN0NUXSBuagVc7ztowy0BwcYJzKJCT4NAzTfuZbY0t7H3lmjSI0uZTC9p9OzCOFiNg4E8PDHKmcCO1uxgw)

![](https://lh4.googleusercontent.com/XF4qGs6nKmj-yLmLEfpUbkAuJMAdhnx5KcspB1gt_dneepxjzIKjQw5enEzzREpOi2o4kMXgJtZJIhw8RPYUGSPXI8z87KM5uzi68gik4OEFb89YcxDF9n6N36aba88I_zRjV8u2dcp8bexdirl7nA)


# Mint MAI

Here is a step by step guide on using StellaSwap's lending facility powered by QiDao Protocol, this guide will take you through locking in collateral and borrowing MAI stablecoin

Note: Borrowing against collateral may lead to liquidation and is risky, make sure to read the full docs and DYOR to avoid losing your assets.

![](/files/r7BJ3H7OxLtc5kro0Lqn)

### Step 1: Head to Mint MAI Facility

You can get there by finding Stake on main header and clicking `Mint MAI`, or by directly visitng the page app > <https://app.stellaswap.com/mai>

![](/files/y78tI9etsd3nz9mkrnkB)

### Step 2: Create Vault

Choose which asset you would like to deposit as a collateral. In order to lock in your asset in the smart contract and borrow MAI for a portion of your assets value.&#x20;

Once you have chosen the asset and posses it in your wallet, click on `Create Vault` to begin the borrowing process, you will only need to create vault once.&#x20;

*Note: Borrowing against collateral can lead to (liquidation): your deposited assets being sold to pay back your loan if your assets value drop to liquidation price.*

![](/files/QQ1ZUBySJlgH9DOiJGyd)

Approve MetaMask message to confirm creating vault.

![](/files/C3j5Ad94Ft0yQZsbzAR6)

### Step3: Deposit Collateral&#x20;

Make sure you are on Deposit tab and enter the amount of collateral you would like to deposit. This will determine how much MAI you can borrow as the maximum is 40% of your deposited asset value.&#x20;

Click on `Approve` to continue, and confirm the pop-up MetaMask transaction.

![](/files/87eyYxYmownRvqRMagaL)

Once contract approval transaction is done, you can deposit your collateral by clicking `Deposit`

![](/files/bSJJIkSNNdnV4XatOkDs)

### Step 4: Borrow (Mint) MAI

After depositing collateral you will be able to see it in vault info, on this page you will also be able to see how much MAI you are able to Mint (borrow).&#x20;

![](/files/qfrOuueG4alMYlWHaA5M)

Head to Borrow tab in vault, and input your desired amount to borrow.&#x20;

> ***Note**: borrowing an amount closer to the max available to borrow is risky when it comes to volatile assets and may lead to liquidation if the asset value reaches liquidation price*

![](/files/v43NoL8W6YhB2R0gMx7T)

After inputting the amount, Click `Approve`, confirm MetaMask message and click `Borrow MAI` once its done.

![](/files/Ivu7EIS3BRW15Ef8kngA)

### Step 5: Success!&#x20;

You have successfully borrowed MAI and can find it in your wallet. You can now trade, farm or transfer MAI as you would any other stablecoin.&#x20;

*Don't forget to maintain your loan to avoid liquidation, keep an eye on the estimated liquidation price for your collateral and either pay back loan or lock in more collateral to keep a healthy rate.*

![](/files/dJZEKcUv8qHT08dWTAHL)

### Optional: Maintain MAI Position

This section will cover how to maintain your MAI position and avoid getting liquidated.

When you create a MAI vault, you are borrowing against your provided collateral value. Given the volatility you have to maintain the health of your vault to avoid liquidations.&#x20;

Your Vault's health can be seen in these two metrics of `Current Loan to Value` and `Liquidation Price`.  The further away the number of max loan from your vault's current loan to value the healthier and less likely you are to being liquidated. Same goes for liquidation price, the further away liquidation price from actual price means safer vault.

<figure><img src="/files/7OIaqkrPArK3F8RTqZ0b" alt=""><figcaption></figcaption></figure>

So what if your liquidation price is close and the current loan to value is almost at max loan to value. There are two ways to avoid liquidations:\
\
1\. Pay back MAI

2\. Add more Collateral

Using Stella's MAI facility you can simulate changes to your vault when adding collateral or paying back MAI by inputting the numbers on the Deposit tab and Repay tab.

Here is an example of adding an extra 100 xSTELLA to a vault with 25% Loan to Value ratio

<figure><img src="/files/thSUUTPlt5TuxxCHCrtY" alt=""><figcaption></figcaption></figure>

Notice how the after value drops to 19%, taking us further away from liquidation.

Here is the same vault when repaying some of the debt

<figure><img src="/files/ZhNPpyCAZuOfpuQEUtel" alt=""><figcaption></figcaption></figure>

In conclusion make sure you maintain a healthy vault to avoid liquidation by checking relevant metrics and taking action when necessary.


# Contract Addresses

Contract Addresses Deployed on StellaSwap

| Contract                 | Address                                    |
| ------------------------ | ------------------------------------------ |
| Base4Pool                | 0xB326b5189AA42Acaa3C649B120f084Ed8F4dCaA6 |
| USDC.axl Metapool        | 0xacb7dA459719EA26054D0481c5B3AE5903bd9906 |
| MAI Metapool             | 0xF0A2ae65342f143fc09c83E5f19b706aBB37414D |
| aUSD.xc-GLMR Pulsar Pool | 0x86c50c9Bc4E3F15d6d6Eb47393cB07BD701bcf04 |
| STELLA-GLMR Pulsar Pool  | 0x1b11D991f32FB59Ec4EE744de68aD65d9e85b2d2 |
| PHA.xc-GLMR Pulsar Pool  | 0x2f7DAF9B66a7bEE6f9E046973e2E3d01D810207C |
| Router V3                | 0xe6d0ED3759709b743707DcfeCAe39BC180C981fe |
|                          |                                            |


# General FAQ

Frequently Asked Questions on StellaSwap

![](/files/gNtrDZQOM4cvC3elWDKO)

### When did StellaSwap Launch? <a href="#docs-internal-guid-297adb2f-7fff-f05b-c820-36ce410906b0" id="docs-internal-guid-297adb2f-7fff-f05b-c820-36ce410906b0"></a>

StellaSwap launched in tandem with the full EVM launch of Moonbeam, on January 11th, 2022.

### Is StellaSwap Safe?

We've undergone not one but two audits by leading third-party audits in the DeFi space. Being double-audited reflects our ongoing commitment to the highest standards of security for the comfort of our users. You can find more information on the audits here: <https://docs.stellaswap.com/resources/audit>

### What is STELLA?

$STELLA is StellaSwap's native token that is the main medium of exchange across our ecosystem of product offerings.

* Tokenomics - <https://docs.stellaswap.com/tokenomics/stella-token>

### How Can I Stake Stella

* Provide liquidity by staking your coins on StellaSwap's farms and earn high APYs
* You’ll earn rewards in Stella + 0.25% of transaction fees
* Stake $STELLA in xSTELLA and receive a portion of swap fees[ https://medium.com/p/b3899895d3f7](https://medium.com/p/b3899895d3f7)

<br>

### What is the Max Supply of STELLA?

The maximum supply of $STELLA would be 500 million, with an emission distribution period of 3 years starting from our launch date. StellaSwap was launched via a fair launch model, which is the fairest way of protocol launch and token distribution.

Note - Our emissions schedule is not linear, our current emissions are lower than that. We are actively managing our emissions to balance liquidity incentives and token value.

### How do I know that Stella is a successful dex?

You’ll need to DYOR. However, here are some helpful resources

<https://dexscreener.com/moonbeam>

Hit the filter at the bottom to 24 hours, and then sort by Volume. This will tell you how much trading volume each pool on each dex on moonbeam gets

<https://defillama.com/chain/Moonbeam>

As of this writing, we’re the top dex on Moonbeam by both TVL and transaction volumes.

<br>

### Should I LP my tokens? I heard about Impermanent Loss and it sounds scary!

Don’t be afraid! Effectively what this means is, if you hold 2 tokens in an LP and they both go up, when you withdraw you’ll have proportionally more of whichever one went up less.

<br>

It’s important to remember you’ll still have more money than you started (assuming they did go up!), just not as much as if you had simply held whichever one of the two tokens performed better. Assuming you can’t tell the future, using an LP and having “Impermanent Loss” is a way to hedge your bets between two tokens.

<br>

And also remember, you’ll be earning rewards and fees along the way.

<br>

Here’s an impermanent loss calculator you can use to estimate it

<https://dailydefi.org/tools/impermanent-loss-calculator/>

<br>

Stella Rewards + LP fees + price action  - Impermanent Loss, is the way to think about this.

<br>

### Common Support Questions

### How do I bridge my tokens to Moonbeam?

Check out our guides - <https://docs.stellaswap.com/resources/how-to-guides/bridge>

Also, note that bridging can sometimes take a little while. Don’t panic when your tokens don’t show up immediately.

<br>

### Where can I get gas for my first Moonbeam transaction?

You can use our Swap-for-Gas feature: <https://app.stellaswap.com/bridge/gas-swap>

Your token is not supported? You can try our faucet as well (link at the bottom of that page)

<br>

### Where can I go to get support?

Check out our discord [discord.stellaswap.com](https://t.co/Z7gTJ707hI)

<br>

### I just withdrew my tokens from a farm and my rewards are gone!

Don’t worry! Anytime you interact with a farm, your rewards will auto harvest

<br>

### Why can’t I trade my stablecoins?

Moonbeam has several different “brands” of stablecoin, one for each bridge. There’s Celer, Multichain, Nomad, etc. They’re not interchangeable, and all have different contract addresses, and you’ll need to swap from one to another.

<br>

<br>

### The website is broken in some way! Metamask won’t do anything when I click buttons!

It’s most likely a browser issue on your side. Clear cookies, restart browser, all that sort of stuff

<br>

### I was just DM’d by a mod. They want me to click a link/provide my seed phrase?

Never EVER do this. Mods will not DM you. And we will NEVER ask for any personal information, especially seed phrases.


# Security


# Audit

Security is the top priority for the StellaSwap team. That is why we have engaged with Certik, is the leading security-focused ranking platform to analyze and monitor blockchain protocols and DeFi projects.

{% tabs %}
{% tab title="Certik" %}

<figure><img src="/files/HAW5oe74t3w4z06WJ0SK" alt=""><figcaption></figcaption></figure>

We have completed a full audit of all our smart contracts by SolidProof. The engagement was technical in nature and focused on identifying security flaws in the design and implementation of the contracts.

The full audit can be reviewed here:&#x20;

{% file src="/files/ClFWlXfvLvFbn4kUL1eM" %}

### Token Smart Contract

We've also undergone a full audit on our token smart contracts. You can view the Audit on Certik's website: <https://www.certik.com/projects/stellaswap>
{% endtab %}

{% tab title="SolidProof" %}

<figure><img src="/files/hzT7SaORoSTgm0NufTzI" alt=""><figcaption></figcaption></figure>

We have completed a full audit of all our smart contracts by SolidProof. The engagement was technical in nature and focused on identifying security flaws in the design and implementation of the contracts.

The full audit can be reviewed here: <https://github.com/solidproof/projects/tree/main/StellaSwap>

### Stable AMM Audit

<figure><img src="/files/SarrOPXAnhCBzctlGEG6" alt=""><figcaption></figcaption></figure>

We engaged SolidProof for a comprehensive audit of our [Stable AMM](https://stellaswap.medium.com/stellaswap-launching-correlated-asset-amm-for-low-slippage-stablecoin-trading-with-minimal-fees-16837ef23f43) before launching. The full audit of our Stable AMM can be found here:

{% file src="/files/ft0uSkFVlZS1bNRiINNa" %}

### Token Smart Contract

We have successfully completed an audit of our token smart contract address and Solid Proof has maintained that "The contract does not contain issues of high or medium criticality". Here is the audit report from SolidProof:

[SolidProof Audit Report](https://github.com/solidproof/smart-contract-audits/blob/main/SmartContract_Audit_Solidproof_StellaSwap.pdf)
{% endtab %}

{% tab title="Pulsar V3" %}
Our Pulsar V3 codebase has been audited by numerous top auditors to ensure maximum coverage. This include ABDK Consulting, Hexen & Hexen. StellaSwap also partnered with Quickswap to perform an additional bounty audit on Code4rena.

### Audit Reports

ABDK Consulting

{% file src="/files/cVUaoPwoxzTVHjhoe9N8" %}

Hexen

{% file src="/files/tnX4sf0AtOIUkJVSm9nz" %}

Code4rena

<https://code4rena.com/contests/2022-09-quickswap-and-stellaswap-contest>
{% endtab %}

{% tab title="ImmuneFi" %}

<figure><img src="/files/trBVGZiHKwPekjV8CF4P" alt=""><figcaption></figcaption></figure>

In order to continually foster greater security oversight, StellaSwap has an active bug bounty program on ImmuneFi, Web3's leading bug bounty platform. We're proud of the fact that we have one of the largest bug bounty across Polkadot & Moonbeam. Our commitment to security is the highest priority.

Here's the bounty program: <https://immunefi.com/bounty/stellaswap/>
{% endtab %}
{% endtabs %}


# Team

We have assembled a team of solid developers in the field of cybersecurity & smart contracts development, and also experienced individuals that have scaled financial technology (fintech) solutions globally.

![](/files/gpTVSo2BBwyslqZkKBS6)

### Why are we anonymous?

Like many DeFi and crypto projects, we are anonymous to preserve the spirit of decentralization and "letting the product speak for itself". The very nature of blockchains are global and permissionless, and that's the philosophy that we want to entrench in what we do. Full empowerment to the community through governance is the ideal state that we're working towards, and in that process, identities may serve to compromise the governance dynamics.

In fact, we're not totally anonymous. We've been KYC-ed by Moonbeam's leadership team and they know who we are and what we're capable of. Right now, as with many other DeFi projects, we're publicly anonymous as we want the protocol to be the #1 priority. This is especially critical when we reach to a stage of full governance.


# Smart Contracts

### $STELLA Token Smart Contract Details

**Contract address:** 0x0E358838ce72d5e61E0018a2ffaC4bEC5F4c88d2

### Factory Smart Contract Details

**Contract address:** 0x68A384D826D3678f78BB9FB1533c7E9577dACc0E

### Router  Smart Contract Details

**Contract address:** 0x70085a09D30D6f8C4ecF6eE10120d1847383BB57


# Swap SDK

We’re excited to launch the public release of StellaSwap’s Development Kit (SDK 😉), a tool that allows developers & projects to interact with StellaSwap’s DEX and access our deep-liquidity. As the most-used DEX on Polkadot, we’re proud to be the *schelling point* of native assets and users wanting to trade & stake in a familiar EVM-environment.

<figure><img src="/files/6xhr7pac5pe051m820S5" alt=""><figcaption></figcaption></figure>

## Overview of our SDK <a href="#id-7914" id="id-7914"></a>

Our public SDK provides functionality for integrating swaps on Moonbeam into any app or plugin. Moonbeam is the leading EVM parachain in Polkadot, and therefore taps on the best of Polkadot’s security and Ethereum’s convenience.

Developers and projects can integrate our our DEX for various applications that leverages on our liquidity. Our SDK features a range of useful documentation and APRs that entails technical specifications and code samples.

## Description <a href="#id-7914" id="id-7914"></a>

The @stellaswap/swap-sdk provides functionality for integrating swap on Moonbeam into any app or plugin. StellaSwap SDK allows end-users to exchange tokens seamlessly on Moonbeam network.

#### Features

* Uses state-of-the-art Hybrid Router
* Utilizes Stable, V2, V3 AMMs
* Error Handling

#### Installation

To install the package, use npm or yarn:

```
npm install @stellaswap/swap-sdk
# OR
yarn add @stellaswap/swap-sdk
```

### Usage

#### Importing the SDK

First, import the SDK.

```
import stellaSwap from '@stellaswap/swap-sdk';
```

#### Allowance

This helps to check allowance of tokenAddress against spender, it will return allowed number if there is any.

```
const addresses = await stellaSwap.getAddresses();
const spender = addresses.permit2;
const allowance = await stellaSwap.checkAllowance(
  account,
  erc20Instance,
  spender
);
```

```
Response: 0
```

**Approve**

To perform approve pass desired value as `amountIn` and for unlimited approval use `0`. In response, it returns transaction hash.

```
const addresses = await stellaSwap.getAddresses();
const spender = addresses.permit2;
const tx = await stellaSwap.approve(amountIn, erc20Instance, spender);
```

#### Get Quote

To get `amountOut` of a trade use `getQuote`. For `account` it can be null if user is not connected. For native asset pass `ETH` as `token0Addr` or `token1Addr`.

```
const quote = await stellaSwap.getQuote(
  token0Addr,
  token1Addr,
  amountIn,
  account,
  slippage
);
```

**Response**

To filter out `amountOut` use `quote.result.amountOut`. For the rest of the response, it includes;

* Complete trade path.
* Execution with commands and inputs

#### Swap

This can executes actual swap, for native asset pass `ETH` as `token0Addr` or `token1Addr`.

```
const tx = await stellaSwap.executeSwap(
  token0Addr,
  token1Addr,
  amountIn,
  signer,
  slippage
);
```

#### Swap Native to ERC20

To swap native to ERC20, pass `token0Addr` as `ETH` and `token1Addr` as erc20 address.

```
const encodedTxData = await stellaSwap.executeNativeSwap(
  token0Addr,
  token1Addr,
  amountIn,
  slippage,
  aggregatorContractInstance
);
const txParams = {
  from: ACCOUNT,
  value: amountIn,
  to: aggregatorContractInstance.address,
  data: encodedTxData,
  gasLimit: 1_500_000,
  gasPrice: await signer.getGasPrice(),
};

const txResponse = await signer.sendTransaction(txParams);
await txResponse.wait();
return txResponse.hash;
```

#### Swap ERC20 to ERC20

To swap native to ERC20, pass `token0Addr` as erc20 address and `token1Addr` as erc20 address.

```
const { signature, permit } = await permit2.getPermit2Signature(
  token0Addr,
  amountIn,
  signer
);

const encodedTxData = await stellaSwap.executeERC20Swap(
  token0Addr,
  token1Addr,
  amountIn,
  slippage,
  aggregatorContractInstance,
  permit,
  signature
);
const txParams = {
  to: aggregatorContractInstance.address,
  data: encodedTxData,
  gasLimit: 1_500_000,
  gasPrice: await signer.getGasPrice(),
};

const txResponse = await signer.sendTransaction(txParams);
await txResponse.wait();

console.log("Transaction hash:", txResponse.hash);
return txResponse.hash;
```

#### Example for `getPermit2Signature`

```
import {
  PermitTransferFrom,
  Witness,
  SignatureTransfer,
  MaxUint256,
} from "@uniswap/permit2-sdk";
import { joinSignature, splitSignature } from "@ethersproject/bytes";
import stellaSwap from "@stellaswap/swap-sdkÏ";

const permit2 = {
  async getPermit2Signature(token0Addr: string, amountIn: string, signer: any) {
    const addresses = await stellaSwap.getAddresses();
    const AGGREGATOR_ADDRESS = addresses.aggregator;
    const PERMIT2_ADDRESS = addresses.permit2;

    const spender = AGGREGATOR_ADDRESS;

    const permit: PermitTransferFrom = {
      permitted: {
        token: token0Addr,
        amount: amountIn,
      },
      spender: spender,
      nonce: await utils.calcNonces(signer),
      deadline: MaxUint256,
    };

    const witness: Witness = {
      witnessTypeName: "Witness",
      witnessType: { Witness: [{ name: "user", type: "address" }] },
      witness: { user: spender },
    };

    const { domain, types, values } = SignatureTransfer.getPermitData(
      permit,
      PERMIT2_ADDRESS,
      await signer.getChainId(),
      witness
    );

    const signature = await signer._signTypedData(domain, types, values);

    let { r, s, v } = splitSignature(signature);

    if (v == 0) v = 27;
    if (v == 1) v = 28;

    const joined = joinSignature({ r, s, v });

    return { signature: joined, permit, witness };
  },
};

export default permit2;
```

### Dependencies

* axios
* @uniswap/permit2-sdk

### Configuration

The SDK is pre-configured to be used with the Moonbeam mainnet and doesn't require an API key.

### Error Handling

The SDK includes basic error handling. All methods return Promises, so you can use `.catch()` to handle errors as you see fit.

```
stellaSwap.checkAllowance(tokenAddress, signer, spender).catch((error) => {
  console.error("Check Allowance failed:", error.message);
});
```

### Contribution

Feel free to submit issues and enhancement requests.


# API Reference

Pulsar V3 utilizes Algebra's codebase and as such, the documentation is derived from Algebra.

### Main Contracts

#### AlgebraFactory.sol

Deploys pools and data storages, manages ownership and dynamic fee configuration

#### AlgebraPool.sol

Main contract of pair with concentrated liquidity and and dynamic fee. It contains the logic of swaps, liquidity providing, flash loans. Allows you to swap deflationary tokens and has protection from “Just-In-Time” liquidity providing

#### AlgebraPoolDeployer.sol

A contract that constructs a pool must implement this to pass arguments to the pool. This is used to avoid having constructor arguments in the pool contract, which results in the init code hash of the pool being constant allowing the CREATE2 address of the pool to be cheaply computed on-chain

#### DataStorageOperator.sol

This contract is used for interacting with DataStorage library

#### AdaptiveFee.sol

Calculates fee based on combination of sigmoids

#### DataStorage.sol

DataStorage provides price, liquidity, volatility data useful for a wide variety of system designs. Mainly used to calculate dynamic fee. Instances of stored dataStorage data, "timepoints", are collected in the dataStorage array Timepoints are overwritten when the full length of the dataStorage array is populated. The most recent timepoint is available by passing 0 to getSingleTimepoint()

#### PriceMovementMath.sol

Library that used for computing the result of a swap

#### TickManager.sol

Library for managing tick processes and relevant calculations

#### TickTable.sol

Packed tick initialized state library. Stores a packed mapping of tick index to its initialized state. The mapping uses int16 for keys since ticks are represented as int24 and there are 256 (2^8) values per word

#### TokenDeltaMath.sol

TokenDeltaMath contains the math that uses square root of price as a Q64.96 and liquidity to compute deltas


# Pulsar V3 Contracts

### ddresses on Prod RPC

```javascript
Block : 2649799

Pool Hash: 0x424896f6cdc5182412012e0779626543e1dc4b12e1c45ee5718ae92f10ad97f2


AlgebraPoolDeployer to: 0x965A857955d868fd98482E9439b1aF297623fb94 ✅
AlgebraFactory deployed to: 0xabE1655110112D0E45EF91e94f8d757e4ddBA59C ✅

Quoter deployed to: 0xCF6fb88ac742aB896595705816079c360c590DE5 ✅
SwapRouter deployed to: 0xe6d0ED3759709b743707DcfeCAe39BC180C981fe ✅
NonfungibleTokenPositionDescriptor deployed to: 0xF7D57Bf6c27973a42C2464845dAB046361a61f7A ✅
Proxy deployed to: 0x21B23CB583056D10d81378eDE349086fA1940819 ✅
NonfungiblePositionManager deployed to: 0x1FF2ADAa387dD27c22b31086E658108588eDa03a ✅
AlgebraInterfaceMulticall deployed to: 0x24D357c3Deda4F412a4d7B5e0DB5f8E4a63d6E96 ✅
V3Migrator deployed to: 0xb4630ACbaB32254CD42728D2a1851c88604490Ad ✅

AlgebraLimitFarming deployed to: 0xF722a295aBD8cFb691C78Dd9b6699701491c3ff5 ✅
AlgebraEternalFarming deployed to: 0xd4b2B7DC9Bc1C47852851f4C5Dc345eabA1A5279 ✅
FarmingCenter deployed to: 0x0D4F8A55a5B2583189468ca3b0A32d972f90e6e5 ✅

```

### Subgraphs

```javascript

https://api.thegraph.com/subgraphs/name/stellaswap/pulsar
https://api.thegraph.com/subgraphs/name/stellaswap/pulsar-farming
https://api.thegraph.com/subgraphs/name/stellaswap/pulsar-blocks
```

### ABIs

{% file src="/files/Pumcrym6PzjdeXiYKXEi" %}

{% file src="/files/HdOOH4lXLziy9J2lTVoT" %}

{% file src="/files/42QQZTRjbuBeJuLtTLR3" %}

{% file src="/files/HMt2hvWwl7Gd3tQeJELI" %}

{% file src="/files/pXsApcOMLGxvL6QYJWr5" %}

{% file src="/files/Ej2DhRpr7Lw2fyKr5cXm" %}

{% file src="/files/WZDGWzuikGVGpuFGMCNy" %}

{% file src="/files/w6iztR6ajzc19loGHqkN" %}


# Flashloan (V3)

Pulsar pools provide `flash` method to flashloan.

### Flow

<figure><img src="/files/VelwDGrpIiHZuk8sdzYs" alt=""><figcaption></figcaption></figure>

### Implementation for Flashing Contract (Solidity)

```solidity
import '@cryptoalgebra/core/contracts/interfaces/IAlgebraPool.sol';
import '@cryptoalgebra/core/contracts/interfaces/callback/IAlgebraFlashCallback.sol';

import '@cryptoalgebra/periphery/contracts/libraries/TransferHelper.sol';

contract SimpleFlasher {
	// Variables so we can verify callback
	address poolCalled;
	uint256 amount0;
	uint256 amount1;
	
	function flash(
	    address pool,
	    address recipient,
	    uint256 _amount0,
	    uint256 _amount1
	  ) external {
			// setting the variables
			poolCalled = pool;
			amount0 = _amount0;
			amount1 = _amount1;
	
			// requesting flash loan to `recipient` address
	    IAlgebraPool(pool).flash(recipient, amount0, amount1, bytes(''));
			
			// cleaning up
			poolCalled = address(0);
			amount0 = 0;
			amount1 = 0;
	  }
	
	  function algebraFlashCallback(
	    uint256 fee0,
	    uint256 fee1,
	    bytes calldata data
	  ) external override {
			require(msg.sender == poolCalled, "only pool can call");
	
			// do the magic here ...
	
			// repay to pool
			TransferHelper.safeTransfer(IAlgebraPool(msg.sender).token0(), msg.sender, amount0 + fee0);
			TransferHelper.safeTransfer(IAlgebraPool(msg.sender).token1(), msg.sender, amount1 + fee1);
	  }
}
```

### More Optimal Implementation for Flashing Contract (Javascript)

```javascript
import '@cryptoalgebra/core/contracts/interfaces/IAlgebraPool.sol';
import '@cryptoalgebra/core/contracts/interfaces/callback/IAlgebraFlashCallback.sol';

import '@cryptoalgebra/periphery/contracts/libraries/CallbackValidation.sol';
import '@cryptoalgebra/periphery/contracts/libraries/TransferHelper.sol';

contract MoreOptimalFlasher {
  address immutable poolDeployer; // address of AlgebraPoolDeployer contract

	constructor(_poolDeployer) {
		poolDeployer = _poolDeployer;
	}

	function flash(
	    address pool,
	    address recipient,
	    uint256 amount0,
	    uint256 amount1
	  ) external {
			address token0 = IAlgebraPool(pool).token0();
			address token1 = IAlgebraPool(pool).token1();
			
			// requesting flash loan to `recipient` address
	    IAlgebraPool(pool).flash(recipient, amount0, amount1, abi.encode(token0, token1, amount0, amount1));
	  }
	
	  function algebraFlashCallback(
	    uint256 fee0,
	    uint256 fee1,
	    bytes calldata data
	  ) external override {
			(address token0, address token1, uint256 amount0, uint256 amount1) = abi.decode(data, (address, adrress, uint256, uint256));
			CallbackValidation.verifyCallback(poolDeployer, token0, token1) // check if method is called by algebra pool, revert otherwise
	
			// do the magic here ...
	
			// repay to pool
			TransferHelper.safeTransfer(token0, msg.sender, amount0 + fee0);
			TransferHelper.safeTransfer(token1, msg.sender, amount1 + fee1);
	  }
}
```